
| | |  GitHub पर स्रोत देखें GitHub पर स्रोत देखें | | |
हाल ही में बाहर आने के लिए गहरी सीखने में सबसे रोमांचक घटनाओं में से एक है कलात्मक शैली हस्तांतरण , या एक नई छवि, एक के रूप में जाना बनाने की क्षमता मिलावट एक कलात्मक शैली का प्रतिनिधित्व करने तथा एक सामग्री का प्रतिनिधित्व: दो इनपुट छवियों के आधार पर।
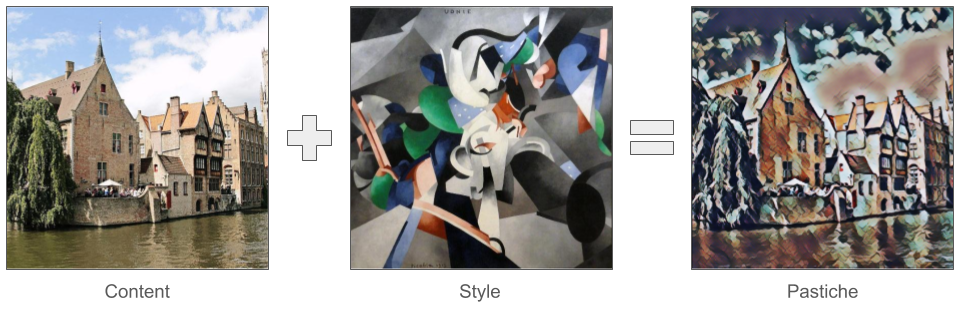
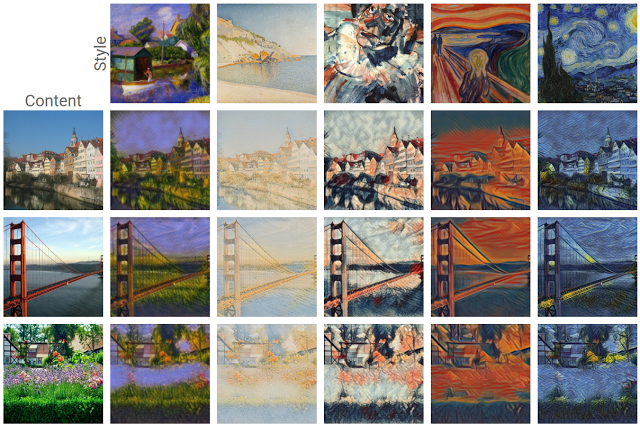
इस तकनीक का उपयोग करके, हम कई शैलियों में सुंदर नई कलाकृतियां तैयार कर सकते हैं।
यदि आप TensorFlow Lite के लिए नए हैं और Android के साथ काम कर रहे हैं, तो हम निम्नलिखित उदाहरण अनुप्रयोगों को एक्सप्लोर करने की अनुशंसा करते हैं जो आरंभ करने में आपकी सहायता कर सकते हैं।
आप Android या iOS से एक मंच अन्य प्रयोग कर रहे हैं, या आप पहले से परिचित हैं, तो TensorFlow लाइट एपीआई , आप जानने के लिए कैसे एक पूर्व प्रशिक्षित TensorFlow लाइट के साथ सामग्री और शैली छवि के किसी भी जोड़ी पर शैली हस्तांतरण लागू करने के लिए इस ट्यूटोरियल का पालन कर सकते नमूना। आप अपने मोबाइल एप्लिकेशन में स्टाइल ट्रांसफर जोड़ने के लिए मॉडल का उपयोग कर सकते हैं।
मॉडल मुक्त-स्रोत पर है GitHub । आप विभिन्न मापदंडों के साथ मॉडल को फिर से प्रशिक्षित कर सकते हैं (उदाहरण के लिए आउटपुट छवि को सामग्री छवि की तरह दिखने के लिए सामग्री परतों के वजन में वृद्धि)।
मॉडल आर्किटेक्चर को समझें
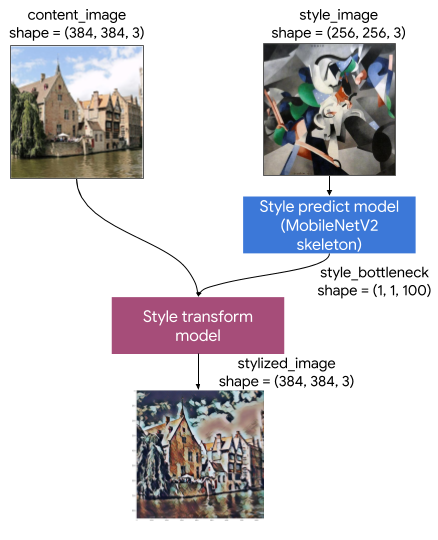
इस आर्टिस्टिक स्टाइल ट्रांसफर मॉडल में दो सबमॉडल होते हैं:
- शैली Prediciton मॉडल: एक MobilenetV2 आधारित तंत्रिका नेटवर्क है कि एक 100 आयाम शैली टोंटी वेक्टर के लिए एक इनपुट शैली छवि लेता है।
- शैली रूपांतरण मॉडल: एक तंत्रिका नेटवर्क है कि किसी सामग्री छवि के लिए एक शैली टोंटी वेक्टर लागू लेता है और एक शैली छवि बनाता है।
यदि आपके ऐप को केवल स्टाइल छवियों के एक निश्चित सेट का समर्थन करने की आवश्यकता है, तो आप पहले से ही उनके स्टाइल टोंटी वैक्टर की गणना कर सकते हैं, और अपने ऐप के बाइनरी से स्टाइल प्रेडिक्शन मॉडल को बाहर कर सकते हैं।
सेट अप
आयात निर्भरताएँ।
import tensorflow as tf
print(tf.__version__)
2.6.0
import IPython.display as display

import matplotlib.pyplot as plt
import matplotlib as mpl
mpl.rcParams['figure.figsize'] = (12,12)
mpl.rcParams['axes.grid'] = False

import numpy as np
import time
import functools
सामग्री और शैली के चित्र और पूर्व-प्रशिक्षित TensorFlow लाइट मॉडल डाउनलोड करें।
content_path = tf.keras.utils.get_file('belfry.jpg','https://storage.googleapis.com/khanhlvg-public.appspot.com/arbitrary-style-transfer/belfry-2611573_1280.jpg')
style_path = tf.keras.utils.get_file('style23.jpg','https://storage.googleapis.com/khanhlvg-public.appspot.com/arbitrary-style-transfer/style23.jpg')

style_predict_path = tf.keras.utils.get_file('style_predict.tflite', 'https://tfhub.dev/google/lite-model/magenta/arbitrary-image-stylization-v1-256/int8/prediction/1?lite-format=tflite')
style_transform_path = tf.keras.utils.get_file('style_transform.tflite', 'https://tfhub.dev/google/lite-model/magenta/arbitrary-image-stylization-v1-256/int8/transfer/1?lite-format=tflite')
Downloading data from https://storage.googleapis.com/khanhlvg-public.appspot.com/arbitrary-style-transfer/belfry-2611573_1280.jpg
458752/458481 [==============================] - 0s 0us/step
466944/458481 [==============================] - 0s 0us/step
Downloading data from https://storage.googleapis.com/khanhlvg-public.appspot.com/arbitrary-style-transfer/style23.jpg
114688/108525 [===============================] - 0s 0us/step
122880/108525 [=================================] - 0s 0us/step
Downloading data from https://tfhub.dev/google/lite-model/magenta/arbitrary-image-stylization-v1-256/int8/prediction/1?lite-format=tflite
2834432/2828838 [==============================] - 0s 0us/step
2842624/2828838 [==============================] - 0s 0us/step
Downloading data from https://tfhub.dev/google/lite-model/magenta/arbitrary-image-stylization-v1-256/int8/transfer/1?lite-format=tflite
286720/284398 [==============================] - 0s 0us/step
294912/284398 [===============================] - 0s 0us/step
इनपुट्स को प्री-प्रोसेस करें
- सामग्री छवि और शैली की छवि आरजीबी छवियां होनी चाहिए जिसमें पिक्सेल मान [0..1] के बीच फ्लोट32 संख्याएं हों।
- शैली छवि का आकार (1, 256, 256, 3) होना चाहिए। हम छवि को केंद्रीय रूप से क्रॉप करते हैं और उसका आकार बदलते हैं।
- सामग्री छवि (1, 384, 384, 3) होनी चाहिए। हम छवि को केंद्रीय रूप से क्रॉप करते हैं और उसका आकार बदलते हैं।
# Function to load an image from a file, and add a batch dimension.
def load_img(path_to_img):
  img = tf.io.read_file(path_to_img)
  img = tf.io.decode_image(img, channels=3)
  img = tf.image.convert_image_dtype(img, tf.float32)
  img = img[tf.newaxis, :]

  return img

# Function to pre-process by resizing an central cropping it.
def preprocess_image(image, target_dim):
  # Resize the image so that the shorter dimension becomes 256px.
  shape = tf.cast(tf.shape(image)[1:-1], tf.float32)
  short_dim = min(shape)
  scale = target_dim / short_dim
  new_shape = tf.cast(shape * scale, tf.int32)
  image = tf.image.resize(image, new_shape)

  # Central crop the image.
  image = tf.image.resize_with_crop_or_pad(image, target_dim, target_dim)

  return image

# Load the input images.
content_image = load_img(content_path)
style_image = load_img(style_path)

# Preprocess the input images.
preprocessed_content_image = preprocess_image(content_image, 384)
preprocessed_style_image = preprocess_image(style_image, 256)

print('Style Image Shape:', preprocessed_style_image.shape)
print('Content Image Shape:', preprocessed_content_image.shape)
Style Image Shape: (1, 256, 256, 3)
Content Image Shape: (1, 384, 384, 3)
इनपुट्स को विज़ुअलाइज़ करें
def imshow(image, title=None):
  if len(image.shape) > 3:
    image = tf.squeeze(image, axis=0)

  plt.imshow(image)
  if title:
    plt.title(title)

plt.subplot(1, 2, 1)
imshow(preprocessed_content_image, 'Content Image')

plt.subplot(1, 2, 2)
imshow(preprocessed_style_image, 'Style Image')

TensorFlow Lite के साथ रन स्टाइल ट्रांसफर
शैली भविष्यवाणी
# Function to run style prediction on preprocessed style image.
def run_style_predict(preprocessed_style_image):
  # Load the model.
  interpreter = tf.lite.Interpreter(model_path=style_predict_path)

  # Set model input.
  interpreter.allocate_tensors()
  input_details = interpreter.get_input_details()
  interpreter.set_tensor(input_details[0]["index"], preprocessed_style_image)

  # Calculate style bottleneck.
  interpreter.invoke()
  style_bottleneck = interpreter.tensor(
      interpreter.get_output_details()[0]["index"]
      )()

  return style_bottleneck

# Calculate style bottleneck for the preprocessed style image.
style_bottleneck = run_style_predict(preprocessed_style_image)
print('Style Bottleneck Shape:', style_bottleneck.shape)
Style Bottleneck Shape: (1, 1, 1, 100)
शैली परिवर्तन
# Run style transform on preprocessed style image
def run_style_transform(style_bottleneck, preprocessed_content_image):
  # Load the model.
  interpreter = tf.lite.Interpreter(model_path=style_transform_path)

  # Set model input.
  input_details = interpreter.get_input_details()
  interpreter.allocate_tensors()

  # Set model inputs.
  interpreter.set_tensor(input_details[0]["index"], preprocessed_content_image)
  interpreter.set_tensor(input_details[1]["index"], style_bottleneck)
  interpreter.invoke()

  # Transform content image.
  stylized_image = interpreter.tensor(
      interpreter.get_output_details()[0]["index"]
      )()

  return stylized_image

# Stylize the content image using the style bottleneck.
stylized_image = run_style_transform(style_bottleneck, preprocessed_content_image)

# Visualize the output.
imshow(stylized_image, 'Stylized Image')

शैली सम्मिश्रण
हम सामग्री छवि की शैली को शैलीबद्ध आउटपुट में मिश्रित कर सकते हैं, जो बदले में आउटपुट को सामग्री छवि की तरह दिखता है।
# Calculate style bottleneck of the content image.
style_bottleneck_content = run_style_predict(
    preprocess_image(content_image, 256)
    )
# Define content blending ratio between [0..1].
# 0.0: 0% style extracts from content image.
# 1.0: 100% style extracted from content image.
content_blending_ratio = 0.5

# Blend the style bottleneck of style image and content image
style_bottleneck_blended = content_blending_ratio * style_bottleneck_content \
                           + (1 - content_blending_ratio) * style_bottleneck

# Stylize the content image using the style bottleneck.
stylized_image_blended = run_style_transform(style_bottleneck_blended,
                                             preprocessed_content_image)

# Visualize the output.
imshow(stylized_image_blended, 'Blended Stylized Image')

प्रदर्शन बेंचमार्क
प्रदर्शन बेंचमार्क संख्या उपकरण के साथ उत्पन्न कर रहे हैं यहाँ वर्णित ।
| मॉडल का नाम | मॉडल का आकार | युक्ति | एनएनएपीआई | CPU | जीपीयू |
|---|---|---|---|---|---|
| शैली भविष्यवाणी मॉडल (int8) | 2.8 एमबी | पिक्सेल 3 (एंड्रॉइड 10) | 142ms | 14ms | |
| पिक्सेल 4 (एंड्रॉइड 10) | 5.2ms | 6.7ms | |||
| आईफोन एक्सएस (आईओएस 12.4.1) | 10.7ms | ||||
| स्टाइल ट्रांसफॉर्म मॉडल (int8) | 0.2 एमबी | पिक्सेल 3 (एंड्रॉइड 10) | 540ms | ||
| पिक्सेल 4 (एंड्रॉइड 10) | 405ms | ||||
| आईफोन एक्सएस (आईओएस 12.4.1) | 251ms | ||||
| शैली भविष्यवाणी मॉडल (float16) | 4.7 एमबी | पिक्सेल 3 (एंड्रॉइड 10) | 86ms | 28ms | 9.1ms |
| पिक्सेल 4 (एंड्रॉइड 10) | 32ms | 12ms | 10ms | ||
| स्टाइल ट्रांसफर मॉडल (फ्लोट 16) | 0.4 एमबी | पिक्सेल 3 (एंड्रॉइड 10) | 1095ms | 545ms | 42ms |
| पिक्सेल 4 (एंड्रॉइड 10) | 603ms | 377ms | 42ms |
* 4 धागे का इस्तेमाल किया।
** सर्वश्रेष्ठ प्रदर्शन के लिए iPhone पर 2 धागे।