 在 TensorFlow.org 上查看 在 TensorFlow.org 上查看 |
 在 Google Colab 中运行 在 Google Colab 中运行 |
 在 GitHub 中查看源代码 在 GitHub 中查看源代码 |
{img1下载笔记本 |
概述
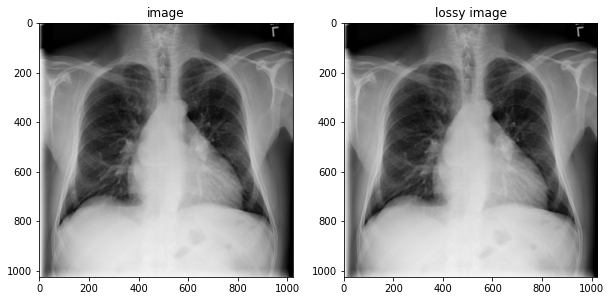
本教程将介绍如何在 TensorFlow IO 中使用 tfio.image.decode_dicom_image 通过 TensorFlow 解码 DICOM 文件。
设置和用法
下载 DICOM 图像
本教程中使用的 DICOM 图像来自 NIH Chest X-Ray 数据集。
NIH Chest X-Ray 数据集包含 NIH 临床中心提供的 100,000 张胸部 X 射线检查的去标识化 PNG 图像,可通过此链接下载。
Google Cloud 还提供了可从 Cloud Storage 中获得的 DICOM 版本图像。
在本教程中,您将从 GitHub 仓库下载数据集的样本文件
注:有关数据集的更多信息,请查看以下参考资料:
- Xiaosong Wang, Yifan Peng, Le Lu, Zhiyong Lu, Mohammadhadi Bagheri, Ronald Summers, ChestX-ray8: Hospital-scale Chest X-ray Database and Benchmarks on Weakly-Supervised Classification and Localization of Common Thorax Diseases, IEEE CVPR, pp. 3462-3471, 2017
curl -OL https://github.com/tensorflow/io/raw/master/docs/tutorials/dicom/dicom_00000001_000.dcmls -l dicom_00000001_000.dcm
% Total    % Received % Xferd  Average Speed   Time    Time     Time  Current
                                 Dload  Upload   Total   Spent    Left  Speed
100   164  100   164    0     0    315      0 --:--:-- --:--:-- --:--:--   315
100 1024k  100 1024k    0     0   964k      0  0:00:01  0:00:01 --:--:-- 2005k
-rw-rw-r-- 1 kbuilder kokoro 1049332 Aug 25 19:10 dicom_00000001_000.dcm
安装要求的软件包,然后重新启动运行时
try:
  # Use the Colab's preinstalled TensorFlow 2.x
  %tensorflow_version 2.x
except:
  pass
pip install tensorflow-io解码 DICOM 图像
import matplotlib.pyplot as plt
import numpy as np

import tensorflow as tf
import tensorflow_io as tfio

image_bytes = tf.io.read_file('dicom_00000001_000.dcm')

image = tfio.image.decode_dicom_image(image_bytes, dtype=tf.uint16)

skipped = tfio.image.decode_dicom_image(image_bytes, on_error='skip', dtype=tf.uint8)

lossy_image = tfio.image.decode_dicom_image(image_bytes, scale='auto', on_error='lossy', dtype=tf.uint8)


fig, axes = plt.subplots(1,2, figsize=(10,10))
axes[0].imshow(np.squeeze(image.numpy()), cmap='gray')
axes[0].set_title('image')
axes[1].imshow(np.squeeze(lossy_image.numpy()), cmap='gray')
axes[1].set_title('lossy image');
2021-08-25 19:10:26.074099: W tensorflow_io/core/kernels/audio_video_mp3_kernels.cc:271] libmp3lame.so.0 or lame functions are not available

文档
此软件包具有两个包装 DCMTK 函数的运算。decode_dicom_image 可以解码 DICOM 文件中的像素数据,decode_dicom_data 可以解码标记信息。tags 包含有用的 DICOM 标记,例如 tags.PatientsName。标记表示法借用自 pydicom dicom 软件包。
获取 DICOM 图像数据
io.dicom.decode_dicom_image(
    contents,
    color_dim=False,
    on_error='skip',
    scale='preserve',
    dtype=tf.uint16,
    name=None
)
contents:字符串类型的张量。零维。字节字符串编码的 DICOM 文件color_dim:可选的bool。默认值为False。如果为True,则第三个通道将附加到构成三维张量的所有图像。1024 x 1024 灰度图像将变为 1024 x 1024 x 1on_error:默认值为skip。如果在打开图像时发生错误,或者输出类型不能容纳所有可能的输入值,则此特性会确定行为。例如,当用户将输出 dtype 设置为tf.uint8,但 dicom 图像存储tf.uint16类型时。strict会引发错误。skip会返回一个一维空张量。lossy将继续执行通过scale特性缩放值的运算。scale:默认值为preserve。此特性确定如何处理输入值的比例。auto将自动缩放输入值,如果输出类型为整数,auto将使用最大输出比例,例如,可以将存储 [0, 255] 范围内值的uint8线性拉伸以填充uint16,即 [0,65535]。如果输出为浮点数,auto将缩放为 [0,1]。preserve可按原样保留值,大于最大可能输出的输入值将被裁剪。dtype:以下数据类型的可选tf.DType:tf.uint8, tf.uint16, tf.uint32, tf.uint64, tf.float16, tf.float32, tf.float64。默认值为tf.uint16。name:运算的名称(可选)。
返回值 一个类型为 dtype 的 Tensor,其形状由 DICOM 文件确定。
获取 DICOM 标记数据
io.dicom.decode_dicom_data(
    contents,
    tags=None,
    name=None
)
contents:字符串类型的张量。零维。字节字符串编码的 DICOM 文件tags:任意维度的tf.uint32类型张量。这些uint32数字可以直接映射到 DICOM 标记name:运算的名称(可选)。
返回值 一个类型为 tf.string 且形状与 tags 相同的 Tensor。如果 dicom 标记是一个字符串列表,则它们会组合成一个字符串,并用双反斜杠 **返回值** 一个类型为tf.string且形状与tags相同的Tensor`。如果 dicom 标记是一个字符串列表,则它们会组合成一个字符串,并用双反斜杠 分隔。如果标记是一个数字列表,则 DCMTK 中会出现错误,只有第 0 个元素会作为字符串返回。
Bibtex
如果此软件包有帮助,请引用以下内容:
@misc{marcelo_lerendegui_2019_3337331,
  author       = {Marcelo Lerendegui and
                  Ouwen Huang},
  title        = {Tensorflow Dicom Decoder},
  month        = jul,
  year         = 2019,
  doi          = {10.5281/zenodo.3337331},
  url          = {https://doi.org/10.5281/zenodo.3337331}
}
许可
Copyright 2019 Marcelo Lerendegui, Ouwen Huang, Gradient Health Inc.
根据 Apache 许可 2.0(“许可”)获得许可;除非遵循许可要求,否则您不得使用此文件。您可在以下网址获得许可的副本:
http://www.apache.org/licenses/LICENSE-2.0
除非适用法律要求或以书面形式同意,否则在本许可下分发的软件将在“按原样”基础上分发,不存在任何明示或暗示的任何类型的保证或条件。有关在本许可下管理权限和限制的特定语言,请参阅本许可。
