
| | |  GitHub에서 소스 보기 GitHub에서 소스 보기 | | |
최근에 와서 깊은 학습에서 가장 흥미로운 발전 중 하나는 예술적 스타일 전송 , 또는으로 알려진 새로운 이미지를 생성 할 수있는 기능 혼성 곡 의 내용을 나타내는 하나의 예술적 스타일을 표현하는 하나 : 두 개의 입력 영상에 기반을.
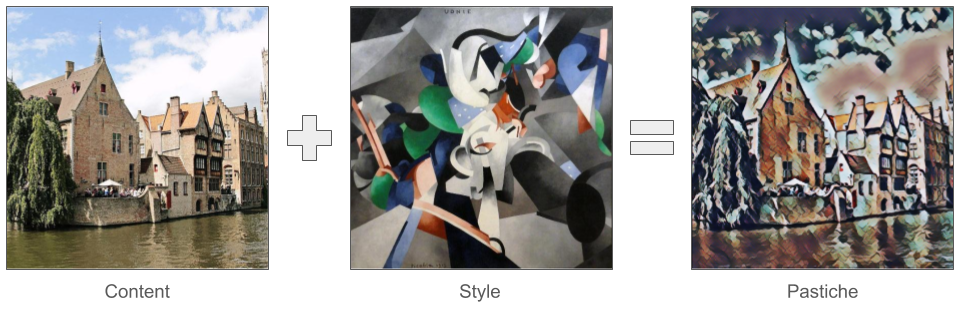
이 기술을 사용하여 다양한 스타일의 아름다운 새 작품을 생성할 수 있습니다.
TensorFlow Lite를 처음 사용하고 Android로 작업하는 경우 시작하는 데 도움이 될 수 있는 다음 예제 애플리케이션을 탐색하는 것이 좋습니다.
당신이 안드로이드 또는 iOS가 아닌 다른 플랫폼을 사용, 또는 이미 잘 알고 있다면 TensorFlow 라이트 API를 , 당신은 사전에 훈련 된 TensorFlow 라이트와 내용과 스타일 이미지의 쌍 스타일의 전송을 적용하는 방법에 대한 자세한 내용은이 튜토리얼을 따라 할 수 있습니다 모델. 이 모델을 사용하여 자신의 모바일 애플리케이션에 스타일 전송을 추가할 수 있습니다.
이 모델은 오픈 소스에 GitHub의 . 다른 매개변수를 사용하여 모델을 다시 훈련시킬 수 있습니다(예: 출력 이미지가 콘텐츠 이미지와 더 비슷하게 보이도록 콘텐츠 레이어의 가중치를 증가).
모델 아키텍처 이해
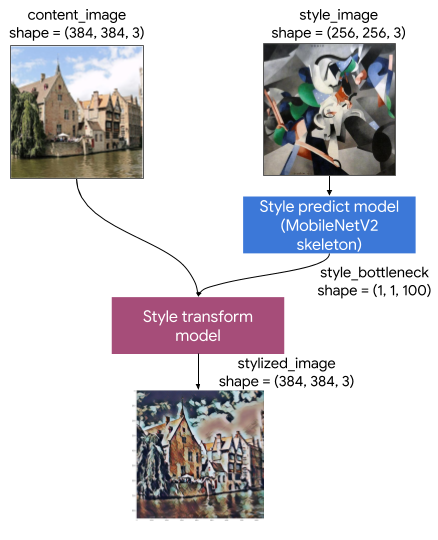
이 Artistic Style Transfer 모델은 두 개의 하위 모델로 구성됩니다.
- 스타일 Prediciton 모델 : A A 100 치수 스타일의 병목 벡터에 입력 스타일 이미지 소요 신경망을 MobilenetV2 기반.
- 스타일 모델을 변환 : 콘텐츠 이미지에 스타일 병목 벡터를 적용 받아 양식에 일치시키는 이미지를 생성하는 신경 네트워크를.
앱이 고정된 스타일 이미지 세트만 지원해야 하는 경우 스타일 병목 현상 벡터를 미리 계산하고 앱의 바이너리에서 스타일 예측 모델을 제외할 수 있습니다.
설정
종속성을 가져옵니다.
import tensorflow as tf
print(tf.__version__)
2.6.0
import IPython.display as display

import matplotlib.pyplot as plt
import matplotlib as mpl
mpl.rcParams['figure.figsize'] = (12,12)
mpl.rcParams['axes.grid'] = False

import numpy as np
import time
import functools
콘텐츠 및 스타일 이미지와 사전 훈련된 TensorFlow Lite 모델을 다운로드하십시오.
content_path = tf.keras.utils.get_file('belfry.jpg','https://storage.googleapis.com/khanhlvg-public.appspot.com/arbitrary-style-transfer/belfry-2611573_1280.jpg')
style_path = tf.keras.utils.get_file('style23.jpg','https://storage.googleapis.com/khanhlvg-public.appspot.com/arbitrary-style-transfer/style23.jpg')

style_predict_path = tf.keras.utils.get_file('style_predict.tflite', 'https://tfhub.dev/google/lite-model/magenta/arbitrary-image-stylization-v1-256/int8/prediction/1?lite-format=tflite')
style_transform_path = tf.keras.utils.get_file('style_transform.tflite', 'https://tfhub.dev/google/lite-model/magenta/arbitrary-image-stylization-v1-256/int8/transfer/1?lite-format=tflite')
Downloading data from https://storage.googleapis.com/khanhlvg-public.appspot.com/arbitrary-style-transfer/belfry-2611573_1280.jpg
458752/458481 [==============================] - 0s 0us/step
466944/458481 [==============================] - 0s 0us/step
Downloading data from https://storage.googleapis.com/khanhlvg-public.appspot.com/arbitrary-style-transfer/style23.jpg
114688/108525 [===============================] - 0s 0us/step
122880/108525 [=================================] - 0s 0us/step
Downloading data from https://tfhub.dev/google/lite-model/magenta/arbitrary-image-stylization-v1-256/int8/prediction/1?lite-format=tflite
2834432/2828838 [==============================] - 0s 0us/step
2842624/2828838 [==============================] - 0s 0us/step
Downloading data from https://tfhub.dev/google/lite-model/magenta/arbitrary-image-stylization-v1-256/int8/transfer/1?lite-format=tflite
286720/284398 [==============================] - 0s 0us/step
294912/284398 [===============================] - 0s 0us/step
입력 전처리
- 콘텐츠 이미지와 스타일 이미지는 픽셀 값이 [0..1] 사이의 float32 숫자인 RGB 이미지여야 합니다.
- 스타일 이미지 크기는 (1, 256, 256, 3)이어야 합니다. 이미지를 중앙에서 자르고 크기를 조정합니다.
- 콘텐츠 이미지는 (1, 384, 384, 3)이어야 합니다. 이미지를 중앙에서 자르고 크기를 조정합니다.
# Function to load an image from a file, and add a batch dimension.
def load_img(path_to_img):
  img = tf.io.read_file(path_to_img)
  img = tf.io.decode_image(img, channels=3)
  img = tf.image.convert_image_dtype(img, tf.float32)
  img = img[tf.newaxis, :]

  return img

# Function to pre-process by resizing an central cropping it.
def preprocess_image(image, target_dim):
  # Resize the image so that the shorter dimension becomes 256px.
  shape = tf.cast(tf.shape(image)[1:-1], tf.float32)
  short_dim = min(shape)
  scale = target_dim / short_dim
  new_shape = tf.cast(shape * scale, tf.int32)
  image = tf.image.resize(image, new_shape)

  # Central crop the image.
  image = tf.image.resize_with_crop_or_pad(image, target_dim, target_dim)

  return image

# Load the input images.
content_image = load_img(content_path)
style_image = load_img(style_path)

# Preprocess the input images.
preprocessed_content_image = preprocess_image(content_image, 384)
preprocessed_style_image = preprocess_image(style_image, 256)

print('Style Image Shape:', preprocessed_style_image.shape)
print('Content Image Shape:', preprocessed_content_image.shape)
Style Image Shape: (1, 256, 256, 3)
Content Image Shape: (1, 384, 384, 3)
입력 시각화
def imshow(image, title=None):
  if len(image.shape) > 3:
    image = tf.squeeze(image, axis=0)

  plt.imshow(image)
  if title:
    plt.title(title)

plt.subplot(1, 2, 1)
imshow(preprocessed_content_image, 'Content Image')

plt.subplot(1, 2, 2)
imshow(preprocessed_style_image, 'Style Image')

TensorFlow Lite로 스타일 전송 실행
스타일 예측
# Function to run style prediction on preprocessed style image.
def run_style_predict(preprocessed_style_image):
  # Load the model.
  interpreter = tf.lite.Interpreter(model_path=style_predict_path)

  # Set model input.
  interpreter.allocate_tensors()
  input_details = interpreter.get_input_details()
  interpreter.set_tensor(input_details[0]["index"], preprocessed_style_image)

  # Calculate style bottleneck.
  interpreter.invoke()
  style_bottleneck = interpreter.tensor(
      interpreter.get_output_details()[0]["index"]
      )()

  return style_bottleneck

# Calculate style bottleneck for the preprocessed style image.
style_bottleneck = run_style_predict(preprocessed_style_image)
print('Style Bottleneck Shape:', style_bottleneck.shape)
Style Bottleneck Shape: (1, 1, 1, 100)
스타일 변환
# Run style transform on preprocessed style image
def run_style_transform(style_bottleneck, preprocessed_content_image):
  # Load the model.
  interpreter = tf.lite.Interpreter(model_path=style_transform_path)

  # Set model input.
  input_details = interpreter.get_input_details()
  interpreter.allocate_tensors()

  # Set model inputs.
  interpreter.set_tensor(input_details[0]["index"], preprocessed_content_image)
  interpreter.set_tensor(input_details[1]["index"], style_bottleneck)
  interpreter.invoke()

  # Transform content image.
  stylized_image = interpreter.tensor(
      interpreter.get_output_details()[0]["index"]
      )()

  return stylized_image

# Stylize the content image using the style bottleneck.
stylized_image = run_style_transform(style_bottleneck, preprocessed_content_image)

# Visualize the output.
imshow(stylized_image, 'Stylized Image')

스타일 블렌딩
콘텐츠 이미지의 스타일을 스타일화된 출력에 혼합하여 출력을 콘텐츠 이미지와 더 비슷하게 만들 수 있습니다.
# Calculate style bottleneck of the content image.
style_bottleneck_content = run_style_predict(
    preprocess_image(content_image, 256)
    )
# Define content blending ratio between [0..1].
# 0.0: 0% style extracts from content image.
# 1.0: 100% style extracted from content image.
content_blending_ratio = 0.5

# Blend the style bottleneck of style image and content image
style_bottleneck_blended = content_blending_ratio * style_bottleneck_content \
                           + (1 - content_blending_ratio) * style_bottleneck

# Stylize the content image using the style bottleneck.
stylized_image_blended = run_style_transform(style_bottleneck_blended,
                                             preprocessed_content_image)

# Visualize the output.
imshow(stylized_image_blended, 'Blended Stylized Image')

성능 벤치마크
성능 벤치 마크 번호는 도구를 사용하여 생성됩니다 여기에 설명 .
| 모델명 | 모델 사이즈 | 장치 | NNAPI | CPU | GPU |
|---|---|---|---|---|---|
| 스타일 예측 모델(int8) | 2.8MB | 픽셀 3(안드로이드 10) | 142ms | 14ms | |
| 픽셀 4(안드로이드 10) | 5.2ms | 6.7ms | |||
| 아이폰XS(iOS 12.4.1) | 10.7ms | ||||
| 스타일 변환 모델(int8) | 0.2MB | 픽셀 3(안드로이드 10) | 540ms | ||
| 픽셀 4(안드로이드 10) | 405ms | ||||
| 아이폰XS(iOS 12.4.1) | 251ms | ||||
| 스타일 예측 모델(float16) | 4.7MB | 픽셀 3(안드로이드 10) | 86ms | 28ms | 9.1ms |
| 픽셀 4(안드로이드 10) | 32ms | 12ms | 10ms | ||
| 스타일 전송 모델(float16) | 0.4MB | 픽셀 3(안드로이드 10) | 1095ms | 545ms | 42ms |
| 픽셀 4(안드로이드 10) | 603ms | 377ms | 42ms |
* 4개의 스레드가 사용되었습니다.
** 최고의 성능을 위한 iPhone의 스레드 2개.