
| | |  GitHub에서 소스 보기 GitHub에서 소스 보기 | | |
개요
저해상도 대응물에서 고해상도(HR) 이미지를 복구하는 작업을 일반적으로 SISR(단일 이미지 초해상도)이라고 합니다.
(여기에 사용 된 모델은 ESRGAN입니다 : 향상된 슈퍼 해상도 제너 적대적 네트워크 ESRGAN을 ). 그리고 TensorFlow Lite를 사용하여 사전 훈련된 모델에서 추론을 실행할 것입니다.
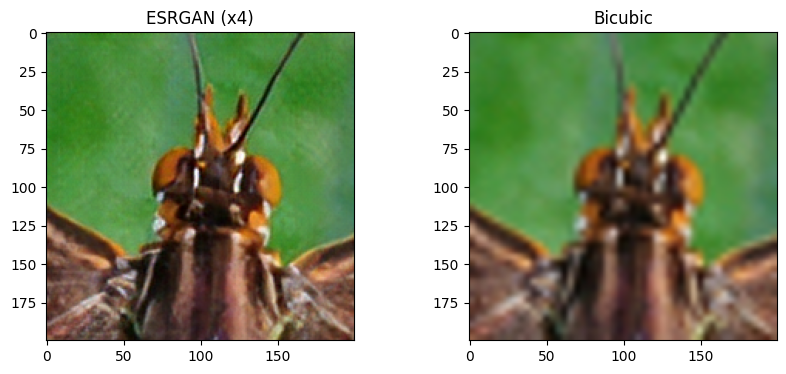
TFLite 모델이 변환되어 구현 TF 허브에 개최했다. 우리가 변환한 모델은 50x50 저해상도 이미지를 200x200 고해상도 이미지로 업샘플링했습니다(배율 계수=4). 다른 입력 크기나 배율을 원하면 원래 모델을 다시 변환하거나 다시 훈련해야 합니다.
설정
먼저 필요한 라이브러리를 설치합시다.
pip install matplotlib tensorflow tensorflow-hub
종속성을 가져옵니다.
import tensorflow as tf
import tensorflow_hub as hub
import matplotlib.pyplot as plt
print(tf.__version__)
2.7.0
ESRGAN 모델 다운로드 및 변환
model = hub.load("https://tfhub.dev/captain-pool/esrgan-tf2/1")
concrete_func = model.signatures[tf.saved_model.DEFAULT_SERVING_SIGNATURE_DEF_KEY]

@tf.function(input_signature=[tf.TensorSpec(shape=[1, 50, 50, 3], dtype=tf.float32)])
def f(input):
  return concrete_func(input);

converter = tf.lite.TFLiteConverter.from_concrete_functions([f.get_concrete_function()], model)
converter.optimizations = [tf.lite.Optimize.DEFAULT]
tflite_model = converter.convert()

# Save the TF Lite model.
with tf.io.gfile.GFile('ESRGAN.tflite', 'wb') as f:
  f.write(tflite_model)

esrgan_model_path = './ESRGAN.tflite'
WARNING:absl:Found untraced functions such as restored_function_body, restored_function_body, restored_function_body, restored_function_body, restored_function_body while saving (showing 5 of 335). These functions will not be directly callable after loading.
INFO:tensorflow:Assets written to: /tmp/tmpinlbbz0t/assets
INFO:tensorflow:Assets written to: /tmp/tmpinlbbz0t/assets
2021-11-16 12:15:19.621471: W tensorflow/compiler/mlir/lite/python/tf_tfl_flatbuffer_helpers.cc:363] Ignored output_format.
2021-11-16 12:15:19.621517: W tensorflow/compiler/mlir/lite/python/tf_tfl_flatbuffer_helpers.cc:366] Ignored drop_control_dependency.
WARNING:absl:Buffer deduplication procedure will be skipped when flatbuffer library is not properly loaded
테스트 이미지(곤충 머리)를 다운로드합니다.
test_img_path = tf.keras.utils.get_file('lr.jpg', 'https://raw.githubusercontent.com/tensorflow/examples/master/lite/examples/super_resolution/android/app/src/main/assets/lr-1.jpg')
Downloading data from https://raw.githubusercontent.com/tensorflow/examples/master/lite/examples/super_resolution/android/app/src/main/assets/lr-1.jpg
16384/6432 [============================================================================] - 0s 0us/step
TensorFlow Lite를 사용하여 초해상도 이미지 생성
lr = tf.io.read_file(test_img_path)
lr = tf.image.decode_jpeg(lr)
lr = tf.expand_dims(lr, axis=0)
lr = tf.cast(lr, tf.float32)

# Load TFLite model and allocate tensors.
interpreter = tf.lite.Interpreter(model_path=esrgan_model_path)
interpreter.allocate_tensors()

# Get input and output tensors.
input_details = interpreter.get_input_details()
output_details = interpreter.get_output_details()

# Run the model
interpreter.set_tensor(input_details[0]['index'], lr)
interpreter.invoke()

# Extract the output and postprocess it
output_data = interpreter.get_tensor(output_details[0]['index'])
sr = tf.squeeze(output_data, axis=0)
sr = tf.clip_by_value(sr, 0, 255)
sr = tf.round(sr)
sr = tf.cast(sr, tf.uint8)
결과 시각화
lr = tf.cast(tf.squeeze(lr, axis=0), tf.uint8)
plt.figure(figsize = (1, 1))
plt.title('LR')
plt.imshow(lr.numpy());

plt.figure(figsize=(10, 4))
plt.subplot(1, 2, 1)
plt.title(f'ESRGAN (x4)')
plt.imshow(sr.numpy());

bicubic = tf.image.resize(lr, [200, 200], tf.image.ResizeMethod.BICUBIC)
bicubic = tf.cast(bicubic, tf.uint8)
plt.subplot(1, 2, 2)
plt.title('Bicubic')
plt.imshow(bicubic.numpy());
성능 벤치마크
성능 벤치 마크 번호는 도구를 사용하여 생성됩니다 여기에 설명 .
| 모델명 | 모델 크기 | 장치 | CPU | GPU |
|---|---|---|---|---|
| 초해상도(ESRGAN) | 4.8MB | 픽셀 3 | 586.8ms* | 128.6ms |
| 픽셀 4 | 385.1ms* | 130.3ms |
사용 * 4 개 스레드