
| | |  Ver fuente en GitHub Ver fuente en GitHub | | |
Uno de los desarrollos más interesantes en el aprendizaje profundo a salir recientemente es la transferencia de estilo artístico , o la posibilidad de crear una nueva imagen, conocido como un pastiche , en base a dos imágenes de entrada: uno que representa el estilo artístico y uno que representa el contenido.
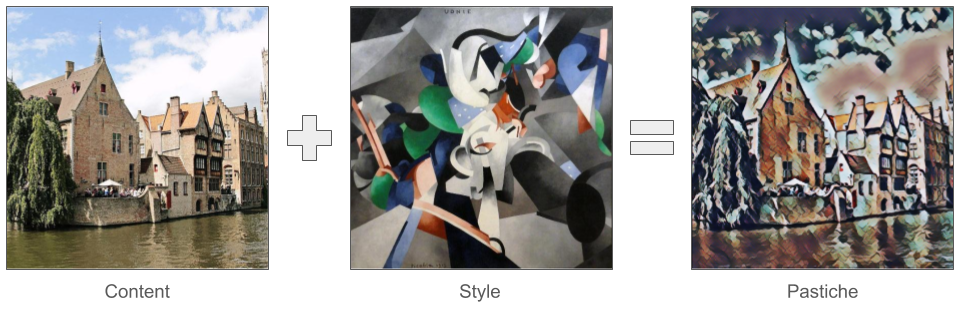
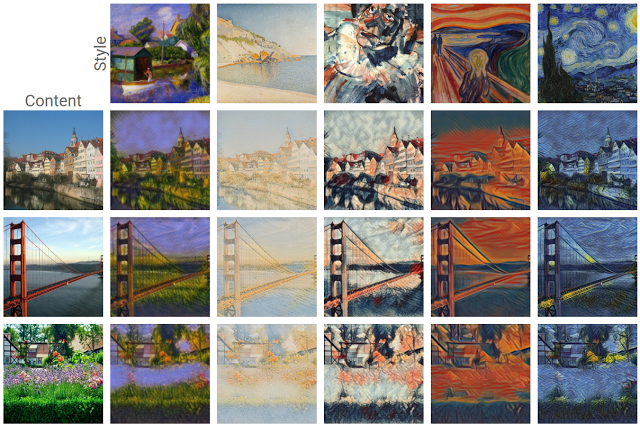
Usando esta técnica, podemos generar hermosas obras de arte nuevas en una variedad de estilos.
Si es nuevo en TensorFlow Lite y está trabajando con Android, le recomendamos que explore las siguientes aplicaciones de ejemplo que pueden ayudarlo a comenzar.
Si está utilizando una plataforma que no sea Android o iOS, o si ya está familiarizado con los TensorFlow Lite API , puede seguir este tutorial para aprender a aplicar la transferencia de estilo en cualquier par de imagen de estilo contenido y con un pre-formados TensorFlow Lite modelo. Puede usar el modelo para agregar transferencia de estilo a sus propias aplicaciones móviles.
El modelo es el de código abierto GitHub . Puede volver a entrenar el modelo con diferentes parámetros (por ejemplo, aumentar el peso de las capas de contenido para que la imagen de salida se parezca más a la imagen de contenido).
Comprender la arquitectura del modelo
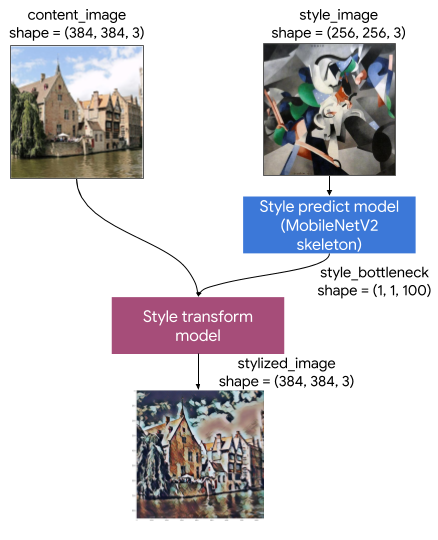
Este modelo de transferencia de estilo artístico consta de dos submodelos:
- Estilo Prediciton Modelo: A-MobilenetV2 basa red neuronal que tiene una imagen de estilo de entrada a un cuello de botella de vectores estilo 100-dimensión.
- Estilo Transform Modelo: Una red neuronal que se lleva a aplicar un cuello de botella vector de estilo a un contenido de imágenes y crea una imagen estilizada.
Si su aplicación solo necesita admitir un conjunto fijo de imágenes de estilo, puede calcular sus vectores de cuello de botella de estilo por adelantado y excluir el modelo de predicción de estilo del binario de su aplicación.
Configuración
Importar dependencias.
import tensorflow as tf
print(tf.__version__)
2.6.0
import IPython.display as display

import matplotlib.pyplot as plt
import matplotlib as mpl
mpl.rcParams['figure.figsize'] = (12,12)
mpl.rcParams['axes.grid'] = False

import numpy as np
import time
import functools
Descarga el contenido y las imágenes de estilo, y los modelos de TensorFlow Lite entrenados previamente.
content_path = tf.keras.utils.get_file('belfry.jpg','https://storage.googleapis.com/khanhlvg-public.appspot.com/arbitrary-style-transfer/belfry-2611573_1280.jpg')
style_path = tf.keras.utils.get_file('style23.jpg','https://storage.googleapis.com/khanhlvg-public.appspot.com/arbitrary-style-transfer/style23.jpg')

style_predict_path = tf.keras.utils.get_file('style_predict.tflite', 'https://tfhub.dev/google/lite-model/magenta/arbitrary-image-stylization-v1-256/int8/prediction/1?lite-format=tflite')
style_transform_path = tf.keras.utils.get_file('style_transform.tflite', 'https://tfhub.dev/google/lite-model/magenta/arbitrary-image-stylization-v1-256/int8/transfer/1?lite-format=tflite')
Downloading data from https://storage.googleapis.com/khanhlvg-public.appspot.com/arbitrary-style-transfer/belfry-2611573_1280.jpg
458752/458481 [==============================] - 0s 0us/step
466944/458481 [==============================] - 0s 0us/step
Downloading data from https://storage.googleapis.com/khanhlvg-public.appspot.com/arbitrary-style-transfer/style23.jpg
114688/108525 [===============================] - 0s 0us/step
122880/108525 [=================================] - 0s 0us/step
Downloading data from https://tfhub.dev/google/lite-model/magenta/arbitrary-image-stylization-v1-256/int8/prediction/1?lite-format=tflite
2834432/2828838 [==============================] - 0s 0us/step
2842624/2828838 [==============================] - 0s 0us/step
Downloading data from https://tfhub.dev/google/lite-model/magenta/arbitrary-image-stylization-v1-256/int8/transfer/1?lite-format=tflite
286720/284398 [==============================] - 0s 0us/step
294912/284398 [===============================] - 0s 0us/step
Preprocesar las entradas
- La imagen de contenido y la imagen de estilo deben ser imágenes RGB con valores de píxeles en números float32 entre [0..1].
- El tamaño de la imagen de estilo debe ser (1, 256, 256, 3). Recortamos centralmente la imagen y la redimensionamos.
- La imagen del contenido debe ser (1, 384, 384, 3). Recortamos centralmente la imagen y la redimensionamos.
# Function to load an image from a file, and add a batch dimension.
def load_img(path_to_img):
  img = tf.io.read_file(path_to_img)
  img = tf.io.decode_image(img, channels=3)
  img = tf.image.convert_image_dtype(img, tf.float32)
  img = img[tf.newaxis, :]

  return img

# Function to pre-process by resizing an central cropping it.
def preprocess_image(image, target_dim):
  # Resize the image so that the shorter dimension becomes 256px.
  shape = tf.cast(tf.shape(image)[1:-1], tf.float32)
  short_dim = min(shape)
  scale = target_dim / short_dim
  new_shape = tf.cast(shape * scale, tf.int32)
  image = tf.image.resize(image, new_shape)

  # Central crop the image.
  image = tf.image.resize_with_crop_or_pad(image, target_dim, target_dim)

  return image

# Load the input images.
content_image = load_img(content_path)
style_image = load_img(style_path)

# Preprocess the input images.
preprocessed_content_image = preprocess_image(content_image, 384)
preprocessed_style_image = preprocess_image(style_image, 256)

print('Style Image Shape:', preprocessed_style_image.shape)
print('Content Image Shape:', preprocessed_content_image.shape)
Style Image Shape: (1, 256, 256, 3)
Content Image Shape: (1, 384, 384, 3)
Visualiza las entradas
def imshow(image, title=None):
  if len(image.shape) > 3:
    image = tf.squeeze(image, axis=0)

  plt.imshow(image)
  if title:
    plt.title(title)

plt.subplot(1, 2, 1)
imshow(preprocessed_content_image, 'Content Image')

plt.subplot(1, 2, 2)
imshow(preprocessed_style_image, 'Style Image')

Ejecute la transferencia de estilo con TensorFlow Lite
Predicción de estilo
# Function to run style prediction on preprocessed style image.
def run_style_predict(preprocessed_style_image):
  # Load the model.
  interpreter = tf.lite.Interpreter(model_path=style_predict_path)

  # Set model input.
  interpreter.allocate_tensors()
  input_details = interpreter.get_input_details()
  interpreter.set_tensor(input_details[0]["index"], preprocessed_style_image)

  # Calculate style bottleneck.
  interpreter.invoke()
  style_bottleneck = interpreter.tensor(
      interpreter.get_output_details()[0]["index"]
      )()

  return style_bottleneck

# Calculate style bottleneck for the preprocessed style image.
style_bottleneck = run_style_predict(preprocessed_style_image)
print('Style Bottleneck Shape:', style_bottleneck.shape)
Style Bottleneck Shape: (1, 1, 1, 100)
Transformación de estilo
# Run style transform on preprocessed style image
def run_style_transform(style_bottleneck, preprocessed_content_image):
  # Load the model.
  interpreter = tf.lite.Interpreter(model_path=style_transform_path)

  # Set model input.
  input_details = interpreter.get_input_details()
  interpreter.allocate_tensors()

  # Set model inputs.
  interpreter.set_tensor(input_details[0]["index"], preprocessed_content_image)
  interpreter.set_tensor(input_details[1]["index"], style_bottleneck)
  interpreter.invoke()

  # Transform content image.
  stylized_image = interpreter.tensor(
      interpreter.get_output_details()[0]["index"]
      )()

  return stylized_image

# Stylize the content image using the style bottleneck.
stylized_image = run_style_transform(style_bottleneck, preprocessed_content_image)

# Visualize the output.
imshow(stylized_image, 'Stylized Image')

Mezcla de estilos
Podemos combinar el estilo de la imagen del contenido en la salida estilizada, lo que a su vez hace que la salida se parezca más a la imagen del contenido.
# Calculate style bottleneck of the content image.
style_bottleneck_content = run_style_predict(
    preprocess_image(content_image, 256)
    )
# Define content blending ratio between [0..1].
# 0.0: 0% style extracts from content image.
# 1.0: 100% style extracted from content image.
content_blending_ratio = 0.5

# Blend the style bottleneck of style image and content image
style_bottleneck_blended = content_blending_ratio * style_bottleneck_content \
                           + (1 - content_blending_ratio) * style_bottleneck

# Stylize the content image using the style bottleneck.
stylized_image_blended = run_style_transform(style_bottleneck_blended,
                                             preprocessed_content_image)

# Visualize the output.
imshow(stylized_image_blended, 'Blended Stylized Image')

Benchmarks de desempeño
Números de referencia de rendimiento son generados con la herramienta descrita aquí .
| Nombre del modelo | Tamaño del modelo | Dispositivo | NNAPI | UPC | GPU |
|---|---|---|---|---|---|
| Modelo de predicción de estilo (int8) | 2,8 Mb | Pixel 3 (Android 10) | 142 ms | 14 ms | |
| Pixel 4 (Android 10) | 5,2 ms | 6,7 ms | |||
| iPhone XS (iOS 12.4.1) | 10,7 ms | ||||
| Modelo de transformación de estilo (int8) | 0,2 Mb | Pixel 3 (Android 10) | 540 ms | ||
| Pixel 4 (Android 10) | 405ms | ||||
| iPhone XS (iOS 12.4.1) | 251ms | ||||
| Modelo de predicción de estilo (float16) | 4,7 Mb | Pixel 3 (Android 10) | 86ms | 28 ms | 9,1 ms |
| Pixel 4 (Android 10) | 32ms | 12 ms | 10ms | ||
| Modelo de transferencia de estilo (float16) | 0,4 Mb | Pixel 3 (Android 10) | 1095ms | 545ms | 42ms |
| Pixel 4 (Android 10) | 603ms | 377ms | 42ms |
* 4 hilos utilizados.
** 2 subprocesos en iPhone para el mejor rendimiento.