
 在 GitHub 上查看源代码 在 GitHub 上查看源代码 |
import tensorflow as tf
import numpy as np
2022-12-14 22:30:00.433530: W tensorflow/compiler/xla/stream_executor/platform/default/dso_loader.cc:64] Could not load dynamic library 'libnvinfer.so.7'; dlerror: libnvinfer.so.7: cannot open shared object file: No such file or directory
2022-12-14 22:30:00.433623: W tensorflow/compiler/xla/stream_executor/platform/default/dso_loader.cc:64] Could not load dynamic library 'libnvinfer_plugin.so.7'; dlerror: libnvinfer_plugin.so.7: cannot open shared object file: No such file or directory
2022-12-14 22:30:00.433633: W tensorflow/compiler/tf2tensorrt/utils/py_utils.cc:38] TF-TRT Warning: Cannot dlopen some TensorRT libraries. If you would like to use Nvidia GPU with TensorRT, please make sure the missing libraries mentioned above are installed properly.
张量是具有统一类型(称为 dtype)的多维数组。您可以在 tf.dtypes.DType 中查看所有支持的 dtypes。
如果您熟悉 NumPy,就会知道张量与 np.arrays 有一定的相似性。
就像 Python 数值和字符串一样,所有张量都是不可变的:永远无法更新张量的内容,只能创建新的张量。
基础知识
首先,创建一些基本张量。
下面是一个“标量”(或称“0 秩”张量)。标量包含单个值,但没有“轴”。
# This will be an int32 tensor by default; see "dtypes" below.
rank_0_tensor = tf.constant(4)
print(rank_0_tensor)
tf.Tensor(4, shape=(), dtype=int32)
“向量”(或称“1 秩”张量)就像一个值列表。向量有 1 个轴:
# Let's make this a float tensor.
rank_1_tensor = tf.constant([2.0, 3.0, 4.0])
print(rank_1_tensor)
tf.Tensor([2. 3. 4.], shape=(3,), dtype=float32)
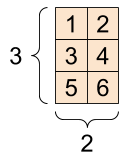
“矩阵”(或称“2 秩”张量)有 2 个轴:
# If you want to be specific, you can set the dtype (see below) at creation time
rank_2_tensor = tf.constant([[1, 2],
                             [3, 4],
                             [5, 6]], dtype=tf.float16)
print(rank_2_tensor)
tf.Tensor(
[[1. 2.]
 [3. 4.]
 [5. 6.]], shape=(3, 2), dtype=float16)
标量,形状:[] |
向量,形状:[3] |
矩阵,形状:[3, 2] |
|---|---|---|
 |
 |
 |
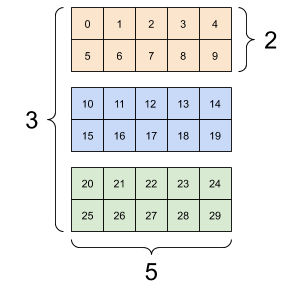
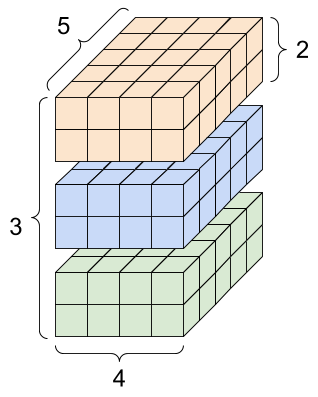
张量的轴可能更多,下面是一个包含 3 个轴的张量:
# There can be an arbitrary number of
# axes (sometimes called "dimensions")
rank_3_tensor = tf.constant([
  [[0, 1, 2, 3, 4],
   [5, 6, 7, 8, 9]],
  [[10, 11, 12, 13, 14],
   [15, 16, 17, 18, 19]],
  [[20, 21, 22, 23, 24],
   [25, 26, 27, 28, 29]],])

print(rank_3_tensor)
tf.Tensor(
[[[ 0  1  2  3  4]
  [ 5  6  7  8  9]]

 [[10 11 12 13 14]
  [15 16 17 18 19]]

 [[20 21 22 23 24]
  [25 26 27 28 29]]], shape=(3, 2, 5), dtype=int32)
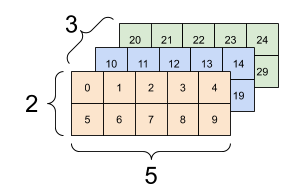
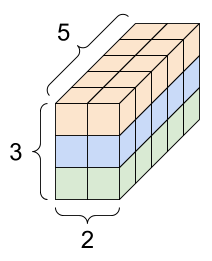
对于包含 2 个以上的轴的张量,您可以通过多种方式加以呈现。
3 轴张量,形状:[3, 2, 5] |
||
|---|---|---|
 |
 |
 |
通过使用 np.array 或 tensor.numpy 方法,您可以将张量转换为 NumPy 数组:
np.array(rank_2_tensor)
array([[1., 2.],
       [3., 4.],
       [5., 6.]], dtype=float16)
rank_2_tensor.numpy()
array([[1., 2.],
       [3., 4.],
       [5., 6.]], dtype=float16)
张量通常包含浮点型和整型数据,但是还有许多其他数据类型,包括:
- 复杂的数值
- 字符串
tf.Tensor 基类要求张量是“矩形”,也就是说,每个轴上的每一个元素大小相同。但是,有可以处理不同形状的特殊类型张量:
- 不规则张量(请参阅下文中的 RaggedTensor)
- 稀疏张量(请参阅下文中的 SparseTensor)
您可以对张量执行基本数学运算,包括加法、逐元素乘法和矩阵乘法。
a = tf.constant([[1, 2],
                 [3, 4]])
b = tf.constant([[1, 1],
                 [1, 1]]) # Could have also said `tf.ones([2,2])`

print(tf.add(a, b), "\n")
print(tf.multiply(a, b), "\n")
print(tf.matmul(a, b), "\n")
tf.Tensor(
[[2 3]
 [4 5]], shape=(2, 2), dtype=int32)

tf.Tensor(
[[1 2]
 [3 4]], shape=(2, 2), dtype=int32)

tf.Tensor(
[[3 3]
 [7 7]], shape=(2, 2), dtype=int32)
print(a + b, "\n") # element-wise addition
print(a * b, "\n") # element-wise multiplication
print(a @ b, "\n") # matrix multiplication
tf.Tensor(
[[2 3]
 [4 5]], shape=(2, 2), dtype=int32)

tf.Tensor(
[[1 2]
 [3 4]], shape=(2, 2), dtype=int32)

tf.Tensor(
[[3 3]
 [7 7]], shape=(2, 2), dtype=int32)
各种运算都可以使用张量。
c = tf.constant([[4.0, 5.0], [10.0, 1.0]])

# Find the largest value
print(tf.reduce_max(c))
# Find the index of the largest value
print(tf.math.argmax(c))
# Compute the softmax
print(tf.nn.softmax(c))
tf.Tensor(10.0, shape=(), dtype=float32)
tf.Tensor([1 0], shape=(2,), dtype=int64)
tf.Tensor(
[[2.6894143e-01 7.3105854e-01]
 [9.9987662e-01 1.2339458e-04]], shape=(2, 2), dtype=float32)
注:通常,在 TensorFlow 函数需要 Tensor 作为输入的任何地方,该函数也将接受可使用 tf.convert_to_tensor 转换为 Tensor 的任何内容。请参见下面的示例。
tf.convert_to_tensor([1,2,3])
<tf.Tensor: shape=(3,), dtype=int32, numpy=array([1, 2, 3], dtype=int32)>
tf.reduce_max([1,2,3])
<tf.Tensor: shape=(), dtype=int32, numpy=3>
tf.reduce_max(np.array([1,2,3]))
<tf.Tensor: shape=(), dtype=int64, numpy=3>
形状简介
张量有形状。下面是几个相关术语:
- 形状:张量的每个轴的长度(元素数量)。
- 秩:张量轴数。标量的秩为 0,向量的秩为 1,矩阵的秩为 2。
- 轴或维度:张量的一个特殊维度。
- 大小:张量的总项数,即形状矢量元素的乘积
注:虽然您可能会看到“二维张量”之类的表述,但 2 秩张量通常并不是用来描述二维空间。
张量和 tf.TensorShape 对象提供了方便的属性来访问:
rank_4_tensor = tf.zeros([3, 2, 4, 5])
4 秩张量,形状:[3, 2, 4, 5] |
|
|---|---|
 |
 |
print("Type of every element:", rank_4_tensor.dtype)
print("Number of axes:", rank_4_tensor.ndim)
print("Shape of tensor:", rank_4_tensor.shape)
print("Elements along axis 0 of tensor:", rank_4_tensor.shape[0])
print("Elements along the last axis of tensor:", rank_4_tensor.shape[-1])
print("Total number of elements (3*2*4*5): ", tf.size(rank_4_tensor).numpy())
Type of every element: <dtype: 'float32'>
Number of axes: 4
Shape of tensor: (3, 2, 4, 5)
Elements along axis 0 of tensor: 3
Elements along the last axis of tensor: 5
Total number of elements (3*2*4*5):  120
但请注意,Tensor.ndim 和 Tensor.shape 特性不返回 Tensor 对象。如果您需要 Tensor,请使用 tf.rank 或 tf.shape 函数。这种差异不易察觉,但在构建计算图时(稍后)可能非常重要。
tf.rank(rank_4_tensor)
<tf.Tensor: shape=(), dtype=int32, numpy=4>
tf.shape(rank_4_tensor)
<tf.Tensor: shape=(4,), dtype=int32, numpy=array([3, 2, 4, 5], dtype=int32)>
虽然通常用索引来指代轴,但是您始终要记住每个轴的含义。轴一般按照从全局到局部的顺序进行排序:首先是批次轴,随后是空间维度,最后是每个位置的特征。这样,在内存中,特征向量就会位于连续的区域。
| 典型的轴顺序 |
|---|
 |
索引
单轴索引
TensorFlow 遵循标准 Python 索引编制规则(类似于在 Python 中为列表或字符串编制索引)以及 NumPy 索引编制的基本规则。
- 索引从
0开始编制 - 负索引表示按倒序编制索引
- 冒号
:用于切片:start:stop:step
rank_1_tensor = tf.constant([0, 1, 1, 2, 3, 5, 8, 13, 21, 34])
print(rank_1_tensor.numpy())
[ 0 1 1 2 3 5 8 13 21 34]
使用标量编制索引会移除轴:
print("First:", rank_1_tensor[0].numpy())
print("Second:", rank_1_tensor[1].numpy())
print("Last:", rank_1_tensor[-1].numpy())
First: 0
Second: 1
Last: 34
使用 : 切片编制索引会保留轴:
print("Everything:", rank_1_tensor[:].numpy())
print("Before 4:", rank_1_tensor[:4].numpy())
print("From 4 to the end:", rank_1_tensor[4:].numpy())
print("From 2, before 7:", rank_1_tensor[2:7].numpy())
print("Every other item:", rank_1_tensor[::2].numpy())
print("Reversed:", rank_1_tensor[::-1].numpy())
Everything: [ 0  1  1  2  3  5  8 13 21 34]
Before 4: [0 1 1 2]
From 4 to the end: [ 3  5  8 13 21 34]
From 2, before 7: [1 2 3 5 8]
Every other item: [ 0  1  3  8 21]
Reversed: [34 21 13  8  5  3  2  1  1  0]
多轴索引
更高秩的张量通过传递多个索引来编制索引。
对于高秩张量的每个单独的轴,遵循与单轴情形完全相同的规则。
print(rank_2_tensor.numpy())
[[1. 2.]
 [3. 4.]
 [5. 6.]]
为每个索引传递一个整数,结果是一个标量。
# Pull out a single value from a 2-rank tensor
print(rank_2_tensor[1, 1].numpy())
4.0
您可以使用整数与切片的任意组合编制索引:
# Get row and column tensors
print("Second row:", rank_2_tensor[1, :].numpy())
print("Second column:", rank_2_tensor[:, 1].numpy())
print("Last row:", rank_2_tensor[-1, :].numpy())
print("First item in last column:", rank_2_tensor[0, -1].numpy())
print("Skip the first row:")
print(rank_2_tensor[1:, :].numpy(), "\n")
Second row: [3. 4.]
Second column: [2. 4. 6.]
Last row: [5. 6.]
First item in last column: 2.0
Skip the first row:
[[3. 4.]
 [5. 6.]]
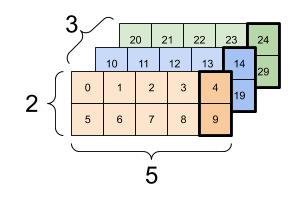
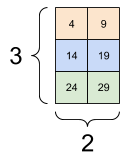
下面是一个 3 轴张量的示例:
print(rank_3_tensor[:, :, 4])
tf.Tensor(
[[ 4  9]
 [14 19]
 [24 29]], shape=(3, 2), dtype=int32)
| 选择批次中每个示例的所有位置的最后一个特征 | |
|---|---|
 |
 |
请参阅张量切片指南,了解如何应用索引编制以操作张量中的各个元素。
操作形状
改变张量的形状很有用。
# Shape returns a `TensorShape` object that shows the size along each axis
x = tf.constant([[1], [2], [3]])
print(x.shape)
(3, 1)
# You can convert this object into a Python list, too
print(x.shape.as_list())
[3, 1]
通过重构可以改变张量的形状。tf.reshape 运算的速度很快,资源消耗很低,因为不需要复制底层数据。
# You can reshape a tensor to a new shape.
# Note that you're passing in a list
reshaped = tf.reshape(x, [1, 3])
print(x.shape)
print(reshaped.shape)
(3, 1)
(1, 3)
数据在内存中的布局保持不变,同时使用请求的形状创建一个指向同一数据的新张量。TensorFlow 采用 C 样式的“行优先”内存访问顺序,即最右侧的索引值递增对应于内存中的单步位移。
print(rank_3_tensor)
tf.Tensor(
[[[ 0  1  2  3  4]
  [ 5  6  7  8  9]]

 [[10 11 12 13 14]
  [15 16 17 18 19]]

 [[20 21 22 23 24]
  [25 26 27 28 29]]], shape=(3, 2, 5), dtype=int32)
如果您展平张量,则可以看到它在内存中的排列顺序。
# A `-1` passed in the `shape` argument says "Whatever fits".
print(tf.reshape(rank_3_tensor, [-1]))
tf.Tensor(
[ 0  1  2  3  4  5  6  7  8  9 10 11 12 13 14 15 16 17 18 19 20 21 22 23
 24 25 26 27 28 29], shape=(30,), dtype=int32)
一般来说,tf.reshape 唯一合理的用途是用于合并或拆分相邻轴(或添加/移除 1)。
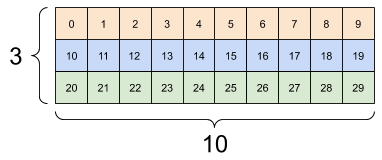
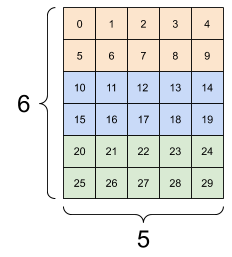
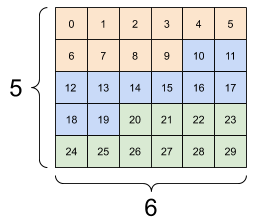
对于 3x2x5 张量,重构为 (3x2)x5 或 3x(2x5) 都合理,因为切片不会混淆:
print(tf.reshape(rank_3_tensor, [3*2, 5]), "\n")
print(tf.reshape(rank_3_tensor, [3, -1]))
tf.Tensor(
[[ 0  1  2  3  4]
 [ 5  6  7  8  9]
 [10 11 12 13 14]
 [15 16 17 18 19]
 [20 21 22 23 24]
 [25 26 27 28 29]], shape=(6, 5), dtype=int32)

tf.Tensor(
[[ 0  1  2  3  4  5  6  7  8  9]
 [10 11 12 13 14 15 16 17 18 19]
 [20 21 22 23 24 25 26 27 28 29]], shape=(3, 10), dtype=int32)
| 一些正确的重构示例。 | ||
|---|---|---|
 |
 |
 |
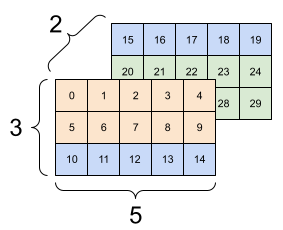
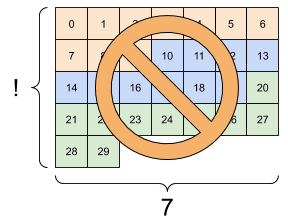
重构可以处理总元素个数相同的任何新形状,但是如果不遵从轴的顺序,则不会发挥任何作用。
利用 tf.reshape 无法实现轴的交换,要交换轴,您需要使用 tf.transpose。
# Bad examples: don't do this

# You can't reorder axes with reshape.
print(tf.reshape(rank_3_tensor, [2, 3, 5]), "\n")

# This is a mess
print(tf.reshape(rank_3_tensor, [5, 6]), "\n")

# This doesn't work at all
try:
  tf.reshape(rank_3_tensor, [7, -1])
except Exception as e:
  print(f"{type(e).__name__}: {e}")
tf.Tensor(
[[[ 0  1  2  3  4]
  [ 5  6  7  8  9]
  [10 11 12 13 14]]

 [[15 16 17 18 19]
  [20 21 22 23 24]
  [25 26 27 28 29]]], shape=(2, 3, 5), dtype=int32)

tf.Tensor(
[[ 0  1  2  3  4  5]
 [ 6  7  8  9 10 11]
 [12 13 14 15 16 17]
 [18 19 20 21 22 23]
 [24 25 26 27 28 29]], shape=(5, 6), dtype=int32)

InvalidArgumentError: { {function_node __wrapped__Reshape_device_/job:localhost/replica:0/task:0/device:GPU:0} } Input to reshape is a tensor with 30 values, but the requested shape requires a multiple of 7 [Op:Reshape]
| 一些错误的重构示例。 | ||
|---|---|---|
 |
 |
 |
您可能会遇到非完全指定的形状。要么是形状包含 None(轴长度未知),要么是整个形状为 None(张量的秩未知)。
除 tf.RaggedTensor 外,此类形状只会在 TensorFlow 的符号化计算图构建 API 环境中出现:
DTypes 详解
使用 Tensor.dtype 属性可以检查 tf.Tensor 的数据类型。
从 Python 对象创建 tf.Tensor 时,您可以选择指定数据类型。
如果不指定,TensorFlow 会选择一个可以表示您的数据的数据类型。TensorFlow 将 Python 整数转换为 tf.int32,将 Python 浮点数转换为 tf.float32。另外,当转换为数组时,TensorFlow 会采用与 NumPy 相同的规则。
数据类型可以相互转换。
the_f64_tensor = tf.constant([2.2, 3.3, 4.4], dtype=tf.float64)
the_f16_tensor = tf.cast(the_f64_tensor, dtype=tf.float16)
# Now, cast to an uint8 and lose the decimal precision
the_u8_tensor = tf.cast(the_f16_tensor, dtype=tf.uint8)
print(the_u8_tensor)
tf.Tensor([2 3 4], shape=(3,), dtype=uint8)
广播
广播是从 NumPy 中的等效功能借用的一个概念。简而言之,在一定条件下,对一组张量执行组合运算时,为了适应大张量,会对小张量进行“扩展”。
最简单和最常见的例子是尝试将张量与标量相乘或相加。在这种情况下会对标量进行广播,使其变成与其他参数相同的形状。
x = tf.constant([1, 2, 3])

y = tf.constant(2)
z = tf.constant([2, 2, 2])
# All of these are the same computation
print(tf.multiply(x, 2))
print(x * y)
print(x * z)
tf.Tensor([2 4 6], shape=(3,), dtype=int32)
tf.Tensor([2 4 6], shape=(3,), dtype=int32)
tf.Tensor([2 4 6], shape=(3,), dtype=int32)
同样,可以扩展长度为 1 的轴,使其匹配其他参数。在同一个计算中可以同时扩展两个参数。
在本例中,一个 3x1 的矩阵与一个 1x4 进行元素级乘法运算,从而产生一个 3x4 的矩阵。注意前导 1 是可选的:y 的形状是 [4]。
# These are the same computations
x = tf.reshape(x,[3,1])
y = tf.range(1, 5)
print(x, "\n")
print(y, "\n")
print(tf.multiply(x, y))
tf.Tensor(
[[1]
 [2]
 [3]], shape=(3, 1), dtype=int32)

tf.Tensor([1 2 3 4], shape=(4,), dtype=int32)

tf.Tensor(
[[ 1  2  3  4]
 [ 2  4  6  8]
 [ 3  6  9 12]], shape=(3, 4), dtype=int32)
广播相加:[3, 1] 乘以 [1, 4] 的结果是 [3,4] |
|---|
 |
下面是不使用广播的同一运算:
x_stretch = tf.constant([[1, 1, 1, 1],
                         [2, 2, 2, 2],
                         [3, 3, 3, 3]])

y_stretch = tf.constant([[1, 2, 3, 4],
                         [1, 2, 3, 4],
                         [1, 2, 3, 4]])

print(x_stretch * y_stretch)  # Again, operator overloading
tf.Tensor(
[[ 1  2  3  4]
 [ 2  4  6  8]
 [ 3  6  9 12]], shape=(3, 4), dtype=int32)
在大多数情况下,广播的时间和空间效率更高,因为广播运算不会在内存中具体化扩展的张量。
使用 tf.broadcast_to 可以了解广播的运算方式。
print(tf.broadcast_to(tf.constant([1, 2, 3]), [3, 3]))
tf.Tensor(
[[1 2 3]
 [1 2 3]
 [1 2 3]], shape=(3, 3), dtype=int32)
与数学运算不同,broadcast_to 并不会节省内存。在这个示例中,您将具体化张量。
这可能会变得更复杂。Jake VanderPlas 的 Python 数据科学手册一书中的这一节{:.external}介绍了更多广播技巧(同样使用 NumPy)。
tf.convert_to_tensor
大部分运算(如 tf.matmul 和 tf.reshape)会使用 tf.Tensor 类的参数。不过,在上面的示例中,您会发现形状类似于张量的 Python 对象也可以接受。
大部分(但并非全部)运算会在非张量参数上调用 convert_to_tensor。我们提供了一个转换注册表,大多数对象类(如 NumPy 的 ndarray、TensorShape、Python 列表和 tf.Variable)都可以自动转换。
有关更多详细信息,请参阅 tf.register_tensor_conversion_function。如果您有自己的类型,则可能希望自动转换为张量。
不规则张量
如果张量的某个轴上的元素个数可变,则称为“不规则”张量。对于不规则数据,请使用 tf.ragged.RaggedTensor。
例如,下面的例子无法用规则张量表示:
“tf.RaggedTensor”,形状:[4, None] |
|---|
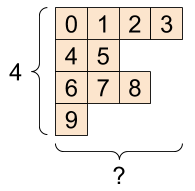 |
ragged_list = [
    [0, 1, 2, 3],
    [4, 5],
    [6, 7, 8],
    [9]]
try:
  tensor = tf.constant(ragged_list)
except Exception as e:
  print(f"{type(e).__name__}: {e}")
ValueError: Can't convert non-rectangular Python sequence to Tensor.
应使用 tf.ragged.constant 来创建 tf.RaggedTensor:
ragged_tensor = tf.ragged.constant(ragged_list)
print(ragged_tensor)
<tf.RaggedTensor [[0, 1, 2, 3], [4, 5], [6, 7, 8], [9]]>
tf.RaggedTensor 的形状将包含一些具有未知长度的轴:
print(ragged_tensor.shape)
(4, None)
字符串张量
tf.string 是一种 dtype,也就是说,在张量中,您可以用字符串(可变长度字节数组)来表示数据。
字符串是原子类型,无法像 Python 字符串一样编制索引。字符串的长度并不是张量的一个轴。有关操作字符串的函数,请参阅 tf.strings。
下面是一个标量字符串张量:
# Tensors can be strings, too here is a scalar string.
scalar_string_tensor = tf.constant("Gray wolf")
print(scalar_string_tensor)
tf.Tensor(b'Gray wolf', shape=(), dtype=string)
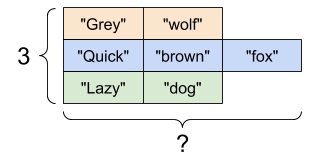
下面是一个字符串向量:
字符串向量,形状:[3,] |
|---|
 |
# If you have three string tensors of different lengths, this is OK.
tensor_of_strings = tf.constant(["Gray wolf",
                                 "Quick brown fox",
                                 "Lazy dog"])
# Note that the shape is (3,). The string length is not included.
print(tensor_of_strings)
tf.Tensor([b'Gray wolf' b'Quick brown fox' b'Lazy dog'], shape=(3,), dtype=string)
在上面的打印输出中,b 前缀表示 tf.string dtype 不是 Unicode 字符串,而是字节字符串。有关在 TensorFlow 如何使用 Unicode 文本的详细信息,请参阅 Unicode 教程。
如果传递 Unicode 字符,则会使用 utf-8 编码。
tf.constant("🥳👍")
<tf.Tensor: shape=(), dtype=string, numpy=b'\xf0\x9f\xa5\xb3\xf0\x9f\x91\x8d'>
在 tf.strings 中可以找到用于操作字符串的一些基本函数,包括 tf.strings.split。
# You can use split to split a string into a set of tensors
print(tf.strings.split(scalar_string_tensor, sep=" "))
tf.Tensor([b'Gray' b'wolf'], shape=(2,), dtype=string)
# ...but it turns into a `RaggedTensor` if you split up a tensor of strings,
# as each string might be split into a different number of parts.
print(tf.strings.split(tensor_of_strings))
<tf.RaggedTensor [[b'Gray', b'wolf'], [b'Quick', b'brown', b'fox'], [b'Lazy', b'dog']]>
三个字符串分割,形状:[3, None] |
|---|
 |
以及 tf.string.to_number:
text = tf.constant("1 10 100")
print(tf.strings.to_number(tf.strings.split(text, " ")))
tf.Tensor([ 1. 10. 100.], shape=(3,), dtype=float32)
虽然不能使用 tf.cast 将字符串张量转换为数值,但是可以先将其转换为字节,然后转换为数值。
byte_strings = tf.strings.bytes_split(tf.constant("Duck"))
byte_ints = tf.io.decode_raw(tf.constant("Duck"), tf.uint8)
print("Byte strings:", byte_strings)
print("Bytes:", byte_ints)
Byte strings: tf.Tensor([b'D' b'u' b'c' b'k'], shape=(4,), dtype=string)
Bytes: tf.Tensor([ 68 117  99 107], shape=(4,), dtype=uint8)
# Or split it up as unicode and then decode it
unicode_bytes = tf.constant("アヒル 🦆")
unicode_char_bytes = tf.strings.unicode_split(unicode_bytes, "UTF-8")
unicode_values = tf.strings.unicode_decode(unicode_bytes, "UTF-8")

print("\nUnicode bytes:", unicode_bytes)
print("\nUnicode chars:", unicode_char_bytes)
print("\nUnicode values:", unicode_values)
Unicode bytes: tf.Tensor(b'\xe3\x82\xa2\xe3\x83\x92\xe3\x83\xab \xf0\x9f\xa6\x86', shape=(), dtype=string)

Unicode chars: tf.Tensor([b'\xe3\x82\xa2' b'\xe3\x83\x92' b'\xe3\x83\xab' b' ' b'\xf0\x9f\xa6\x86'], shape=(5,), dtype=string)

Unicode values: tf.Tensor([ 12450  12498  12523     32 129414], shape=(5,), dtype=int32)
tf.string dtype 可用于 TensorFlow 中的所有原始字节数据。tf.io 模块包含在数据与字节类型之间进行相互转换的函数,包括解码图像和解析 csv 的函数。
稀疏张量
在某些情况下,数据很稀疏,比如说在一个非常宽的嵌入空间中。为了高效存储稀疏数据,TensorFlow 支持 tf.sparse.SparseTensor 和相关运算。
“tf.SparseTensor”,形状:[3, 4] |
|---|
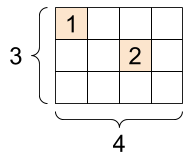 |
# Sparse tensors store values by index in a memory-efficient manner
sparse_tensor = tf.sparse.SparseTensor(indices=[[0, 0], [1, 2]],
                                       values=[1, 2],
                                       dense_shape=[3, 4])
print(sparse_tensor, "\n")

# You can convert sparse tensors to dense
print(tf.sparse.to_dense(sparse_tensor))
SparseTensor(indices=tf.Tensor(
[[0 0]
 [1 2]], shape=(2, 2), dtype=int64), values=tf.Tensor([1 2], shape=(2,), dtype=int32), dense_shape=tf.Tensor([3 4], shape=(2,), dtype=int64))

tf.Tensor(
[[1 0 0 0]
 [0 0 2 0]
 [0 0 0 0]], shape=(3, 4), dtype=int32)