
| | |  GitHub에서 소스 보기 GitHub에서 소스 보기 |
이 노트북을 기반으로 영어 번역 스페인어 순서 (seq2seq) 모델과 일련의 훈련 주의 기반 신경 기계 번역에 접근 효과를 . 이것은 다음 사항에 대한 지식이 있다고 가정하는 고급 예입니다.
- Sequence to sequence 모델
- keras 레이어 아래의 TensorFlow 기본 사항:
- 텐서로 직접 작업하기
- 사용자 정의 작성
keras.Model들과keras.layers
이 아키텍처는 다소 오래된 동안 그것은 (에에 가기 전에주의 메커니즘의 깊은 이해를 얻을 수있는을 통해 작업에 매우 유용한 프로젝트 여전히 변압기 ).
"? ¿ todavia estan 엉 카사"이 노트북 모델을 훈련 한 후에는 같은 스페인의 문장을 입력 할 수 및 영어 번역 반환합니다 : "집에서 아직도를"
생성 된 모델은 같은 내보낼 tf.saved_model 가 TensorFlow 다른 환경에서 사용될 수 있도록.
번역 품질은 장난감 예에 적합하지만 생성된 주의 플롯이 더 흥미로울 수 있습니다. 이것은 번역하는 동안 입력 문장의 어느 부분이 모델의 주의를 끌었는지 보여줍니다.
설정
pip install tensorflow_text
import numpy as np

import typing
from typing import Any, Tuple

import tensorflow as tf

import tensorflow_text as tf_text

import matplotlib.pyplot as plt
import matplotlib.ticker as ticker
이 튜토리얼은 처음부터 몇 개의 레이어를 빌드합니다. 사용자 정의 구현과 내장 구현 간에 전환하려면 이 변수를 사용하세요.
use_builtins = True
이 튜토리얼은 셰이프를 틀리기 쉬운 저수준 API를 많이 사용합니다. 이 클래스는 튜토리얼 전체에서 모양을 확인하는 데 사용됩니다.
모양 검사기
class ShapeChecker():
  def __init__(self):
    # Keep a cache of every axis-name seen
    self.shapes = {}

  def __call__(self, tensor, names, broadcast=False):
    if not tf.executing_eagerly():
      return

    if isinstance(names, str):
      names = (names,)

    shape = tf.shape(tensor)
    rank = tf.rank(tensor)

    if rank != len(names):
      raise ValueError(f'Rank mismatch:\n'
                       f'    found {rank}: {shape.numpy()}\n'
                       f'    expected {len(names)}: {names}\n')

    for i, name in enumerate(names):
      if isinstance(name, int):
        old_dim = name
      else:
        old_dim = self.shapes.get(name, None)
      new_dim = shape[i]

      if (broadcast and new_dim == 1):
        continue

      if old_dim is None:
        # If the axis name is new, add its length to the cache.
        self.shapes[name] = new_dim
        continue

      if new_dim != old_dim:
        raise ValueError(f"Shape mismatch for dimension: '{name}'\n"
                         f"    found: {new_dim}\n"
                         f"    expected: {old_dim}\n")
자료
우리가 제공하는 언어 데이터 세트 사용합니다 http://www.manythings.org/anki/ 이 데이터 세트는 형식 언어 번역 쌍을 포함를 :
May I borrow this book? ¿Puedo tomar prestado este libro?
그들은 다양한 언어를 사용할 수 있지만 우리는 영어-스페인어 데이터 세트를 사용할 것입니다.
데이터세트 다운로드 및 준비
편의를 위해 Google Cloud에서 이 데이터세트의 사본을 호스팅했지만 자체 사본을 다운로드할 수도 있습니다. 데이터 세트를 다운로드한 후 데이터를 준비하기 위해 수행할 단계는 다음과 같습니다.
- 각 문장에 토큰 시작과 끝을 추가합니다.
- 특수 문자를 제거하여 문장을 정리합니다.
- 단어 색인 및 역단어 색인을 작성하십시오(단어 → id 및 id → 단어에서 사전 매핑).
- 각 문장을 최대 길이로 채웁니다.
# Download the file
import pathlib

path_to_zip = tf.keras.utils.get_file(
    'spa-eng.zip', origin='http://storage.googleapis.com/download.tensorflow.org/data/spa-eng.zip',
    extract=True)

path_to_file = pathlib.Path(path_to_zip).parent/'spa-eng/spa.txt'
Downloading data from http://storage.googleapis.com/download.tensorflow.org/data/spa-eng.zip
2646016/2638744 [==============================] - 0s 0us/step
2654208/2638744 [==============================] - 0s 0us/step
def load_data(path):
  text = path.read_text(encoding='utf-8')

  lines = text.splitlines()
  pairs = [line.split('\t') for line in lines]

  inp = [inp for targ, inp in pairs]
  targ = [targ for targ, inp in pairs]

  return targ, inp
targ, inp = load_data(path_to_file)
print(inp[-1])
Si quieres sonar como un hablante nativo, debes estar dispuesto a practicar diciendo la misma frase una y otra vez de la misma manera en que un músico de banjo practica el mismo fraseo una y otra vez hasta que lo puedan tocar correctamente y en el tiempo esperado.
print(targ[-1])
If you want to sound like a native speaker, you must be willing to practice saying the same sentence over and over in the same way that banjo players practice the same phrase over and over until they can play it correctly and at the desired tempo.
tf.data 데이터세트 만들기
문자열이 배열에서 당신은 만들 수 있습니다 tf.data.Dataset 그 섞어 배치 그들을 효율적으로 문자열을 :
BUFFER_SIZE = len(inp)
BATCH_SIZE = 64

dataset = tf.data.Dataset.from_tensor_slices((inp, targ)).shuffle(BUFFER_SIZE)
dataset = dataset.batch(BATCH_SIZE)
for example_input_batch, example_target_batch in dataset.take(1):
  print(example_input_batch[:5])
  print()
  print(example_target_batch[:5])
  break
tf.Tensor(
[b'No s\xc3\xa9 lo que quiero.' b'\xc2\xbfDeber\xc3\xada repetirlo?'
 b'Tard\xc3\xa9 m\xc3\xa1s de 2 horas en traducir unas p\xc3\xa1ginas en ingl\xc3\xa9s.'
 b'A Tom comenz\xc3\xb3 a temerle a Mary.' b'Mi pasatiempo es la lectura.'], shape=(5,), dtype=string)

tf.Tensor(
[b"I don't know what I want." b'Should I repeat it?'
 b'It took me more than two hours to translate a few pages of English.'
 b'Tom became afraid of Mary.' b'My hobby is reading.'], shape=(5,), dtype=string)
텍스트 전처리
이 튜토리얼의 목표 중 하나는로 내보낼 수 있습니다 모델 구축하는 것입니다 tf.saved_model . 그 수출 모델을 편리하게 사용할 수 있도록하기 위해이해야 tf.string 입력을 반환 tf.string 출력 : 모든 텍스트 처리는 모델 내부에서 발생합니다.
표준화
이 모델은 어휘가 제한된 다국어 텍스트를 다루고 있습니다. 따라서 입력 텍스트를 표준화하는 것이 중요합니다.
첫 번째 단계는 악센트가 있는 문자를 분할하고 호환성 문자를 해당 ASCII 문자로 바꾸는 유니코드 정규화입니다.
tensorflow_text 패키지는 유니 코드 정규화 작업을 포함 :
example_text = tf.constant('¿Todavía está en casa?')

print(example_text.numpy())
print(tf_text.normalize_utf8(example_text, 'NFKD').numpy())
b'\xc2\xbfTodav\xc3\xada est\xc3\xa1 en casa?'
b'\xc2\xbfTodavi\xcc\x81a esta\xcc\x81 en casa?'
유니코드 정규화는 텍스트 표준화 기능의 첫 번째 단계가 될 것입니다.
def tf_lower_and_split_punct(text):
  # Split accecented characters.
  text = tf_text.normalize_utf8(text, 'NFKD')
  text = tf.strings.lower(text)
  # Keep space, a to z, and select punctuation.
  text = tf.strings.regex_replace(text, '[^ a-z.?!,¿]', '')
  # Add spaces around punctuation.
  text = tf.strings.regex_replace(text, '[.?!,¿]', r' \0 ')
  # Strip whitespace.
  text = tf.strings.strip(text)

  text = tf.strings.join(['[START]', text, '[END]'], separator=' ')
  return text
print(example_text.numpy().decode())
print(tf_lower_and_split_punct(example_text).numpy().decode())
¿Todavía está en casa?
[START] ¿ todavia esta en casa ? [END]
텍스트 벡터화
이 표준화 함수는 싸서한다 tf.keras.layers.TextVectorization 토큰 서열 어휘 추출 및 입력 텍스트의 변환을 처리 층.
max_vocab_size = 5000

input_text_processor = tf.keras.layers.TextVectorization(
    standardize=tf_lower_and_split_punct,
    max_tokens=max_vocab_size)
TextVectorization 층 및 기타 전처리 층은 가지고 adapt 방법. 이 방법은 훈련 데이터의 한 시대를 읽고, 같은 많은 작업 Model.fix . 이 adapt 방법은 데이터에 기초 층을 초기화한다. 여기에서 어휘를 결정합니다.
input_text_processor.adapt(inp)

# Here are the first 10 words from the vocabulary:
input_text_processor.get_vocabulary()[:10]
['', '[UNK]', '[START]', '[END]', '.', 'que', 'de', 'el', 'a', 'no']
즉 스페인의 TextVectorization 구축하고 현재 레이어 .adapt() 영어 하나
output_text_processor = tf.keras.layers.TextVectorization(
    standardize=tf_lower_and_split_punct,
    max_tokens=max_vocab_size)

output_text_processor.adapt(targ)
output_text_processor.get_vocabulary()[:10]
['', '[UNK]', '[START]', '[END]', '.', 'the', 'i', 'to', 'you', 'tom']
이제 이러한 레이어는 문자열 배치를 토큰 ID 배치로 변환할 수 있습니다.
example_tokens = input_text_processor(example_input_batch)
example_tokens[:3, :10]
<tf.Tensor: shape=(3, 10), dtype=int64, numpy=
array([[   2,    9,   17,   22,    5,   48,    4,    3,    0,    0],
       [   2,   13,  177,    1,   12,    3,    0,    0,    0,    0],
       [   2,  120,   35,    6,  290,   14, 2134,  506, 2637,   14]])>
get_vocabulary 방법은 텍스트로 다시 토큰 ID를 변환 할 수 있습니다 :
input_vocab = np.array(input_text_processor.get_vocabulary())
tokens = input_vocab[example_tokens[0].numpy()]
' '.join(tokens)
'[START] no se lo que quiero . [END] '
반환된 토큰 ID는 0으로 채워집니다. 이것은 쉽게 마스크로 바뀔 수 있습니다.
plt.subplot(1, 2, 1)
plt.pcolormesh(example_tokens)
plt.title('Token IDs')

plt.subplot(1, 2, 2)
plt.pcolormesh(example_tokens != 0)
plt.title('Mask')
Text(0.5, 1.0, 'Mask')

인코더/디코더 모델
다음 다이어그램은 모델의 개요를 보여줍니다. 각 시간 단계에서 디코더의 출력은 인코딩된 입력에 대한 가중치 합과 결합되어 다음 단어를 예측합니다. 도표와 공식 출신 루옹의 논문 .

시작하기 전에 모델에 대한 몇 가지 상수를 정의하십시오.
embedding_dim = 256
units = 1024
인코더
위 다이어그램의 파란색 부분인 인코더를 빌드하는 것으로 시작합니다.
인코더:
- (에서 토큰 ID 목록을 취
input_text_processor). - 각 토큰에 대한 내장 벡터 조회 (A 사용
layers.Embedding). - 새로운 시퀀스에 묻어 (A 사용하여 처리
layers.GRU). - 보고:
- 처리된 시퀀스입니다. 이것은 주의 헤드로 전달됩니다.
- 내부 상태입니다. 디코더를 초기화하는 데 사용됩니다.
class Encoder(tf.keras.layers.Layer):
  def __init__(self, input_vocab_size, embedding_dim, enc_units):
    super(Encoder, self).__init__()
    self.enc_units = enc_units
    self.input_vocab_size = input_vocab_size

    # The embedding layer converts tokens to vectors
    self.embedding = tf.keras.layers.Embedding(self.input_vocab_size,
                                               embedding_dim)

    # The GRU RNN layer processes those vectors sequentially.
    self.gru = tf.keras.layers.GRU(self.enc_units,
                                   # Return the sequence and state
                                   return_sequences=True,
                                   return_state=True,
                                   recurrent_initializer='glorot_uniform')

  def call(self, tokens, state=None):
    shape_checker = ShapeChecker()
    shape_checker(tokens, ('batch', 's'))

    # 2. The embedding layer looks up the embedding for each token.
    vectors = self.embedding(tokens)
    shape_checker(vectors, ('batch', 's', 'embed_dim'))

    # 3. The GRU processes the embedding sequence.
    #    output shape: (batch, s, enc_units)
    #    state shape: (batch, enc_units)
    output, state = self.gru(vectors, initial_state=state)
    shape_checker(output, ('batch', 's', 'enc_units'))
    shape_checker(state, ('batch', 'enc_units'))

    # 4. Returns the new sequence and its state.
    return output, state
이것이 지금까지 어떻게 일치하는지입니다.
# Convert the input text to tokens.
example_tokens = input_text_processor(example_input_batch)

# Encode the input sequence.
encoder = Encoder(input_text_processor.vocabulary_size(),
                  embedding_dim, units)
example_enc_output, example_enc_state = encoder(example_tokens)

print(f'Input batch, shape (batch): {example_input_batch.shape}')
print(f'Input batch tokens, shape (batch, s): {example_tokens.shape}')
print(f'Encoder output, shape (batch, s, units): {example_enc_output.shape}')
print(f'Encoder state, shape (batch, units): {example_enc_state.shape}')
Input batch, shape (batch): (64,)
Input batch tokens, shape (batch, s): (64, 14)
Encoder output, shape (batch, s, units): (64, 14, 1024)
Encoder state, shape (batch, units): (64, 1024)
인코더는 해당 상태를 디코더 초기화에 사용할 수 있도록 내부 상태를 반환합니다.
RNN이 여러 호출을 통해 시퀀스를 처리할 수 있도록 상태를 반환하는 것도 일반적입니다. 디코더를 만드는 과정을 더 많이 보게 될 것입니다.
주의 머리
디코더는 주의를 사용하여 입력 시퀀스의 일부에 선택적으로 초점을 맞춥니다. Attention은 각 예제에 대한 입력으로 벡터 시퀀스를 사용하고 각 예제에 대해 "attention" 벡터를 반환합니다. 이 관심 층은 비슷 layers.GlobalAveragePoling1D 하지만 관심 층은 가중 평균을 행한다.
작동 방식을 살펴보겠습니다.


어디에:
- \(s\) 인코더 인덱스입니다.
- \(t\) 디코더 인덱스이다.
- \(\alpha_{ts}\) 관심의 무게입니다.
- \(h_s\) 인코더의 출력 시퀀스 (주목 "키"및 변압기 용어 "값")에 참가하고있다.
- \(h_t\) 시퀀스 (변압기 용어 주목 "쿼리")에 참석 디코더 상태이다.
- \(c_t\) 얻어진 콘텍스트 벡터이다.
- \(a_t\) 은 "컨텍스트"및 "쿼리"조합 최종 출력이다.
방정식:
- 관심 무게, 계산 \(\alpha_{ts}\)인코더의 출력 시퀀스에 걸쳐 softmax를 같이.
- 인코더 출력의 가중치 합으로 컨텍스트 벡터를 계산합니다.
마지막은이다 \(score\) 기능. 그 작업은 각 키-쿼리 쌍에 대한 스칼라 로짓 점수를 계산하는 것입니다. 두 가지 일반적인 접근 방식이 있습니다.

이 튜토리얼은 사용 Bahdanau의 첨가제 관심을 . TensorFlow은 모두 구현 포함 layers.Attention 및 layers.AdditiveAttention . 핸들 아래 클래스의 쌍 가중치 행렬 layers.Dense 층, 및 내장 구현을 요구한다.
class BahdanauAttention(tf.keras.layers.Layer):
  def __init__(self, units):
    super().__init__()
    # For Eqn. (4), the  Bahdanau attention
    self.W1 = tf.keras.layers.Dense(units, use_bias=False)
    self.W2 = tf.keras.layers.Dense(units, use_bias=False)

    self.attention = tf.keras.layers.AdditiveAttention()

  def call(self, query, value, mask):
    shape_checker = ShapeChecker()
    shape_checker(query, ('batch', 't', 'query_units'))
    shape_checker(value, ('batch', 's', 'value_units'))
    shape_checker(mask, ('batch', 's'))

    # From Eqn. (4), `W1@ht`.
    w1_query = self.W1(query)
    shape_checker(w1_query, ('batch', 't', 'attn_units'))

    # From Eqn. (4), `W2@hs`.
    w2_key = self.W2(value)
    shape_checker(w2_key, ('batch', 's', 'attn_units'))

    query_mask = tf.ones(tf.shape(query)[:-1], dtype=bool)
    value_mask = mask

    context_vector, attention_weights = self.attention(
        inputs = [w1_query, value, w2_key],
        mask=[query_mask, value_mask],
        return_attention_scores = True,
    )
    shape_checker(context_vector, ('batch', 't', 'value_units'))
    shape_checker(attention_weights, ('batch', 't', 's'))

    return context_vector, attention_weights
주의 레이어 테스트
크리에이트 BahdanauAttention 레이어를 :
attention_layer = BahdanauAttention(units)
이 레이어는 3개의 입력을 받습니다:
-
query:이 나중에, 디코더에 의해 생성됩니다. -
value이 인코더의 출력됩니다. -
mask: 패딩을 제외하려면example_tokens != 0
(example_tokens != 0).shape
TensorShape([64, 14])
어텐션 레이어의 벡터화된 구현을 통해 쿼리 벡터 시퀀스의 배치와 값 벡터 시퀀스의 배치를 전달할 수 있습니다. 결과는 다음과 같습니다.
- 쿼리 크기의 결과 벡터 시퀀스 배치입니다.
- 일괄주의는 크기, 매핑
(query_length, value_length).
# Later, the decoder will generate this attention query
example_attention_query = tf.random.normal(shape=[len(example_tokens), 2, 10])

# Attend to the encoded tokens

context_vector, attention_weights = attention_layer(
    query=example_attention_query,
    value=example_enc_output,
    mask=(example_tokens != 0))

print(f'Attention result shape: (batch_size, query_seq_length, units):           {context_vector.shape}')
print(f'Attention weights shape: (batch_size, query_seq_length, value_seq_length): {attention_weights.shape}')
Attention result shape: (batch_size, query_seq_length, units):           (64, 2, 1024)
Attention weights shape: (batch_size, query_seq_length, value_seq_length): (64, 2, 14)
관심 가중치 합계는해야 1.0 각 시퀀스.
여기에서 시퀀스에서 관심의 무게입니다 t=0 :
plt.subplot(1, 2, 1)
plt.pcolormesh(attention_weights[:, 0, :])
plt.title('Attention weights')

plt.subplot(1, 2, 2)
plt.pcolormesh(example_tokens != 0)
plt.title('Mask')
Text(0.5, 1.0, 'Mask')

때문에 작은 임의 초기의 관심 가중치는 모든 가까운 1/(sequence_length) . 단일 순서의 무게에 확대하면 모델이 확장 배우고, 활용할 수있는 몇 가지 작은 변화가 있음을 알 수있다.
attention_weights.shape
TensorShape([64, 2, 14])
attention_slice = attention_weights[0, 0].numpy()
attention_slice = attention_slice[attention_slice != 0]
plt.suptitle('Attention weights for one sequence')

plt.figure(figsize=(12, 6))
a1 = plt.subplot(1, 2, 1)
plt.bar(range(len(attention_slice)), attention_slice)
# freeze the xlim
plt.xlim(plt.xlim())
plt.xlabel('Attention weights')

a2 = plt.subplot(1, 2, 2)
plt.bar(range(len(attention_slice)), attention_slice)
plt.xlabel('Attention weights, zoomed')

# zoom in
top = max(a1.get_ylim())
zoom = 0.85*top
a2.set_ylim([0.90*top, top])
a1.plot(a1.get_xlim(), [zoom, zoom], color='k')
[<matplotlib.lines.Line2D at 0x7fb42c5b1090>]
<Figure size 432x288 with 0 Axes>

디코더
디코더의 작업은 다음 출력 토큰에 대한 예측을 생성하는 것입니다.
- 디코더는 완전한 인코더 출력을 수신합니다.
- RNN을 사용하여 지금까지 생성한 내용을 추적합니다.
- RNN 출력을 인코더의 출력에 대한 주의에 대한 쿼리로 사용하여 컨텍스트 벡터를 생성합니다.
- 그것은 "주의 벡터"를 생성하기 위해 식 3(아래)을 사용하여 RNN 출력과 컨텍스트 벡터를 결합합니다.
- "주의 벡터"를 기반으로 다음 토큰에 대한 로짓 예측을 생성합니다.

여기입니다 Decoder 클래스와 그 초기화. 이니셜라이저는 필요한 모든 레이어를 생성합니다.
class Decoder(tf.keras.layers.Layer):
  def __init__(self, output_vocab_size, embedding_dim, dec_units):
    super(Decoder, self).__init__()
    self.dec_units = dec_units
    self.output_vocab_size = output_vocab_size
    self.embedding_dim = embedding_dim

    # For Step 1. The embedding layer convets token IDs to vectors
    self.embedding = tf.keras.layers.Embedding(self.output_vocab_size,
                                               embedding_dim)

    # For Step 2. The RNN keeps track of what's been generated so far.
    self.gru = tf.keras.layers.GRU(self.dec_units,
                                   return_sequences=True,
                                   return_state=True,
                                   recurrent_initializer='glorot_uniform')

    # For step 3. The RNN output will be the query for the attention layer.
    self.attention = BahdanauAttention(self.dec_units)

    # For step 4. Eqn. (3): converting `ct` to `at`
    self.Wc = tf.keras.layers.Dense(dec_units, activation=tf.math.tanh,
                                    use_bias=False)

    # For step 5. This fully connected layer produces the logits for each
    # output token.
    self.fc = tf.keras.layers.Dense(self.output_vocab_size)
call 이 계층에 대한 방법이 걸리고 여러 텐서를 반환합니다. 그것들을 간단한 컨테이너 클래스로 구성하십시오:
class DecoderInput(typing.NamedTuple):
  new_tokens: Any
  enc_output: Any
  mask: Any

class DecoderOutput(typing.NamedTuple):
  logits: Any
  attention_weights: Any
여기의 구현 call 방법은 :
def call(self,
         inputs: DecoderInput,
         state=None) -> Tuple[DecoderOutput, tf.Tensor]:
  shape_checker = ShapeChecker()
  shape_checker(inputs.new_tokens, ('batch', 't'))
  shape_checker(inputs.enc_output, ('batch', 's', 'enc_units'))
  shape_checker(inputs.mask, ('batch', 's'))

  if state is not None:
    shape_checker(state, ('batch', 'dec_units'))

  # Step 1. Lookup the embeddings
  vectors = self.embedding(inputs.new_tokens)
  shape_checker(vectors, ('batch', 't', 'embedding_dim'))

  # Step 2. Process one step with the RNN
  rnn_output, state = self.gru(vectors, initial_state=state)

  shape_checker(rnn_output, ('batch', 't', 'dec_units'))
  shape_checker(state, ('batch', 'dec_units'))

  # Step 3. Use the RNN output as the query for the attention over the
  # encoder output.
  context_vector, attention_weights = self.attention(
      query=rnn_output, value=inputs.enc_output, mask=inputs.mask)
  shape_checker(context_vector, ('batch', 't', 'dec_units'))
  shape_checker(attention_weights, ('batch', 't', 's'))

  # Step 4. Eqn. (3): Join the context_vector and rnn_output
  #     [ct; ht] shape: (batch t, value_units + query_units)
  context_and_rnn_output = tf.concat([context_vector, rnn_output], axis=-1)

  # Step 4. Eqn. (3): `at = tanh(Wc@[ct; ht])`
  attention_vector = self.Wc(context_and_rnn_output)
  shape_checker(attention_vector, ('batch', 't', 'dec_units'))

  # Step 5. Generate logit predictions:
  logits = self.fc(attention_vector)
  shape_checker(logits, ('batch', 't', 'output_vocab_size'))

  return DecoderOutput(logits, attention_weights), state
Decoder.call = call
인코더는 RNN 단일 호출로는 전체 입력 순서를 처리합니다. 디코더의이 구현은 효율적인 훈련뿐만 아니라 그렇게 할 수 있습니다. 그러나 이 자습서는 몇 가지 이유로 루프에서 디코더를 실행합니다.
- 유연성: 루프를 작성하면 교육 절차를 직접 제어할 수 있습니다.
- 선명도 : 그것은 마스킹 트릭을하고 사용하는 것이 가능
layers.RNN, 또는tfa.seq2seq단일 통화로이 모든 것을 포장하는 API를. 그러나 루프로 작성하는 것이 더 명확할 수 있습니다.- 루프 무료 교육이 시연되는 텍스트 생성 tutiorial.
이제 이 디코더를 사용해 보십시오.
decoder = Decoder(output_text_processor.vocabulary_size(),
                  embedding_dim, units)
디코더는 4개의 입력을 받습니다.
-
new_tokens- 마지막 토큰이 생성됩니다. 와 디코더 초기화"[START]"토큰. -
enc_output-에 의해 생성 된Encoder. -
mask- 부울 텐서 어디 나타내는tokens != 0 -
state- 이전state디코더 출력 (RNN의 디코더의 내부 상태). 통과하지None에 다시 제로 초기화. 원본 논문은 인코더의 최종 RNN 상태에서 초기화합니다.
# Convert the target sequence, and collect the "[START]" tokens
example_output_tokens = output_text_processor(example_target_batch)

start_index = output_text_processor.get_vocabulary().index('[START]')
first_token = tf.constant([[start_index]] * example_output_tokens.shape[0])
# Run the decoder
dec_result, dec_state = decoder(
    inputs = DecoderInput(new_tokens=first_token,
                          enc_output=example_enc_output,
                          mask=(example_tokens != 0)),
    state = example_enc_state
)

print(f'logits shape: (batch_size, t, output_vocab_size) {dec_result.logits.shape}')
print(f'state shape: (batch_size, dec_units) {dec_state.shape}')
logits shape: (batch_size, t, output_vocab_size) (64, 1, 5000)
state shape: (batch_size, dec_units) (64, 1024)
로지츠에 따라 토큰을 샘플링합니다.
sampled_token = tf.random.categorical(dec_result.logits[:, 0, :], num_samples=1)
토큰을 출력의 첫 번째 단어로 디코딩합니다.
vocab = np.array(output_text_processor.get_vocabulary())
first_word = vocab[sampled_token.numpy()]
first_word[:5]
array([['already'],
       ['plants'],
       ['pretended'],
       ['convince'],
       ['square']], dtype='<U16')
이제 디코더를 사용하여 두 번째 로짓 세트를 생성합니다.
- 같은 패스
enc_output하고mask, 이것들은 변경되지 않았습니다. - 는 다음과 같이 토큰을 샘플링 한 패스
new_tokens. - 패스
decoder_stateRNN가 지난 시간에 중단 한 부분의 메모리를 계속 때문에, 디코더가 마지막으로 반환합니다.
dec_result, dec_state = decoder(
    DecoderInput(sampled_token,
                 example_enc_output,
                 mask=(example_tokens != 0)),
    state=dec_state)
sampled_token = tf.random.categorical(dec_result.logits[:, 0, :], num_samples=1)
first_word = vocab[sampled_token.numpy()]
first_word[:5]
array([['nap'],
       ['mean'],
       ['worker'],
       ['passage'],
       ['baked']], dtype='<U16')
훈련
이제 모든 모델 구성 요소가 있으므로 모델 학습을 시작할 차례입니다. 너는 필요할거야:
- 최적화를 수행하기 위한 손실 함수 및 옵티마이저.
- 각 입력/대상 배치에 대한 모델 업데이트 방법을 정의하는 훈련 단계 함수입니다.
- 훈련을 구동하고 체크포인트를 저장하는 훈련 루프.
손실 함수 정의
class MaskedLoss(tf.keras.losses.Loss):
  def __init__(self):
    self.name = 'masked_loss'
    self.loss = tf.keras.losses.SparseCategoricalCrossentropy(
        from_logits=True, reduction='none')

  def __call__(self, y_true, y_pred):
    shape_checker = ShapeChecker()
    shape_checker(y_true, ('batch', 't'))
    shape_checker(y_pred, ('batch', 't', 'logits'))

    # Calculate the loss for each item in the batch.
    loss = self.loss(y_true, y_pred)
    shape_checker(loss, ('batch', 't'))

    # Mask off the losses on padding.
    mask = tf.cast(y_true != 0, tf.float32)
    shape_checker(mask, ('batch', 't'))
    loss *= mask

    # Return the total.
    return tf.reduce_sum(loss)
교육 단계 구현
모델 클래스로 시작, 교육 과정은로 구현됩니다 train_step 이 모델에 대한 방법. 페이지의 사용자 정의 맞게 자세한 내용은.
여기 train_step 방법은 래퍼입니다 _train_step 나중에 올 것이다 구현. 이 래퍼에 켜거나 끌 수있는 스위치를 포함 tf.function 디버깅을 쉽게하기 위해, 컴파일.
class TrainTranslator(tf.keras.Model):
  def __init__(self, embedding_dim, units,
               input_text_processor,
               output_text_processor,
               use_tf_function=True):
    super().__init__()
    # Build the encoder and decoder
    encoder = Encoder(input_text_processor.vocabulary_size(),
                      embedding_dim, units)
    decoder = Decoder(output_text_processor.vocabulary_size(),
                      embedding_dim, units)

    self.encoder = encoder
    self.decoder = decoder
    self.input_text_processor = input_text_processor
    self.output_text_processor = output_text_processor
    self.use_tf_function = use_tf_function
    self.shape_checker = ShapeChecker()

  def train_step(self, inputs):
    self.shape_checker = ShapeChecker()
    if self.use_tf_function:
      return self._tf_train_step(inputs)
    else:
      return self._train_step(inputs)
전반적 대한 구현 Model.train_step 메서드는 다음과 같이이다 :
- (A)의 일괄 수신
input_text, target_text로부터tf.data.Dataset. - 이러한 원시 텍스트 입력을 토큰 임베딩 및 마스크로 변환합니다.
- 온 인코더 실행
input_tokens얻가하는encoder_output및encoder_state. - 디코더 상태 및 손실을 초기화합니다.
- 오버 루프
target_tokens:- 디코더를 한 번에 한 단계씩 실행합니다.
- 각 단계에 대한 손실을 계산합니다.
- 평균 손실을 누적합니다.
- 손실의 기울기를 계산하고 모델의 업데이트를 적용하기 위해 최적화를 사용
trainable_variables.
_preprocess 있어서, 아래의 추가 구현은 # 1, # 2 단계 :
def _preprocess(self, input_text, target_text):
  self.shape_checker(input_text, ('batch',))
  self.shape_checker(target_text, ('batch',))

  # Convert the text to token IDs
  input_tokens = self.input_text_processor(input_text)
  target_tokens = self.output_text_processor(target_text)
  self.shape_checker(input_tokens, ('batch', 's'))
  self.shape_checker(target_tokens, ('batch', 't'))

  # Convert IDs to masks.
  input_mask = input_tokens != 0
  self.shape_checker(input_mask, ('batch', 's'))

  target_mask = target_tokens != 0
  self.shape_checker(target_mask, ('batch', 't'))

  return input_tokens, input_mask, target_tokens, target_mask
TrainTranslator._preprocess = _preprocess
_train_step 아래에 추가 방법은 실제로 디코더 실행 제외한 나머지 처리 단계 :
def _train_step(self, inputs):
  input_text, target_text = inputs

  (input_tokens, input_mask,
   target_tokens, target_mask) = self._preprocess(input_text, target_text)

  max_target_length = tf.shape(target_tokens)[1]

  with tf.GradientTape() as tape:
    # Encode the input
    enc_output, enc_state = self.encoder(input_tokens)
    self.shape_checker(enc_output, ('batch', 's', 'enc_units'))
    self.shape_checker(enc_state, ('batch', 'enc_units'))

    # Initialize the decoder's state to the encoder's final state.
    # This only works if the encoder and decoder have the same number of
    # units.
    dec_state = enc_state
    loss = tf.constant(0.0)

    for t in tf.range(max_target_length-1):
      # Pass in two tokens from the target sequence:
      # 1. The current input to the decoder.
      # 2. The target for the decoder's next prediction.
      new_tokens = target_tokens[:, t:t+2]
      step_loss, dec_state = self._loop_step(new_tokens, input_mask,
                                             enc_output, dec_state)
      loss = loss + step_loss

    # Average the loss over all non padding tokens.
    average_loss = loss / tf.reduce_sum(tf.cast(target_mask, tf.float32))

  # Apply an optimization step
  variables = self.trainable_variables
  gradients = tape.gradient(average_loss, variables)
  self.optimizer.apply_gradients(zip(gradients, variables))

  # Return a dict mapping metric names to current value
  return {'batch_loss': average_loss}
TrainTranslator._train_step = _train_step
_loop_step 방법은, 아래에 추가의 디코더를 실행하고 점진적인 손실 및 새로운 디코더 상태 (계산 dec_state ).
def _loop_step(self, new_tokens, input_mask, enc_output, dec_state):
  input_token, target_token = new_tokens[:, 0:1], new_tokens[:, 1:2]

  # Run the decoder one step.
  decoder_input = DecoderInput(new_tokens=input_token,
                               enc_output=enc_output,
                               mask=input_mask)

  dec_result, dec_state = self.decoder(decoder_input, state=dec_state)
  self.shape_checker(dec_result.logits, ('batch', 't1', 'logits'))
  self.shape_checker(dec_result.attention_weights, ('batch', 't1', 's'))
  self.shape_checker(dec_state, ('batch', 'dec_units'))

  # `self.loss` returns the total for non-padded tokens
  y = target_token
  y_pred = dec_result.logits
  step_loss = self.loss(y, y_pred)

  return step_loss, dec_state
TrainTranslator._loop_step = _loop_step
훈련 단계 테스트
빌드 TrainTranslator 하고, 사용 훈련을 위해 그것을 구성 Model.compile 방법 :
translator = TrainTranslator(
    embedding_dim, units,
    input_text_processor=input_text_processor,
    output_text_processor=output_text_processor,
    use_tf_function=False)

# Configure the loss and optimizer
translator.compile(
    optimizer=tf.optimizers.Adam(),
    loss=MaskedLoss(),
)
아웃 테스트 train_step . 이와 같은 텍스트 모델의 경우 손실은 다음 근처에서 시작되어야 합니다.
np.log(output_text_processor.vocabulary_size())
8.517193191416236
%%time
for n in range(10):
  print(translator.train_step([example_input_batch, example_target_batch]))
print()
{'batch_loss': <tf.Tensor: shape=(), dtype=float32, numpy=7.5849695>}
{'batch_loss': <tf.Tensor: shape=(), dtype=float32, numpy=7.55271>}
{'batch_loss': <tf.Tensor: shape=(), dtype=float32, numpy=7.4929113>}
{'batch_loss': <tf.Tensor: shape=(), dtype=float32, numpy=7.3296022>}
{'batch_loss': <tf.Tensor: shape=(), dtype=float32, numpy=6.80437>}
{'batch_loss': <tf.Tensor: shape=(), dtype=float32, numpy=5.000246>}
{'batch_loss': <tf.Tensor: shape=(), dtype=float32, numpy=5.8740363>}
{'batch_loss': <tf.Tensor: shape=(), dtype=float32, numpy=4.794589>}
{'batch_loss': <tf.Tensor: shape=(), dtype=float32, numpy=4.3175836>}
{'batch_loss': <tf.Tensor: shape=(), dtype=float32, numpy=4.108163>}

CPU times: user 5.49 s, sys: 0 ns, total: 5.49 s
Wall time: 5.45 s
그것이없이 디버깅을 쉽게하는 동안 tf.function 는 성능 향상을 제공한다. 그래서 이제 것을 _train_step 방법이 작동되면, 시도 tf.function -wrapped _tf_train_step 교육하면서 성능을 극대화하기 위해 :
@tf.function(input_signature=[[tf.TensorSpec(dtype=tf.string, shape=[None]),
                               tf.TensorSpec(dtype=tf.string, shape=[None])]])
def _tf_train_step(self, inputs):
  return self._train_step(inputs)
TrainTranslator._tf_train_step = _tf_train_step
translator.use_tf_function = True
첫 번째 호출은 함수를 추적하기 때문에 느릴 것입니다.
translator.train_step([example_input_batch, example_target_batch])
2021-12-04 12:09:48.074769: E tensorflow/core/grappler/optimizers/meta_optimizer.cc:812] function_optimizer failed: INVALID_ARGUMENT: Input 6 of node gradient_tape/while/while_grad/body/_531/gradient_tape/while/gradients/while/decoder_1/gru_3/PartitionedCall_grad/PartitionedCall was passed variant from gradient_tape/while/while_grad/body/_531/gradient_tape/while/gradients/while/decoder_1/gru_3/PartitionedCall_grad/TensorListPopBack_2:1 incompatible with expected float.
2021-12-04 12:09:48.180156: E tensorflow/core/grappler/optimizers/meta_optimizer.cc:812] layout failed: OUT_OF_RANGE: src_output = 25, but num_outputs is only 25
2021-12-04 12:09:48.285846: E tensorflow/core/grappler/optimizers/meta_optimizer.cc:812] tfg_optimizer{} failed: INVALID_ARGUMENT: Input 6 of node gradient_tape/while/while_grad/body/_531/gradient_tape/while/gradients/while/decoder_1/gru_3/PartitionedCall_grad/PartitionedCall was passed variant from gradient_tape/while/while_grad/body/_531/gradient_tape/while/gradients/while/decoder_1/gru_3/PartitionedCall_grad/TensorListPopBack_2:1 incompatible with expected float.
    when importing GraphDef to MLIR module in GrapplerHook
2021-12-04 12:09:48.307794: E tensorflow/core/grappler/optimizers/meta_optimizer.cc:812] function_optimizer failed: INVALID_ARGUMENT: Input 6 of node gradient_tape/while/while_grad/body/_531/gradient_tape/while/gradients/while/decoder_1/gru_3/PartitionedCall_grad/PartitionedCall was passed variant from gradient_tape/while/while_grad/body/_531/gradient_tape/while/gradients/while/decoder_1/gru_3/PartitionedCall_grad/TensorListPopBack_2:1 incompatible with expected float.
2021-12-04 12:09:48.425447: W tensorflow/core/common_runtime/process_function_library_runtime.cc:866] Ignoring multi-device function optimization failure: INVALID_ARGUMENT: Input 1 of node while/body/_1/while/TensorListPushBack_56 was passed float from while/body/_1/while/decoder_1/gru_3/PartitionedCall:6 incompatible with expected variant.
{'batch_loss': <tf.Tensor: shape=(), dtype=float32, numpy=4.045638>}
그러나 그 후 빠르게 열망에 비해 일반적으로 2 ~ 3 배의 train_step 방법 :
%%time
for n in range(10):
  print(translator.train_step([example_input_batch, example_target_batch]))
print()
{'batch_loss': <tf.Tensor: shape=(), dtype=float32, numpy=4.1098256>}
{'batch_loss': <tf.Tensor: shape=(), dtype=float32, numpy=4.169871>}
{'batch_loss': <tf.Tensor: shape=(), dtype=float32, numpy=4.139249>}
{'batch_loss': <tf.Tensor: shape=(), dtype=float32, numpy=4.0410743>}
{'batch_loss': <tf.Tensor: shape=(), dtype=float32, numpy=3.9664454>}
{'batch_loss': <tf.Tensor: shape=(), dtype=float32, numpy=3.895707>}
{'batch_loss': <tf.Tensor: shape=(), dtype=float32, numpy=3.8154407>}
{'batch_loss': <tf.Tensor: shape=(), dtype=float32, numpy=3.7583396>}
{'batch_loss': <tf.Tensor: shape=(), dtype=float32, numpy=3.6986444>}
{'batch_loss': <tf.Tensor: shape=(), dtype=float32, numpy=3.640298>}

CPU times: user 4.4 s, sys: 960 ms, total: 5.36 s
Wall time: 1.67 s
새 모델에 대한 좋은 테스트는 단일 배치의 입력에 과적합될 수 있는지 확인하는 것입니다. 시도해 보세요. 손실은 빠르게 0이 됩니다.
losses = []
for n in range(100):
  print('.', end='')
  logs = translator.train_step([example_input_batch, example_target_batch])
  losses.append(logs['batch_loss'].numpy())

print()
plt.plot(losses)
....................................................................................................
[<matplotlib.lines.Line2D at 0x7fb427edf210>]

이제 학습 단계가 작동한다고 확신했으므로 처음부터 학습할 모델의 새 복사본을 빌드합니다.
train_translator = TrainTranslator(
    embedding_dim, units,
    input_text_processor=input_text_processor,
    output_text_processor=output_text_processor)

# Configure the loss and optimizer
train_translator.compile(
    optimizer=tf.optimizers.Adam(),
    loss=MaskedLoss(),
)
모델 훈련
, 사용자 정의 교육 루프를 쓰는 구현하는 아무것도 잘못이있는 동안 Model.train_step 이전 섹션에서와 같이 방법을 실행할 수 있습니다 Model.fit 과 피하기는 모든 보일러 플레이트 코드를 재 작성.
이 튜토리얼 시대의 몇 만 기차는, 그래서 사용 callbacks.Callback 플로팅 배치 손실의 역사를 수집합니다 :
class BatchLogs(tf.keras.callbacks.Callback):
  def __init__(self, key):
    self.key = key
    self.logs = []

  def on_train_batch_end(self, n, logs):
    self.logs.append(logs[self.key])

batch_loss = BatchLogs('batch_loss')
train_translator.fit(dataset, epochs=3,
                     callbacks=[batch_loss])
Epoch 1/3
2021-12-04 12:10:11.617839: E tensorflow/core/grappler/optimizers/meta_optimizer.cc:812] function_optimizer failed: INVALID_ARGUMENT: Input 6 of node StatefulPartitionedCall/gradient_tape/while/while_grad/body/_589/gradient_tape/while/gradients/while/decoder_2/gru_5/PartitionedCall_grad/PartitionedCall was passed variant from StatefulPartitionedCall/gradient_tape/while/while_grad/body/_589/gradient_tape/while/gradients/while/decoder_2/gru_5/PartitionedCall_grad/TensorListPopBack_2:1 incompatible with expected float.
2021-12-04 12:10:11.737105: E tensorflow/core/grappler/optimizers/meta_optimizer.cc:812] layout failed: OUT_OF_RANGE: src_output = 25, but num_outputs is only 25
2021-12-04 12:10:11.855054: E tensorflow/core/grappler/optimizers/meta_optimizer.cc:812] tfg_optimizer{} failed: INVALID_ARGUMENT: Input 6 of node StatefulPartitionedCall/gradient_tape/while/while_grad/body/_589/gradient_tape/while/gradients/while/decoder_2/gru_5/PartitionedCall_grad/PartitionedCall was passed variant from StatefulPartitionedCall/gradient_tape/while/while_grad/body/_589/gradient_tape/while/gradients/while/decoder_2/gru_5/PartitionedCall_grad/TensorListPopBack_2:1 incompatible with expected float.
    when importing GraphDef to MLIR module in GrapplerHook
2021-12-04 12:10:11.878896: E tensorflow/core/grappler/optimizers/meta_optimizer.cc:812] function_optimizer failed: INVALID_ARGUMENT: Input 6 of node StatefulPartitionedCall/gradient_tape/while/while_grad/body/_589/gradient_tape/while/gradients/while/decoder_2/gru_5/PartitionedCall_grad/PartitionedCall was passed variant from StatefulPartitionedCall/gradient_tape/while/while_grad/body/_589/gradient_tape/while/gradients/while/decoder_2/gru_5/PartitionedCall_grad/TensorListPopBack_2:1 incompatible with expected float.
2021-12-04 12:10:12.004755: W tensorflow/core/common_runtime/process_function_library_runtime.cc:866] Ignoring multi-device function optimization failure: INVALID_ARGUMENT: Input 1 of node StatefulPartitionedCall/while/body/_59/while/TensorListPushBack_56 was passed float from StatefulPartitionedCall/while/body/_59/while/decoder_2/gru_5/PartitionedCall:6 incompatible with expected variant.
1859/1859 [==============================] - 349s 185ms/step - batch_loss: 2.0443
Epoch 2/3
1859/1859 [==============================] - 350s 188ms/step - batch_loss: 1.0382
Epoch 3/3
1859/1859 [==============================] - 343s 184ms/step - batch_loss: 0.8085
<keras.callbacks.History at 0x7fb42c3eda10>
plt.plot(batch_loss.logs)
plt.ylim([0, 3])
plt.xlabel('Batch #')
plt.ylabel('CE/token')
Text(0, 0.5, 'CE/token')

플롯에서 보이는 점프는 에포크 경계에 있습니다.
번역하다
이제 모델이 훈련되어, 전체 실행하는 기능을 구현 text => text 번역.
이 모델의 요구가 반전하려면 text => token IDs 매핑에 의해 제공 output_text_processor . 또한 특수 토큰의 ID를 알아야 합니다. 이것은 모두 새 클래스의 생성자에서 구현됩니다. 실제 번역 방법의 구현이 뒤따를 것입니다.
전반적으로 이것은 각 시간 단계에서 디코더에 대한 입력이 디코더의 마지막 예측의 샘플이라는 점을 제외하고는 훈련 루프와 유사합니다.
class Translator(tf.Module):

  def __init__(self, encoder, decoder, input_text_processor,
               output_text_processor):
    self.encoder = encoder
    self.decoder = decoder
    self.input_text_processor = input_text_processor
    self.output_text_processor = output_text_processor

    self.output_token_string_from_index = (
        tf.keras.layers.StringLookup(
            vocabulary=output_text_processor.get_vocabulary(),
            mask_token='',
            invert=True))

    # The output should never generate padding, unknown, or start.
    index_from_string = tf.keras.layers.StringLookup(
        vocabulary=output_text_processor.get_vocabulary(), mask_token='')
    token_mask_ids = index_from_string(['', '[UNK]', '[START]']).numpy()

    token_mask = np.zeros([index_from_string.vocabulary_size()], dtype=np.bool)
    token_mask[np.array(token_mask_ids)] = True
    self.token_mask = token_mask

    self.start_token = index_from_string(tf.constant('[START]'))
    self.end_token = index_from_string(tf.constant('[END]'))
translator = Translator(
    encoder=train_translator.encoder,
    decoder=train_translator.decoder,
    input_text_processor=input_text_processor,
    output_text_processor=output_text_processor,
)
/tmpfs/src/tf_docs_env/lib/python3.7/site-packages/ipykernel_launcher.py:21: DeprecationWarning: `np.bool` is a deprecated alias for the builtin `bool`. To silence this warning, use `bool` by itself. Doing this will not modify any behavior and is safe. If you specifically wanted the numpy scalar type, use `np.bool_` here.
Deprecated in NumPy 1.20; for more details and guidance: https://numpy.org/devdocs/release/1.20.0-notes.html#deprecations
토큰 ID를 텍스트로 변환
구현하는 첫 번째 방법은 tokens_to_text 사람이 읽을 수있는 텍스트 토큰 ID를로부터의 변환합니다.
def tokens_to_text(self, result_tokens):
  shape_checker = ShapeChecker()
  shape_checker(result_tokens, ('batch', 't'))
  result_text_tokens = self.output_token_string_from_index(result_tokens)
  shape_checker(result_text_tokens, ('batch', 't'))

  result_text = tf.strings.reduce_join(result_text_tokens,
                                       axis=1, separator=' ')
  shape_checker(result_text, ('batch'))

  result_text = tf.strings.strip(result_text)
  shape_checker(result_text, ('batch',))
  return result_text
Translator.tokens_to_text = tokens_to_text
임의의 토큰 ID를 입력하고 생성되는 내용을 확인합니다.
example_output_tokens = tf.random.uniform(
    shape=[5, 2], minval=0, dtype=tf.int64,
    maxval=output_text_processor.vocabulary_size())
translator.tokens_to_text(example_output_tokens).numpy()
array([b'vain mysteries', b'funny ham', b'drivers responding',
       b'mysterious ignoring', b'fashion votes'], dtype=object)
디코더 예측의 샘플
이 함수는 디코더의 로짓 출력을 가져오고 해당 분포에서 토큰 ID를 샘플링합니다.
def sample(self, logits, temperature):
  shape_checker = ShapeChecker()
  # 't' is usually 1 here.
  shape_checker(logits, ('batch', 't', 'vocab'))
  shape_checker(self.token_mask, ('vocab',))

  token_mask = self.token_mask[tf.newaxis, tf.newaxis, :]
  shape_checker(token_mask, ('batch', 't', 'vocab'), broadcast=True)

  # Set the logits for all masked tokens to -inf, so they are never chosen.
  logits = tf.where(self.token_mask, -np.inf, logits)

  if temperature == 0.0:
    new_tokens = tf.argmax(logits, axis=-1)
  else:
    logits = tf.squeeze(logits, axis=1)
    new_tokens = tf.random.categorical(logits/temperature,
                                        num_samples=1)

  shape_checker(new_tokens, ('batch', 't'))

  return new_tokens
Translator.sample = sample
일부 임의 입력에 대해 이 기능을 테스트 실행합니다.
example_logits = tf.random.normal([5, 1, output_text_processor.vocabulary_size()])
example_output_tokens = translator.sample(example_logits, temperature=1.0)
example_output_tokens
<tf.Tensor: shape=(5, 1), dtype=int64, numpy=
array([[4506],
       [3577],
       [2961],
       [4586],
       [ 944]])>
번역 루프 구현
다음은 텍스트에서 텍스트로의 번역 루프의 완전한 구현입니다.
이 구현은 사용하기 전에, 파이썬 목록에 결과를 수집 tf.concat 텐서로 가입 할 수 있습니다.
이 구현은 정적 밖으로 그래프를 언 롤링 max_length 반복. 이것은 파이썬에서 열망 실행에 문제가 없습니다.
def translate_unrolled(self,
                       input_text, *,
                       max_length=50,
                       return_attention=True,
                       temperature=1.0):
  batch_size = tf.shape(input_text)[0]
  input_tokens = self.input_text_processor(input_text)
  enc_output, enc_state = self.encoder(input_tokens)

  dec_state = enc_state
  new_tokens = tf.fill([batch_size, 1], self.start_token)

  result_tokens = []
  attention = []
  done = tf.zeros([batch_size, 1], dtype=tf.bool)

  for _ in range(max_length):
    dec_input = DecoderInput(new_tokens=new_tokens,
                             enc_output=enc_output,
                             mask=(input_tokens!=0))

    dec_result, dec_state = self.decoder(dec_input, state=dec_state)

    attention.append(dec_result.attention_weights)

    new_tokens = self.sample(dec_result.logits, temperature)

    # If a sequence produces an `end_token`, set it `done`
    done = done | (new_tokens == self.end_token)
    # Once a sequence is done it only produces 0-padding.
    new_tokens = tf.where(done, tf.constant(0, dtype=tf.int64), new_tokens)

    # Collect the generated tokens
    result_tokens.append(new_tokens)

    if tf.executing_eagerly() and tf.reduce_all(done):
      break

  # Convert the list of generates token ids to a list of strings.
  result_tokens = tf.concat(result_tokens, axis=-1)
  result_text = self.tokens_to_text(result_tokens)

  if return_attention:
    attention_stack = tf.concat(attention, axis=1)
    return {'text': result_text, 'attention': attention_stack}
  else:
    return {'text': result_text}
Translator.translate = translate_unrolled
간단한 입력으로 실행:
%%time
input_text = tf.constant([
    'hace mucho frio aqui.', # "It's really cold here."
    'Esta es mi vida.', # "This is my life.""
])

result = translator.translate(
    input_text = input_text)

print(result['text'][0].numpy().decode())
print(result['text'][1].numpy().decode())
print()
its a long cold here .
this is my life .

CPU times: user 165 ms, sys: 4.37 ms, total: 169 ms
Wall time: 164 ms
이 모델을 내보내려면 당신은이 방법을 포장해야합니다 tf.function . 이 기본 구현에는 다음과 같은 몇 가지 문제가 있습니다.
- 결과 그래프는 매우 커서 빌드, 저장 또는 로드하는 데 몇 초가 걸립니다.
- 항상 실행됩니다, 그래서 당신은 정적으로 전개 된 루프에서 분리 할 수 없습니다
max_length반복을 모두 출력 할 경우에도. 하지만 그렇다고 해도 열망 실행보다 약간 빠릅니다.
@tf.function(input_signature=[tf.TensorSpec(dtype=tf.string, shape=[None])])
def tf_translate(self, input_text):
  return self.translate(input_text)

Translator.tf_translate = tf_translate
실행 tf.function 컴파일하기 위해 일단 :
%%time
result = translator.tf_translate(
    input_text = input_text)
CPU times: user 18.8 s, sys: 0 ns, total: 18.8 s
Wall time: 18.7 s
%%time
result = translator.tf_translate(
    input_text = input_text)

print(result['text'][0].numpy().decode())
print(result['text'][1].numpy().decode())
print()
its very cold here .
this is my life .

CPU times: user 175 ms, sys: 0 ns, total: 175 ms
Wall time: 88 ms
[선택 사항] 기호 루프 사용
def translate_symbolic(self,
                       input_text,
                       *,
                       max_length=50,
                       return_attention=True,
                       temperature=1.0):
  shape_checker = ShapeChecker()
  shape_checker(input_text, ('batch',))

  batch_size = tf.shape(input_text)[0]

  # Encode the input
  input_tokens = self.input_text_processor(input_text)
  shape_checker(input_tokens, ('batch', 's'))

  enc_output, enc_state = self.encoder(input_tokens)
  shape_checker(enc_output, ('batch', 's', 'enc_units'))
  shape_checker(enc_state, ('batch', 'enc_units'))

  # Initialize the decoder
  dec_state = enc_state
  new_tokens = tf.fill([batch_size, 1], self.start_token)
  shape_checker(new_tokens, ('batch', 't1'))

  # Initialize the accumulators
  result_tokens = tf.TensorArray(tf.int64, size=1, dynamic_size=True)
  attention = tf.TensorArray(tf.float32, size=1, dynamic_size=True)
  done = tf.zeros([batch_size, 1], dtype=tf.bool)
  shape_checker(done, ('batch', 't1'))

  for t in tf.range(max_length):
    dec_input = DecoderInput(
        new_tokens=new_tokens, enc_output=enc_output, mask=(input_tokens != 0))

    dec_result, dec_state = self.decoder(dec_input, state=dec_state)

    shape_checker(dec_result.attention_weights, ('batch', 't1', 's'))
    attention = attention.write(t, dec_result.attention_weights)

    new_tokens = self.sample(dec_result.logits, temperature)
    shape_checker(dec_result.logits, ('batch', 't1', 'vocab'))
    shape_checker(new_tokens, ('batch', 't1'))

    # If a sequence produces an `end_token`, set it `done`
    done = done | (new_tokens == self.end_token)
    # Once a sequence is done it only produces 0-padding.
    new_tokens = tf.where(done, tf.constant(0, dtype=tf.int64), new_tokens)

    # Collect the generated tokens
    result_tokens = result_tokens.write(t, new_tokens)

    if tf.reduce_all(done):
      break

  # Convert the list of generated token ids to a list of strings.
  result_tokens = result_tokens.stack()
  shape_checker(result_tokens, ('t', 'batch', 't0'))
  result_tokens = tf.squeeze(result_tokens, -1)
  result_tokens = tf.transpose(result_tokens, [1, 0])
  shape_checker(result_tokens, ('batch', 't'))

  result_text = self.tokens_to_text(result_tokens)
  shape_checker(result_text, ('batch',))

  if return_attention:
    attention_stack = attention.stack()
    shape_checker(attention_stack, ('t', 'batch', 't1', 's'))

    attention_stack = tf.squeeze(attention_stack, 2)
    shape_checker(attention_stack, ('t', 'batch', 's'))

    attention_stack = tf.transpose(attention_stack, [1, 0, 2])
    shape_checker(attention_stack, ('batch', 't', 's'))

    return {'text': result_text, 'attention': attention_stack}
  else:
    return {'text': result_text}
Translator.translate = translate_symbolic
초기 구현에서는 파이썬 목록을 사용하여 출력을 수집했습니다. 이 용도는 tf.range 수 있도록 루프 반복자로 tf.autograph 루프를 변환 할 수 있습니다. 이 구현에서 가장 큰 변화는의 사용이다 tf.TensorArray 대신 파이썬 list 축적 텐서합니다. tf.TensorArray 그래프 모드 텐서의 가변 수를 수집 할 필요가있다.
즉시 실행을 통해 이 구현은 원본과 동등하게 수행됩니다.
%%time
result = translator.translate(
    input_text = input_text)

print(result['text'][0].numpy().decode())
print(result['text'][1].numpy().decode())
print()
its very cold here .
this is my life .

CPU times: user 175 ms, sys: 0 ns, total: 175 ms
Wall time: 170 ms
당신이 그것을 포장 때 tf.function 두 개의 차이를 알 수 있습니다.
@tf.function(input_signature=[tf.TensorSpec(dtype=tf.string, shape=[None])])
def tf_translate(self, input_text):
  return self.translate(input_text)

Translator.tf_translate = tf_translate
첫째, 그래프 작성이 훨씬 빠릅니다 (~ 10 배)가 생성되지 않기 때문에 max_iterations 모델의 사본을.
%%time
result = translator.tf_translate(
    input_text = input_text)
CPU times: user 1.79 s, sys: 0 ns, total: 1.79 s
Wall time: 1.77 s
두 번째: 컴파일된 함수는 루프를 벗어날 수 있기 때문에 작은 입력(이 예에서는 5배)에서 훨씬 더 빠릅니다.
%%time
result = translator.tf_translate(
    input_text = input_text)

print(result['text'][0].numpy().decode())
print(result['text'][1].numpy().decode())
print()
its very cold here .
this is my life .

CPU times: user 40.1 ms, sys: 0 ns, total: 40.1 ms
Wall time: 17.1 ms
프로세스 시각화
에 의해 반환 된 관심 무게 translate 은 각 출력 토큰을 생성 할 때 모델이 있었다 방법 쇼 "보고".
따라서 입력에 대한 주의의 합은 모두를 반환해야 합니다.
a = result['attention'][0]

print(np.sum(a, axis=-1))
[1.0000001 0.99999994 1. 0.99999994 1. 0.99999994]
다음은 첫 번째 예제의 첫 번째 출력 단계에 대한 주의 분포입니다. 주의가 훈련되지 않은 모델보다 훨씬 더 집중되어 있는지 확인하십시오.
_ = plt.bar(range(len(a[0, :])), a[0, :])

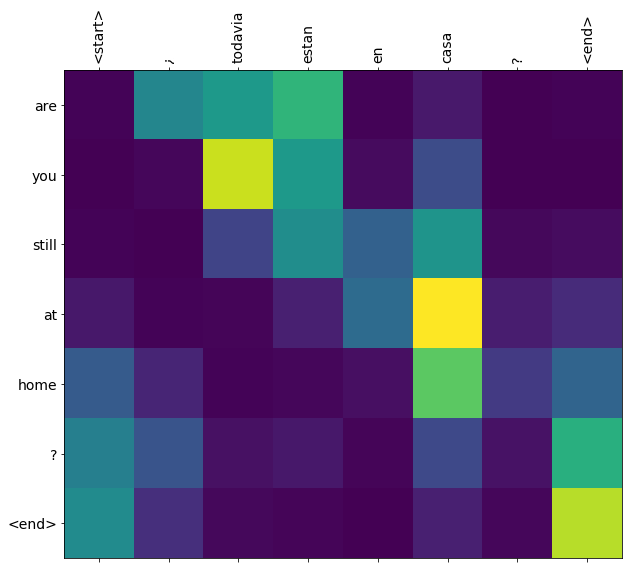
입력 단어와 출력 단어 사이에 대략적인 정렬이 있으므로 대각선 근처에 주의가 집중될 것으로 예상합니다.
plt.imshow(np.array(a), vmin=0.0)
<matplotlib.image.AxesImage at 0x7faf2886ced0>

다음은 더 나은 주의 플롯을 만드는 몇 가지 코드입니다.
레이블이 지정된 주의 플롯
def plot_attention(attention, sentence, predicted_sentence):
  sentence = tf_lower_and_split_punct(sentence).numpy().decode().split()
  predicted_sentence = predicted_sentence.numpy().decode().split() + ['[END]']
  fig = plt.figure(figsize=(10, 10))
  ax = fig.add_subplot(1, 1, 1)

  attention = attention[:len(predicted_sentence), :len(sentence)]

  ax.matshow(attention, cmap='viridis', vmin=0.0)

  fontdict = {'fontsize': 14}

  ax.set_xticklabels([''] + sentence, fontdict=fontdict, rotation=90)
  ax.set_yticklabels([''] + predicted_sentence, fontdict=fontdict)

  ax.xaxis.set_major_locator(ticker.MultipleLocator(1))
  ax.yaxis.set_major_locator(ticker.MultipleLocator(1))

  ax.set_xlabel('Input text')
  ax.set_ylabel('Output text')
  plt.suptitle('Attention weights')
i=0
plot_attention(result['attention'][i], input_text[i], result['text'][i])
/tmpfs/src/tf_docs_env/lib/python3.7/site-packages/ipykernel_launcher.py:14: UserWarning: FixedFormatter should only be used together with FixedLocator

/tmpfs/src/tf_docs_env/lib/python3.7/site-packages/ipykernel_launcher.py:15: UserWarning: FixedFormatter should only be used together with FixedLocator
  from ipykernel import kernelapp as app
몇 개의 문장을 더 번역하고 플롯하십시오:
%%time
three_input_text = tf.constant([
    # This is my life.
    'Esta es mi vida.',
    # Are they still home?
    '¿Todavía están en casa?',
    # Try to find out.'
    'Tratar de descubrir.',
])

result = translator.tf_translate(three_input_text)

for tr in result['text']:
  print(tr.numpy().decode())

print()
this is my life .
are you still at home ?
all about killed .

CPU times: user 78 ms, sys: 23 ms, total: 101 ms
Wall time: 23.1 ms
result['text']
<tf.Tensor: shape=(3,), dtype=string, numpy=
array([b'this is my life .', b'are you still at home ?',
       b'all about killed .'], dtype=object)>
i = 0
plot_attention(result['attention'][i], three_input_text[i], result['text'][i])
/tmpfs/src/tf_docs_env/lib/python3.7/site-packages/ipykernel_launcher.py:14: UserWarning: FixedFormatter should only be used together with FixedLocator

/tmpfs/src/tf_docs_env/lib/python3.7/site-packages/ipykernel_launcher.py:15: UserWarning: FixedFormatter should only be used together with FixedLocator
  from ipykernel import kernelapp as app

i = 1
plot_attention(result['attention'][i], three_input_text[i], result['text'][i])
/tmpfs/src/tf_docs_env/lib/python3.7/site-packages/ipykernel_launcher.py:14: UserWarning: FixedFormatter should only be used together with FixedLocator

/tmpfs/src/tf_docs_env/lib/python3.7/site-packages/ipykernel_launcher.py:15: UserWarning: FixedFormatter should only be used together with FixedLocator
  from ipykernel import kernelapp as app

i = 2
plot_attention(result['attention'][i], three_input_text[i], result['text'][i])
/tmpfs/src/tf_docs_env/lib/python3.7/site-packages/ipykernel_launcher.py:14: UserWarning: FixedFormatter should only be used together with FixedLocator

/tmpfs/src/tf_docs_env/lib/python3.7/site-packages/ipykernel_launcher.py:15: UserWarning: FixedFormatter should only be used together with FixedLocator
  from ipykernel import kernelapp as app

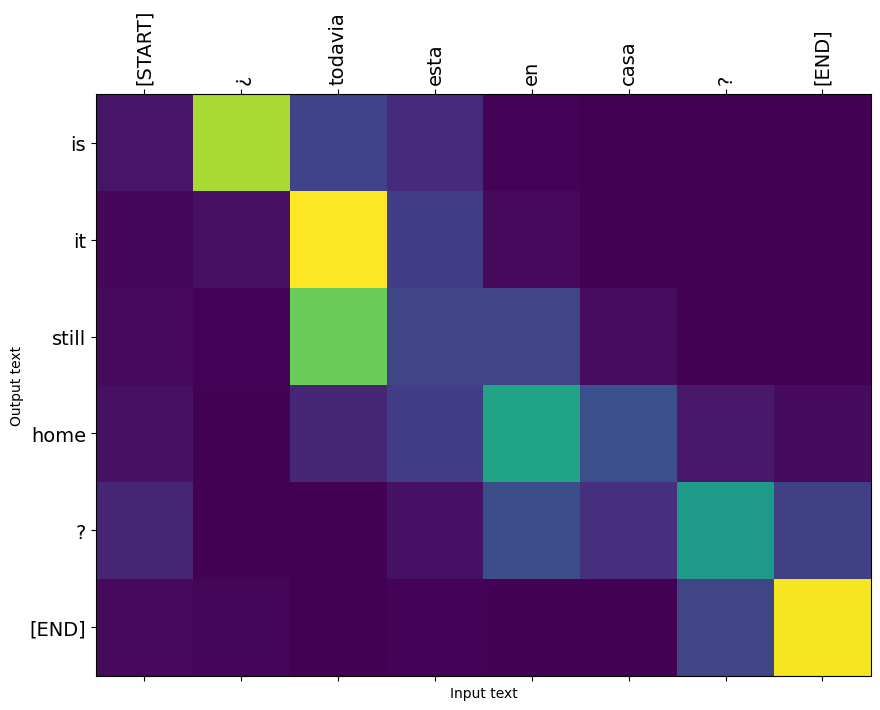
짧은 문장은 종종 잘 작동하지만 입력이 너무 길면 모델이 말 그대로 초점을 잃고 합리적인 예측을 제공하지 않습니다. 여기에는 두 가지 주요 이유가 있습니다.
- 모델은 모델의 예측에 관계없이 각 단계에서 올바른 토큰을 제공하는 교사 강제로 학습되었습니다. 때때로 자체 예측이 제공된다면 모델을 더욱 강력하게 만들 수 있습니다.
- 모델은 RNN 상태를 통해 이전 출력에만 액세스할 수 있습니다. RNN 상태가 손상되면 모델을 복구할 방법이 없습니다. 변압기는 인코더와 디코더에서 자기주의를 사용하여이 문제를 해결.
long_input_text = tf.constant([inp[-1]])

import textwrap
print('Expected output:\n', '\n'.join(textwrap.wrap(targ[-1])))
Expected output:
 If you want to sound like a native speaker, you must be willing to
practice saying the same sentence over and over in the same way that
banjo players practice the same phrase over and over until they can
play it correctly and at the desired tempo.
result = translator.tf_translate(long_input_text)

i = 0
plot_attention(result['attention'][i], long_input_text[i], result['text'][i])
_ = plt.suptitle('This never works')
/tmpfs/src/tf_docs_env/lib/python3.7/site-packages/ipykernel_launcher.py:14: UserWarning: FixedFormatter should only be used together with FixedLocator

/tmpfs/src/tf_docs_env/lib/python3.7/site-packages/ipykernel_launcher.py:15: UserWarning: FixedFormatter should only be used together with FixedLocator
  from ipykernel import kernelapp as app
내 보내다
당신은 일단 당신이 만족하는 모델은로 내보낼 수 tf.saved_model 를 만든이 파이썬 프로그램의 사용 외부합니다.
모델의 서브 클래스이기 때문에 tf.Module (를 통해 keras.Model ), 및 수출을위한 모든 기능이 컴파일되어 tf.function 모델은 깨끗하게 내 보내야합니다 tf.saved_model.save :
이제 함수는 사용하여 내보낼 수 있습니다 추적 된 것을 saved_model.save :
tf.saved_model.save(translator, 'translator',
                    signatures={'serving_default': translator.tf_translate})
2021-12-04 12:27:54.310890: W tensorflow/python/util/util.cc:368] Sets are not currently considered sequences, but this may change in the future, so consider avoiding using them.
WARNING:absl:Found untraced functions such as encoder_2_layer_call_fn, encoder_2_layer_call_and_return_conditional_losses, decoder_2_layer_call_fn, decoder_2_layer_call_and_return_conditional_losses, embedding_4_layer_call_fn while saving (showing 5 of 60). These functions will not be directly callable after loading.
INFO:tensorflow:Assets written to: translator/assets
INFO:tensorflow:Assets written to: translator/assets
reloaded = tf.saved_model.load('translator')
result = reloaded.tf_translate(three_input_text)
%%time
result = reloaded.tf_translate(three_input_text)

for tr in result['text']:
  print(tr.numpy().decode())

print()
this is my life .
are you still at home ?
find out about to find out .

CPU times: user 42.8 ms, sys: 7.69 ms, total: 50.5 ms
Wall time: 20 ms
다음 단계
- 다른 데이터 집합을 다운로드 프랑스어 독일어, 영어, 예를 들어, 번역과 실험에 영어.
- 더 큰 데이터 세트에서 훈련을 시도하거나 더 많은 에포크를 사용합니다.
- 보십시오 변압기 튜토리얼 유사한 번역 작업을 구현하는 대신 RNNs의 변압기 층을 사용한다. 이 버전은 또한 사용
text.BertTokenizerwordpiece의 토큰 화를 구현합니다. - 상기 봐 가지고 tensorflow_addons.seq2seq 시퀀스 모델에 시퀀스의 이런 종류를 구현합니다.
tfa.seq2seq패키지와 같은 높은 수준의 기능이 포함되어seq2seq.BeamSearchDecoder.