 View 在 TensorFlow.org 上查看 View 在 TensorFlow.org 上查看 |
 在 Google Colab 中运行 在 Google Colab 中运行 |
 在 GitHub 中查看源代码 在 GitHub 中查看源代码 |
 下载笔记本 下载笔记本 |
借助 tf.data API,您可以根据简单的可重用片段构建复杂的输入流水线。例如,图像模型的流水线可以聚合来自分布式文件系统中文件的数据,对每个图像应用随机扰动,并将随机选中的图像合并成一个批次进行训练。文本模型的流水线可能涉及从原始文本数据中提取符号,将提取的符号转换为带有查找表的嵌入向量标识符,并将不同长度的序列组合成一个批次。tf.data API 可以处理大量数据、从不同的数据格式读取数据和执行复杂的转换。
tf.data API 引入了一个 tf.data.Dataset 抽象,它表示一个元素序列,其中每个元素都由一个或多个组件组成。例如,在一个图像流水线中,一个元素可能是一个训练样本,有一对表示图像及其标签的张量组件。
您可以通过两种不同的方式创建数据集:
数据源从存储在内存中或存储在一个或多个文件中的数据构造
Dataset。数据转换从一个或多个
tf.data.Dataset对象构造数据集。
import tensorflow as tf
2022-12-14 21:17:59.484022: W tensorflow/compiler/xla/stream_executor/platform/default/dso_loader.cc:64] Could not load dynamic library 'libnvinfer.so.7'; dlerror: libnvinfer.so.7: cannot open shared object file: No such file or directory
2022-12-14 21:17:59.484116: W tensorflow/compiler/xla/stream_executor/platform/default/dso_loader.cc:64] Could not load dynamic library 'libnvinfer_plugin.so.7'; dlerror: libnvinfer_plugin.so.7: cannot open shared object file: No such file or directory
2022-12-14 21:17:59.484126: W tensorflow/compiler/tf2tensorrt/utils/py_utils.cc:38] TF-TRT Warning: Cannot dlopen some TensorRT libraries. If you would like to use Nvidia GPU with TensorRT, please make sure the missing libraries mentioned above are installed properly.
import pathlib
import os
import matplotlib.pyplot as plt
import pandas as pd
import numpy as np

np.set_printoptions(precision=4)
基本机制
要创建输入流水线,您必须从数据源开始。例如,要从内存中的数据构造一个 Dataset,您可以使用 tf.data.Dataset.from_tensors() 或 tf.data.Dataset.from_tensor_slices()。或者,如果您的输入数据以推荐的 TFRecord 格式存储在文件中,则您可以使用 tf.data.TFRecordDataset()。
有了一个 Dataset 对象之后,您可以通过链接 tf.data.Dataset 对象上的方法调用将其转换成一个新的 Dataset。例如,您可以应用逐元素转换(例如 Dataset.map)和多元素转换(例如 Dataset.batch)。有关完整的转换列表,请参阅 tf.data.Dataset 文档。
Dataset 对象是一个 Python 可迭代对象。这使得利用 for 循环使用它的元素成为可能:
dataset = tf.data.Dataset.from_tensor_slices([8, 3, 0, 8, 2, 1])
dataset
<TensorSliceDataset element_spec=TensorSpec(shape=(), dtype=tf.int32, name=None)>
for elem in dataset:
  print(elem.numpy())
8
3
0
8
2
1
或者使用 iter 显式创建一个 Python 迭代器,并利用 next 来使用它的元素:
it = iter(dataset)

print(next(it).numpy())
8
或者,还可以利用 reduce 转换来使用数据集元素,从而减少所有元素以生成单个结果。以下示例演示了如何使用 reduce 转换来计算整数数据集的和。
print(dataset.reduce(0, lambda state, value: state + value).numpy())
WARNING:tensorflow:From /tmpfs/src/tf_docs_env/lib/python3.9/site-packages/tensorflow/python/autograph/pyct/static_analysis/liveness.py:83: Analyzer.lamba_check (from tensorflow.python.autograph.pyct.static_analysis.liveness) is deprecated and will be removed after 2023-09-23.
Instructions for updating:
Lambda fuctions will be no more assumed to be used in the statement where they are used, or at least in the same block. https://github.com/tensorflow/tensorflow/issues/56089
22
数据集结构
数据集会生成一系列元素,其中每个元素都是组件的相同(嵌套)结构。结构的各个组件可以是可由 tf.TypeSpec 表示的任何类型,包括 tf.Tensor、tf.sparse.SparseTensor、tf.RaggedTensor、tf.TensorArray 或 tf.data.Dataset。
可用于表达元素的(嵌套)结构的 Python 构造包括 tuple、dict、NamedTuple 和 OrderedDict。特别要指出的是,list 不是用于表达数据集元素结构的有效构造。这是因为早期的 tf.data 用户坚决要求将 list 输入(例如,传递到 tf.data.Dataset.from_tensors 时)自动打包为张量,并将 list 输出(例如,用户定义函数的返回值)强制转换为 tuple。因此,如果您希望将 list 输入视为结构,则需要将其转换为 tuple,而如果要将 list 输出作为单个组件,则需要使用 tf.stack 将其显式打包。
Dataset.element_spec 属性允许您检查每个元素组件的类型。该属性会返回 tf.TypeSpec 对象与元素结构相匹配的嵌套结构,可以是单个组件、组件元组,或者组件的嵌套元组。例如:
dataset1 = tf.data.Dataset.from_tensor_slices(tf.random.uniform([4, 10]))

dataset1.element_spec
TensorSpec(shape=(10,), dtype=tf.float32, name=None)
dataset2 = tf.data.Dataset.from_tensor_slices(
   (tf.random.uniform([4]),
    tf.random.uniform([4, 100], maxval=100, dtype=tf.int32)))

dataset2.element_spec
(TensorSpec(shape=(), dtype=tf.float32, name=None),
 TensorSpec(shape=(100,), dtype=tf.int32, name=None))
dataset3 = tf.data.Dataset.zip((dataset1, dataset2))

dataset3.element_spec
(TensorSpec(shape=(10,), dtype=tf.float32, name=None),
 (TensorSpec(shape=(), dtype=tf.float32, name=None),
  TensorSpec(shape=(100,), dtype=tf.int32, name=None)))
# Dataset containing a sparse tensor.
dataset4 = tf.data.Dataset.from_tensors(tf.SparseTensor(indices=[[0, 0], [1, 2]], values=[1, 2], dense_shape=[3, 4]))

dataset4.element_spec
SparseTensorSpec(TensorShape([3, 4]), tf.int32)
# Use value_type to see the type of value represented by the element spec
dataset4.element_spec.value_type
tensorflow.python.framework.sparse_tensor.SparseTensor
Dataset 转换支持任何结构的数据集。使用 Dataset.map 和 Dataset.filter 转换时会将函数应用于每个元素,而元素结构会决定函数的参数:
dataset1 = tf.data.Dataset.from_tensor_slices(
    tf.random.uniform([4, 10], minval=1, maxval=10, dtype=tf.int32))

dataset1
<TensorSliceDataset element_spec=TensorSpec(shape=(10,), dtype=tf.int32, name=None)>
for z in dataset1:
  print(z.numpy())
[1 3 5 8 6 5 9 5 1 6]
[3 7 2 9 5 5 5 1 1 4]
[3 4 2 1 4 8 7 2 3 4]
[3 2 4 8 1 9 8 3 3 5]
dataset2 = tf.data.Dataset.from_tensor_slices(
   (tf.random.uniform([4]),
    tf.random.uniform([4, 100], maxval=100, dtype=tf.int32)))

dataset2
<TensorSliceDataset element_spec=(TensorSpec(shape=(), dtype=tf.float32, name=None), TensorSpec(shape=(100,), dtype=tf.int32, name=None))>
dataset3 = tf.data.Dataset.zip((dataset1, dataset2))

dataset3
<ZipDataset element_spec=(TensorSpec(shape=(10,), dtype=tf.int32, name=None), (TensorSpec(shape=(), dtype=tf.float32, name=None), TensorSpec(shape=(100,), dtype=tf.int32, name=None)))>
for a, (b,c) in dataset3:
  print('shapes: {a.shape}, {b.shape}, {c.shape}'.format(a=a, b=b, c=c))
shapes: (10,), (), (100,)
shapes: (10,), (), (100,)
shapes: (10,), (), (100,)
shapes: (10,), (), (100,)
读取输入数据
使用 NumPy 数组
请参阅加载 NumPy 数组教程了解更多示例。
如果您所有的输入数据都适合装入内存,那么从这些数据创建 Dataset 的最简单方式是将它们转换为 tf.Tensor 对象并使用 Dataset.from_tensor_slices。
train, test = tf.keras.datasets.fashion_mnist.load_data()
Downloading data from https://storage.googleapis.com/tensorflow/tf-keras-datasets/train-labels-idx1-ubyte.gz
29515/29515 [==============================] - 0s 0us/step
Downloading data from https://storage.googleapis.com/tensorflow/tf-keras-datasets/train-images-idx3-ubyte.gz
26421880/26421880 [==============================] - 0s 0us/step
Downloading data from https://storage.googleapis.com/tensorflow/tf-keras-datasets/t10k-labels-idx1-ubyte.gz
5148/5148 [==============================] - 0s 0us/step
Downloading data from https://storage.googleapis.com/tensorflow/tf-keras-datasets/t10k-images-idx3-ubyte.gz
4422102/4422102 [==============================] - 0s 0us/step
images, labels = train
images = images/255

dataset = tf.data.Dataset.from_tensor_slices((images, labels))
dataset
<TensorSliceDataset element_spec=(TensorSpec(shape=(28, 28), dtype=tf.float64, name=None), TensorSpec(shape=(), dtype=tf.uint8, name=None))>
注:上面的代码段会将 features 和 labels 数组作为 tf.constant() 运算嵌入到 TensorFlow 计算图中。这对于小数据集来说效果很好,但是会浪费内存(因为数组的内容会被多次复制),并且可能会达到 tf.GraphDef 协议缓冲区的 2GB 上限。
使用 Python 生成器
另一个可被轻松整合为 tf.data.Dataset 的常用数据源是 Python 生成器。
小心:虽然这种方式比较简便,但它的可移植性和可扩缩性有限。它必须在创建生成器的同一 Python 进程中运行,且仍受 Python GIL 约束。
def count(stop):
  i = 0
  while i<stop:
    yield i
    i += 1
for n in count(5):
  print(n)
0
1
2
3
4
Dataset.from_generator 构造函数会将 Python 生成器转换为具有完整功能的 tf.data.Dataset。
构造函数会获取可调用对象作为输入,而非迭代器。这样,构造函数结束后便可重启生成器。构造函数会获取一个可选的 args 参数,作为可调用对象的参数。
output_types 参数是必需的,因为 tf.data 会在内部构建 tf.Graph,而计算图边缘需要 tf.dtype。
ds_counter = tf.data.Dataset.from_generator(count, args=[25], output_types=tf.int32, output_shapes = (), )
for count_batch in ds_counter.repeat().batch(10).take(10):
  print(count_batch.numpy())
[0 1 2 3 4 5 6 7 8 9]
[10 11 12 13 14 15 16 17 18 19]
[20 21 22 23 24  0  1  2  3  4]
[ 5  6  7  8  9 10 11 12 13 14]
[15 16 17 18 19 20 21 22 23 24]
[0 1 2 3 4 5 6 7 8 9]
[10 11 12 13 14 15 16 17 18 19]
[20 21 22 23 24  0  1  2  3  4]
[ 5  6  7  8  9 10 11 12 13 14]
[15 16 17 18 19 20 21 22 23 24]
output_shapes 参数虽然不是必需的,但强烈建议添加,因为许多 TensorFlow 运算不支持秩未知的张量。如果特定轴的长度未知或可变,请在 output_shapes 中将其设置为 None。
还需要注意的是,output_shapes 和 output_types 与其他数据集方法遵循相同的嵌套规则。
下面的示例生成器对两方面进行了演示,它会返回由数组组成的元组,其中第二个数组是长度未知的向量。
def gen_series():
  i = 0
  while True:
    size = np.random.randint(0, 10)
    yield i, np.random.normal(size=(size,))
    i += 1
for i, series in gen_series():
  print(i, ":", str(series))
  if i > 5:
    break
0 : [ 1.3034 -0.5113 -0.7452 -0.2246 -0.1022  0.8224  0.1196 -0.2784]
1 : [ 0.2172  0.1018  1.5095 -0.806  -0.5436  1.0827 -0.6073  0.671   1.8611]
2 : [-0.0357 -1.1447 -1.2915  0.2795  0.3277]
3 : []
4 : []
5 : [ 0.4695  1.3873 -0.9517]
6 : [-0.1771  0.2712  0.0217 -0.9726 -1.0197 -0.6409]
第一个输出是 int32,第二个输出是 float32。
第一个条目是标量,形状为 (),第二个条目是长度未知的向量,形状为 (None,)
ds_series = tf.data.Dataset.from_generator(
    gen_series,
    output_types=(tf.int32, tf.float32),
    output_shapes=((), (None,)))

ds_series
<FlatMapDataset element_spec=(TensorSpec(shape=(), dtype=tf.int32, name=None), TensorSpec(shape=(None,), dtype=tf.float32, name=None))>
现在,可以将它当作常规 tf.data.Dataset 使用。请注意,在批处理形状可变的数据集时,需要使用 Dataset.padded_batch。
ds_series_batch = ds_series.shuffle(20).padded_batch(10)

ids, sequence_batch = next(iter(ds_series_batch))
print(ids.numpy())
print()
print(sequence_batch.numpy())
[ 2 14 19 11  4 13  0 15 27 18]

[[ 0.0894 -0.8761  0.8113  1.3204 -1.0752 -0.075  -0.7585  1.1378]
 [-0.1992 -2.1216  0.      0.      0.      0.      0.      0.    ]
 [-0.3258  0.      0.      0.      0.      0.      0.      0.    ]
 [-0.0676  0.2296  0.3176 -1.6422 -0.811  -2.1016  0.      0.    ]
 [ 0.925   1.667  -0.4664  0.9043  0.5913 -1.2201  0.7899  0.    ]
 [ 0.0922  0.4314  0.9212  0.0582 -0.9598  0.      0.      0.    ]
 [-1.2046  0.2088  0.3363 -0.6237 -1.5659 -0.2361  0.      0.    ]
 [-0.0232  0.9558  0.1941  0.      0.      0.      0.      0.    ]
 [ 0.1729 -0.5317  0.      0.      0.      0.      0.      0.    ]
 [-0.4695  0.4754  0.8179 -0.9163  2.1119  0.4086  0.      0.    ]]
举个更加实际的例子,请尝试将 preprocessing.image.ImageDataGenerator 封装为 tf.data.Dataset。
先下载数据:
flowers = tf.keras.utils.get_file(
    'flower_photos',
    'https://storage.googleapis.com/download.tensorflow.org/example_images/flower_photos.tgz',
    untar=True)
Downloading data from https://storage.googleapis.com/download.tensorflow.org/example_images/flower_photos.tgz
228813984/228813984 [==============================] - 1s 0us/step
img_gen = tf.keras.preprocessing.image.ImageDataGenerator(rescale=1./255, rotation_range=20)
images, labels = next(img_gen.flow_from_directory(flowers))
Found 3670 images belonging to 5 classes.
print(images.dtype, images.shape)
print(labels.dtype, labels.shape)
float32 (32, 256, 256, 3)
float32 (32, 5)
ds = tf.data.Dataset.from_generator(
    lambda: img_gen.flow_from_directory(flowers),
    output_types=(tf.float32, tf.float32),
    output_shapes=([32,256,256,3], [32,5])
)

ds.element_spec
(TensorSpec(shape=(32, 256, 256, 3), dtype=tf.float32, name=None),
 TensorSpec(shape=(32, 5), dtype=tf.float32, name=None))
for images, labels in ds.take(1):
  print('images.shape: ', images.shape)
  print('labels.shape: ', labels.shape)
Found 3670 images belonging to 5 classes.
images.shape:  (32, 256, 256, 3)
labels.shape:  (32, 5)
处理 TFRecord 数据
请参阅加载 TFRecord 教程了解端到端示例。
tf.data API 支持多种文件格式,因此可以处理不适合存储在内存中的大型数据集。例如,TFRecord 文件格式是一种简单的、面向记录的二进制格式,许多 TensorFlow 应用都将其用于训练数据。您可以利用 tf.data.TFRecordDataset 类将一个或多个 TFRecord 文件的内容作为输入流水线的一部分进行流式传输。
下面的示例使用了来自 French Street Name Signs (FSNS) 的测试文件。
# Creates a dataset that reads all of the examples from two files.
fsns_test_file = tf.keras.utils.get_file("fsns.tfrec", "https://storage.googleapis.com/download.tensorflow.org/data/fsns-20160927/testdata/fsns-00000-of-00001")
Downloading data from https://storage.googleapis.com/download.tensorflow.org/data/fsns-20160927/testdata/fsns-00000-of-00001
7904079/7904079 [==============================] - 0s 0us/step
TFRecordDataset 初始值设定项的 filenames 参数可以是字符串、字符串列表,或由字符串组成的 tf.Tensor。因此,如果您有两组分别用于训练和验证的文件,则可以创建一个工厂方法来生成数据集,并将文件名作为输入参数:
dataset = tf.data.TFRecordDataset(filenames = [fsns_test_file])
dataset
<TFRecordDatasetV2 element_spec=TensorSpec(shape=(), dtype=tf.string, name=None)>
许多 TensorFlow 项目在其 TFRecord 文件中使用序列化的 tf.train.Example 记录。这些记录需要在检查前进行解码:
raw_example = next(iter(dataset))
parsed = tf.train.Example.FromString(raw_example.numpy())

parsed.features.feature['image/text']
bytes_list {
  value: "Rue Perreyon"
}
使用文本数据
请参阅加载文本教程了解端到端示例。
许多数据集会作为一个或多个文本文件进行分发。tf.data.TextLineDataset 提供了一种从一个或多个文本文件中提取行的简便方式。如果给定一个或多个文件名,TextLineDataset 会为这些文件的每一行生成一个字符串元素。
directory_url = 'https://storage.googleapis.com/download.tensorflow.org/data/illiad/'
file_names = ['cowper.txt', 'derby.txt', 'butler.txt']

file_paths = [
    tf.keras.utils.get_file(file_name, directory_url + file_name)
    for file_name in file_names
]
Downloading data from https://storage.googleapis.com/download.tensorflow.org/data/illiad/cowper.txt
815980/815980 [==============================] - 0s 0us/step
Downloading data from https://storage.googleapis.com/download.tensorflow.org/data/illiad/derby.txt
809730/809730 [==============================] - 0s 0us/step
Downloading data from https://storage.googleapis.com/download.tensorflow.org/data/illiad/butler.txt
807992/807992 [==============================] - 0s 0us/step
dataset = tf.data.TextLineDataset(file_paths)
这是第一个文件的前几行:
for line in dataset.take(5):
  print(line.numpy())
b"\xef\xbb\xbfAchilles sing, O Goddess! Peleus' son;"
b'His wrath pernicious, who ten thousand woes'
b"Caused to Achaia's host, sent many a soul"
b'Illustrious into Ades premature,'
b'And Heroes gave (so stood the will of Jove)'
要交错不同文件中的行,请使用 Dataset.interleave。这样可以更轻松地重排文件。以下是来自每个转换的第一、第二和第三行:
files_ds = tf.data.Dataset.from_tensor_slices(file_paths)
lines_ds = files_ds.interleave(tf.data.TextLineDataset, cycle_length=3)

for i, line in enumerate(lines_ds.take(9)):
  if i % 3 == 0:
    print()
  print(line.numpy())
b"\xef\xbb\xbfAchilles sing, O Goddess! Peleus' son;"
b"\xef\xbb\xbfOf Peleus' son, Achilles, sing, O Muse,"
b'\xef\xbb\xbfSing, O goddess, the anger of Achilles son of Peleus, that brought'

b'His wrath pernicious, who ten thousand woes'
b'The vengeance, deep and deadly; whence to Greece'
b'countless ills upon the Achaeans. Many a brave soul did it send'

b"Caused to Achaia's host, sent many a soul"
b'Unnumbered ills arose; which many a soul'
b'hurrying down to Hades, and many a hero did it yield a prey to dogs and'
默认情况下,TextLineDataset 会生成每个文件的每一行,但这可能并不理想(例如,有时文件会以标题行开始,或者包含注释)。可以使用 Dataset.skip() 或 Dataset.filter 转换移除这些行。如下所示,跳过第一行,然后过滤出剩余内容。
titanic_file = tf.keras.utils.get_file("train.csv", "https://storage.googleapis.com/tf-datasets/titanic/train.csv")
titanic_lines = tf.data.TextLineDataset(titanic_file)
Downloading data from https://storage.googleapis.com/tf-datasets/titanic/train.csv
30874/30874 [==============================] - 0s 0us/step
for line in titanic_lines.take(10):
  print(line.numpy())
b'survived,sex,age,n_siblings_spouses,parch,fare,class,deck,embark_town,alone'
b'0,male,22.0,1,0,7.25,Third,unknown,Southampton,n'
b'1,female,38.0,1,0,71.2833,First,C,Cherbourg,n'
b'1,female,26.0,0,0,7.925,Third,unknown,Southampton,y'
b'1,female,35.0,1,0,53.1,First,C,Southampton,n'
b'0,male,28.0,0,0,8.4583,Third,unknown,Queenstown,y'
b'0,male,2.0,3,1,21.075,Third,unknown,Southampton,n'
b'1,female,27.0,0,2,11.1333,Third,unknown,Southampton,n'
b'1,female,14.0,1,0,30.0708,Second,unknown,Cherbourg,n'
b'1,female,4.0,1,1,16.7,Third,G,Southampton,n'
def survived(line):
  return tf.not_equal(tf.strings.substr(line, 0, 1), "0")

survivors = titanic_lines.skip(1).filter(survived)
for line in survivors.take(10):
  print(line.numpy())
b'1,female,38.0,1,0,71.2833,First,C,Cherbourg,n'
b'1,female,26.0,0,0,7.925,Third,unknown,Southampton,y'
b'1,female,35.0,1,0,53.1,First,C,Southampton,n'
b'1,female,27.0,0,2,11.1333,Third,unknown,Southampton,n'
b'1,female,14.0,1,0,30.0708,Second,unknown,Cherbourg,n'
b'1,female,4.0,1,1,16.7,Third,G,Southampton,n'
b'1,male,28.0,0,0,13.0,Second,unknown,Southampton,y'
b'1,female,28.0,0,0,7.225,Third,unknown,Cherbourg,y'
b'1,male,28.0,0,0,35.5,First,A,Southampton,y'
b'1,female,38.0,1,5,31.3875,Third,unknown,Southampton,n'
使用 CSV 数据
请参阅加载 CSV 文件和加载 Pandas DataFrame 教程了解更多示例。
CSV 文件格式是一种以纯文本形式存储表格数据的流行格式。
例如:
titanic_file = tf.keras.utils.get_file("train.csv", "https://storage.googleapis.com/tf-datasets/titanic/train.csv")
df = pd.read_csv(titanic_file)
df.head()
如果您的数据适合存储在内存中,那么 Dataset.from_tensor_slices 方法对字典同样有效,使这些数据可以被轻松导入:
titanic_slices = tf.data.Dataset.from_tensor_slices(dict(df))

for feature_batch in titanic_slices.take(1):
  for key, value in feature_batch.items():
    print("  {!r:20s}: {}".format(key, value))
'survived'          : 0
  'sex'               : b'male'
  'age'               : 22.0
  'n_siblings_spouses': 1
  'parch'             : 0
  'fare'              : 7.25
  'class'             : b'Third'
  'deck'              : b'unknown'
  'embark_town'       : b'Southampton'
  'alone'             : b'n'
更具可扩展性的方式是根据需要从磁盘加载。
tf.data 模块提供了从一个或多个符合 RFC 4180 的 CSV 文件提取记录的方法。
experimental.make_csv_dataset 函数是用来读取 CSV 文件集的高级接口。它支持列类型推断和许多其他功能,如批处理和重排,以简化使用。
titanic_batches = tf.data.experimental.make_csv_dataset(
    titanic_file, batch_size=4,
    label_name="survived")
for feature_batch, label_batch in titanic_batches.take(1):
  print("'survived': {}".format(label_batch))
  print("features:")
  for key, value in feature_batch.items():
    print("  {!r:20s}: {}".format(key, value))
'survived': [0 0 0 0]
features:
  'sex'               : [b'male' b'male' b'male' b'male']
  'age'               : [36. 20. 28. 30.]
  'n_siblings_spouses': [1 0 0 0]
  'parch'             : [0 0 0 0]
  'fare'              : [15.55    7.8542  7.8958 13.    ]
  'class'             : [b'Third' b'Third' b'Third' b'Second']
  'deck'              : [b'unknown' b'unknown' b'unknown' b'unknown']
  'embark_town'       : [b'Southampton' b'Southampton' b'Southampton' b'Southampton']
  'alone'             : [b'n' b'y' b'y' b'y']
如果只需要列的一个子集,您可以使用 select_columns 参数。
titanic_batches = tf.data.experimental.make_csv_dataset(
    titanic_file, batch_size=4,
    label_name="survived", select_columns=['class', 'fare', 'survived'])
for feature_batch, label_batch in titanic_batches.take(1):
  print("'survived': {}".format(label_batch))
  for key, value in feature_batch.items():
    print("  {!r:20s}: {}".format(key, value))
'survived': [1 1 0 1]
  'fare'              : [13.     78.2667 52.     15.5   ]
  'class'             : [b'Second' b'First' b'First' b'Third']
还有一个级别更低的 experimental.CsvDataset 类,该类可以提供粒度更细的控制,但它不支持列类型推断,您必须指定每个列的类型。
titanic_types  = [tf.int32, tf.string, tf.float32, tf.int32, tf.int32, tf.float32, tf.string, tf.string, tf.string, tf.string]
dataset = tf.data.experimental.CsvDataset(titanic_file, titanic_types , header=True)

for line in dataset.take(10):
  print([item.numpy() for item in line])
[0, b'male', 22.0, 1, 0, 7.25, b'Third', b'unknown', b'Southampton', b'n']
[1, b'female', 38.0, 1, 0, 71.2833, b'First', b'C', b'Cherbourg', b'n']
[1, b'female', 26.0, 0, 0, 7.925, b'Third', b'unknown', b'Southampton', b'y']
[1, b'female', 35.0, 1, 0, 53.1, b'First', b'C', b'Southampton', b'n']
[0, b'male', 28.0, 0, 0, 8.4583, b'Third', b'unknown', b'Queenstown', b'y']
[0, b'male', 2.0, 3, 1, 21.075, b'Third', b'unknown', b'Southampton', b'n']
[1, b'female', 27.0, 0, 2, 11.1333, b'Third', b'unknown', b'Southampton', b'n']
[1, b'female', 14.0, 1, 0, 30.0708, b'Second', b'unknown', b'Cherbourg', b'n']
[1, b'female', 4.0, 1, 1, 16.7, b'Third', b'G', b'Southampton', b'n']
[0, b'male', 20.0, 0, 0, 8.05, b'Third', b'unknown', b'Southampton', b'y']
如果某些列为空,则此低级接口允许您提供默认值,而非列类型。
%%writefile missing.csv
1,2,3,4
,2,3,4
1,,3,4
1,2,,4
1,2,3,
,,,
Writing missing.csv
# Creates a dataset that reads all of the records from two CSV files, each with
# four float columns which may have missing values.

record_defaults = [999,999,999,999]
dataset = tf.data.experimental.CsvDataset("missing.csv", record_defaults)
dataset = dataset.map(lambda *items: tf.stack(items))
dataset
<MapDataset element_spec=TensorSpec(shape=(4,), dtype=tf.int32, name=None)>
for line in dataset:
  print(line.numpy())
[1 2 3 4]
[999   2   3   4]
[  1 999   3   4]
[  1   2 999   4]
[  1   2   3 999]
[999 999 999 999]
默认情况下,CsvDataset 会生成文件每一行的每一列,但这可能并不理想(例如,有时文件会以一个应该忽略的标题行开始,或者输入中不需要某些列)。可以分别使用 header 和 select_cols 参数移除这些行和字段。
# Creates a dataset that reads all of the records from two CSV files with
# headers, extracting float data from columns 2 and 4.
record_defaults = [999, 999] # Only provide defaults for the selected columns
dataset = tf.data.experimental.CsvDataset("missing.csv", record_defaults, select_cols=[1, 3])
dataset = dataset.map(lambda *items: tf.stack(items))
dataset
<MapDataset element_spec=TensorSpec(shape=(2,), dtype=tf.int32, name=None)>
for line in dataset:
  print(line.numpy())
[2 4]
[2 4]
[999   4]
[2 4]
[  2 999]
[999 999]
使用文件集
许多数据集会作为文件集进行分发,其中,每个文件都是一个样本。
flowers_root = tf.keras.utils.get_file(
    'flower_photos',
    'https://storage.googleapis.com/download.tensorflow.org/example_images/flower_photos.tgz',
    untar=True)
flowers_root = pathlib.Path(flowers_root)
注:这些图像已获得 CC-BY 许可,请参阅 LICENSE.txt 以了解详情。
根目录包含每个类的路径:
for item in flowers_root.glob("*"):
  print(item.name)
daisy
sunflowers
LICENSE.txt
dandelion
tulips
roses
每个类目录中的文件是样本:
list_ds = tf.data.Dataset.list_files(str(flowers_root/'*/*'))

for f in list_ds.take(5):
  print(f.numpy())
b'/home/kbuilder/.keras/datasets/flower_photos/tulips/8603340662_0779bd87fd.jpg'
b'/home/kbuilder/.keras/datasets/flower_photos/dandelion/151385301_153eacf6b5_n.jpg'
b'/home/kbuilder/.keras/datasets/flower_photos/tulips/13539827514_79b60b6c22_n.jpg'
b'/home/kbuilder/.keras/datasets/flower_photos/tulips/8554190977_37ac747799_m.jpg'
b'/home/kbuilder/.keras/datasets/flower_photos/dandelion/4708723476_a1b476a373.jpg'
使用 tf.io.read_file 函数读取数据,并从路径提取标签,返回 (image, label) 对:
def process_path(file_path):
  label = tf.strings.split(file_path, os.sep)[-2]
  return tf.io.read_file(file_path), label

labeled_ds = list_ds.map(process_path)
for image_raw, label_text in labeled_ds.take(1):
  print(repr(image_raw.numpy()[:100]))
  print()
  print(label_text.numpy())
b'\xff\xd8\xff\xe0\x00\x10JFIF\x00\x01\x01\x00\x00\x01\x00\x01\x00\x00\xff\xdb\x00C\x00\x03\x02\x02\x03\x02\x02\x03\x03\x03\x03\x04\x03\x03\x04\x05\x08\x05\x05\x04\x04\x05\n\x07\x07\x06\x08\x0c\n\x0c\x0c\x0b\n\x0b\x0b\r\x0e\x12\x10\r\x0e\x11\x0e\x0b\x0b\x10\x16\x10\x11\x13\x14\x15\x15\x15\x0c\x0f\x17\x18\x16\x14\x18\x12\x14\x15\x14\xff\xdb\x00C\x01\x03\x04\x04\x05\x04\x05'

b'dandelion'
批处理数据集元素
简单批处理
最简单的批处理方式是将数据集的 n 个连续元素堆叠成单个元素。Dataset.batch() 转换就负责执行此操作,它有和 tf.stack() 算子相同的约束,应用于元素的每个组件:也就是说,对于每个组件 i,所有元素都必须有一个形状完全相同的张量。
inc_dataset = tf.data.Dataset.range(100)
dec_dataset = tf.data.Dataset.range(0, -100, -1)
dataset = tf.data.Dataset.zip((inc_dataset, dec_dataset))
batched_dataset = dataset.batch(4)

for batch in batched_dataset.take(4):
  print([arr.numpy() for arr in batch])
[array([0, 1, 2, 3]), array([ 0, -1, -2, -3])]
[array([4, 5, 6, 7]), array([-4, -5, -6, -7])]
[array([ 8,  9, 10, 11]), array([ -8,  -9, -10, -11])]
[array([12, 13, 14, 15]), array([-12, -13, -14, -15])]
当 tf.data 试图传播形状信息时,Dataset.batch 的默认设置会导致未知的批次大小,因为最后一个批次可能不完整。请注意形状中的 None:
batched_dataset
<BatchDataset element_spec=(TensorSpec(shape=(None,), dtype=tf.int64, name=None), TensorSpec(shape=(None,), dtype=tf.int64, name=None))>
使用 drop_remainder 参数忽略最后一个批次,以获得完整的形状传播:
batched_dataset = dataset.batch(7, drop_remainder=True)
batched_dataset
<BatchDataset element_spec=(TensorSpec(shape=(7,), dtype=tf.int64, name=None), TensorSpec(shape=(7,), dtype=tf.int64, name=None))>
批处理带填充的张量
上述方式适用于所有具有相同大小的张量。然而,许多模型(包括序列模型)处理的输入数据可能具有不同的大小(例如,长度不同的序列)。为了处理这种情况,可以通过 Dataset.padded_batch 转换指定一个或多个可能被填充的维度,从而批处理不同形状的张量。
dataset = tf.data.Dataset.range(100)
dataset = dataset.map(lambda x: tf.fill([tf.cast(x, tf.int32)], x))
dataset = dataset.padded_batch(4, padded_shapes=(None,))

for batch in dataset.take(2):
  print(batch.numpy())
  print()
[[0 0 0]
 [1 0 0]
 [2 2 0]
 [3 3 3]]

[[4 4 4 4 0 0 0]
 [5 5 5 5 5 0 0]
 [6 6 6 6 6 6 0]
 [7 7 7 7 7 7 7]]
您可以通过 Dataset.padded_batch 转换为每个组件的每个维度设置不同的填充,它可以是可变长度(在上面的示例中由 None 表示)或是固定长度。它还可以重写填充值,填充值默认为 0。
训练工作流
处理多个周期
tf.data API 提供了两种主要方式来处理同一数据的多个周期。
要在多个周期内迭代数据集,最简单的方式是使用 Dataset.repeat() 转换。首先,创建一个由 Titanic 数据组成的数据集:
titanic_file = tf.keras.utils.get_file("train.csv", "https://storage.googleapis.com/tf-datasets/titanic/train.csv")
titanic_lines = tf.data.TextLineDataset(titanic_file)
def plot_batch_sizes(ds):
  batch_sizes = [batch.shape[0] for batch in ds]
  plt.bar(range(len(batch_sizes)), batch_sizes)
  plt.xlabel('Batch number')
  plt.ylabel('Batch size')
如果应用不带参数的 Dataset.repeat() 转换,将无限次地重复输入。
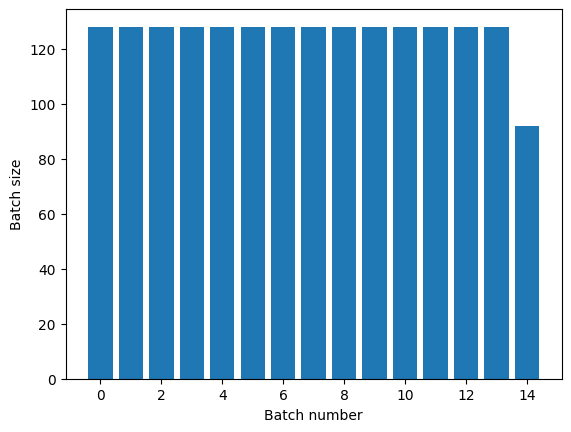
Dataset.repeat 转换会连接其参数,而不会在一个周期结束和下一个周期开始时发出信号。因此,在 Dataset.repeat 之后应用的 Dataset.batch 将生成跨越周期边界的批次:
titanic_batches = titanic_lines.repeat(3).batch(128)
plot_batch_sizes(titanic_batches)
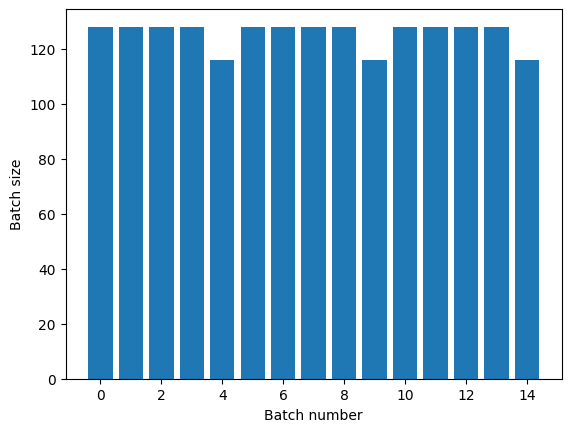
如果您需要明确的周期分隔,请将 Dataset.batch 置于重复前:
titanic_batches = titanic_lines.batch(128).repeat(3)

plot_batch_sizes(titanic_batches)
如果您想在每个周期结束时执行自定义计算(例如,收集统计信息),最简单的方式是在每个周期上重新启动数据集迭代:
epochs = 3
dataset = titanic_lines.batch(128)

for epoch in range(epochs):
  for batch in dataset:
    print(batch.shape)
  print("End of epoch: ", epoch)
(128,)
(128,)
(128,)
(128,)
(116,)
End of epoch:  0
(128,)
(128,)
(128,)
(128,)
(116,)
End of epoch:  1
(128,)
(128,)
(128,)
(128,)
(116,)
End of epoch:  2
随机重排输入数据
Dataset.shuffle() 转换会维持一个固定大小的缓冲区,并从该缓冲区均匀地随机选择下一个元素:
注:虽然较大的 buffer_size 可以更彻底地重排,但可能会占用大量的内存和时间来填充。如果这成为问题,请考虑跨文件使用 Dataset.interleave。
向数据集添加索引,便能看到效果:
lines = tf.data.TextLineDataset(titanic_file)
counter = tf.data.experimental.Counter()

dataset = tf.data.Dataset.zip((counter, lines))
dataset = dataset.shuffle(buffer_size=100)
dataset = dataset.batch(20)
dataset
WARNING:tensorflow:From /tmpfs/tmp/ipykernel_97538/4092668703.py:2: CounterV2 (from tensorflow.python.data.experimental.ops.counter) is deprecated and will be removed in a future version.
Instructions for updating:
Use `tf.data.Dataset.counter(...)` instead.
<BatchDataset element_spec=(TensorSpec(shape=(None,), dtype=tf.int64, name=None), TensorSpec(shape=(None,), dtype=tf.string, name=None))>
由于 buffer_size 是 100,而批次大小是 20,第一个批次不包含索引大于 120 的元素。
n,line_batch = next(iter(dataset))
print(n.numpy())
[ 49  10  45  24  65  78  34  80  16  27   4  39 107  88  90  48  63  56
  41  76]
对于 Dataset.batch,与 Dataset.repeat 的相对顺序很重要。
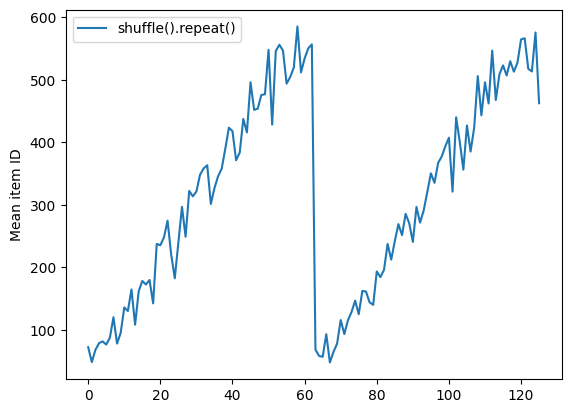
在重排缓冲区为空之前,Dataset.shuffle 不会发出周期结束的信号。因此,置于重复之前的重排会先显示一个周期内的每个元素,然后移至下一个周期:
dataset = tf.data.Dataset.zip((counter, lines))
shuffled = dataset.shuffle(buffer_size=100).batch(10).repeat(2)

print("Here are the item ID's near the epoch boundary:\n")
for n, line_batch in shuffled.skip(60).take(5):
  print(n.numpy())
Here are the item ID's near the epoch boundary:

[609 556 594 564 532 612 590 443 574 619]
[464 432 610 505 567 625 558 622 466 585]
[623 478 125 281 626 575 586 490]
[24 71 69 54 84 72 94  9 25 95]
[ 28  81  88  60  33   3 104 116 113   2]
shuffle_repeat = [n.numpy().mean() for n, line_batch in shuffled]
plt.plot(shuffle_repeat, label="shuffle().repeat()")
plt.ylabel("Mean item ID")
plt.legend()
<matplotlib.legend.Legend at 0x7f7dc81fb9d0>
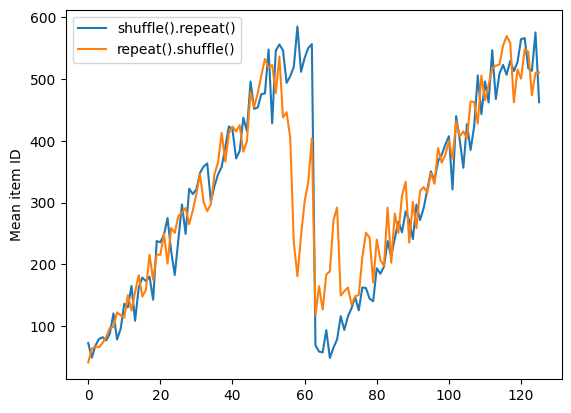
但在重排之前的重复会将周期边界混合在一起:
dataset = tf.data.Dataset.zip((counter, lines))
shuffled = dataset.repeat(2).shuffle(buffer_size=100).batch(10)

print("Here are the item ID's near the epoch boundary:\n")
for n, line_batch in shuffled.skip(55).take(15):
  print(n.numpy())
Here are the item ID's near the epoch boundary:

[597 562 610 600 594  11 471 298  21 571]
[607  25 626 590 577  15  17 497  26  24]
[463 529 548  22   1 611   6 603 446 349]
[ 18 488 538  38  32  35 553 510 621 625]
[564 434  52 560  28 592 573 479  67 596]
[ 29 620  34  71  14  70 373  56 572  62]
[ 61  72  48  54  49  30 542  68  83  12]
[588 586  77  23 579  60  74 544 559  58]
[ 43 532 593  40  51  92  98  20  75  66]
[551 561 112 604   8  96  31  27 547 533]
[115 105  93  37  58 126  78 380 615 440]
[617 605 616 134 613 622  65  50 131 132]
[ 94 104  10  55 587  86  33 125 531  47]
[ 87  39 128   3 118   4  63  99 102 153]
[369 103 424  13 154   0 612 578  16  79]
repeat_shuffle = [n.numpy().mean() for n, line_batch in shuffled]

plt.plot(shuffle_repeat, label="shuffle().repeat()")
plt.plot(repeat_shuffle, label="repeat().shuffle()")
plt.ylabel("Mean item ID")
plt.legend()
<matplotlib.legend.Legend at 0x7f7dc854a220>
预处理数据
Dataset.map(f) 转换会通过对输入数据集的每个元素应用一个给定函数 f 来生成一个新的数据集。它基于 map() 函数,该函数通常应用于函数式编程语言中的列表(和其他结构)。函数 f 会获取在输入中表示单个元素的 tf.Tensor 对象,并返回在新数据集中表示单个元素的 tf.Tensor 对象。它的实现使用标准的 TensorFlow 运算来将一个元素转换为另一个元素。
本部分介绍了关于 Dataset.map() 使用方法的常见示例。
解码图像数据并调整大小
使用真实的图像数据训练神经网络时,常常需要将不同大小的图像转换为统一大小,以便将其批处理成某一固定大小。
重建花卉文件名数据集:
list_ds = tf.data.Dataset.list_files(str(flowers_root/'*/*'))
编写一个操作数据集元素的函数。
# Reads an image from a file, decodes it into a dense tensor, and resizes it
# to a fixed shape.
def parse_image(filename):
  parts = tf.strings.split(filename, os.sep)
  label = parts[-2]

  image = tf.io.read_file(filename)
  image = tf.io.decode_jpeg(image)
  image = tf.image.convert_image_dtype(image, tf.float32)
  image = tf.image.resize(image, [128, 128])
  return image, label
测试它的有效性。
file_path = next(iter(list_ds))
image, label = parse_image(file_path)

def show(image, label):
  plt.figure()
  plt.imshow(image)
  plt.title(label.numpy().decode('utf-8'))
  plt.axis('off')

show(image, label)

将它映射到数据集。
images_ds = list_ds.map(parse_image)

for image, label in images_ds.take(2):
  show(image, label)


应用任意 Python 逻辑
出于性能考虑,请尽可能使用 TensorFlow 运算预处理数据。不过,在解析输入数据时,调用外部 Python 库有时会很有帮助。您可以在 Dataset.map 转换中使用 tf.py_function 运算。
例如,如果您想应用一个随机旋转,而 tf.image 模块只有 tf.image.rot90,这对图像增强不是很有帮助。
注:tensorflow_addons 在 tensorflow_addons.image.rotate 中有一个与 TensorFlow 兼容的 rotate。
为了演示 tf.py_function,请尝试使用 scipy.ndimage.rotate 函数:
import scipy.ndimage as ndimage

def random_rotate_image(image):
  image = ndimage.rotate(image, np.random.uniform(-30, 30), reshape=False)
  return image
image, label = next(iter(images_ds))
image = random_rotate_image(image)
show(image, label)
Clipping input data to the valid range for imshow with RGB data ([0..1] for floats or [0..255] for integers).
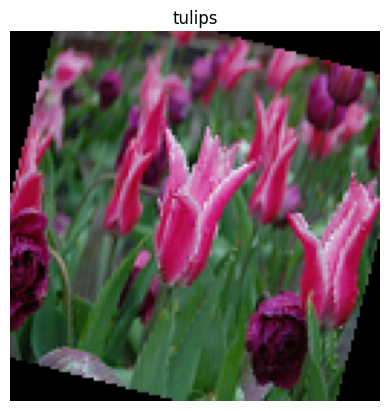
要将此函数用于 Dataset.map,需留意与 Dataset.from_generator 相同的注意事项,在应用该函数时需要描述返回的形状和类型:
def tf_random_rotate_image(image, label):
  im_shape = image.shape
  [image,] = tf.py_function(random_rotate_image, [image], [tf.float32])
  image.set_shape(im_shape)
  return image, label
rot_ds = images_ds.map(tf_random_rotate_image)

for image, label in rot_ds.take(2):
  show(image, label)
Clipping input data to the valid range for imshow with RGB data ([0..1] for floats or [0..255] for integers).
Clipping input data to the valid range for imshow with RGB data ([0..1] for floats or [0..255] for integers).


解析 tf.Example 协议缓冲区消息
许多输入流水线从 TFRecord 格式文件中提取 tf.train.Example 协议缓冲区消息。每个 tf.train.Example 记录包含一个或多个“特征”,而输入流水线通常会将这些特征转换为张量。
fsns_test_file = tf.keras.utils.get_file("fsns.tfrec", "https://storage.googleapis.com/download.tensorflow.org/data/fsns-20160927/testdata/fsns-00000-of-00001")
dataset = tf.data.TFRecordDataset(filenames = [fsns_test_file])
dataset
<TFRecordDatasetV2 element_spec=TensorSpec(shape=(), dtype=tf.string, name=None)>
您可以在 tf.data.Dataset 外部使用 tf.train.Example 协议来理解数据:
raw_example = next(iter(dataset))
parsed = tf.train.Example.FromString(raw_example.numpy())

feature = parsed.features.feature
raw_img = feature['image/encoded'].bytes_list.value[0]
img = tf.image.decode_png(raw_img)
plt.imshow(img)
plt.axis('off')
_ = plt.title(feature["image/text"].bytes_list.value[0])

raw_example = next(iter(dataset))
def tf_parse(eg):
  example = tf.io.parse_example(
      eg[tf.newaxis], {
          'image/encoded': tf.io.FixedLenFeature(shape=(), dtype=tf.string),
          'image/text': tf.io.FixedLenFeature(shape=(), dtype=tf.string)
      })
  return example['image/encoded'][0], example['image/text'][0]
img, txt = tf_parse(raw_example)
print(txt.numpy())
print(repr(img.numpy()[:20]), "...")
b'Rue Perreyon'
b'\x89PNG\r\n\x1a\n\x00\x00\x00\rIHDR\x00\x00\x02X' ...
decoded = dataset.map(tf_parse)
decoded
<MapDataset element_spec=(TensorSpec(shape=(), dtype=tf.string, name=None), TensorSpec(shape=(), dtype=tf.string, name=None))>
image_batch, text_batch = next(iter(decoded.batch(10)))
image_batch.shape
TensorShape([10])
时间序列窗口化
有关端到端的时间序列示例,请参阅:时间序列预测。
时间序列数据通常以保持完整时间轴的方式进行组织。
用一个简单的 Dataset.range 来演示:
range_ds = tf.data.Dataset.range(100000)
通常,基于此类数据的模型需要一个连续的时间片。
最简单的方式是批处理这些数据:
使用 batch
batches = range_ds.batch(10, drop_remainder=True)

for batch in batches.take(5):
  print(batch.numpy())
[0 1 2 3 4 5 6 7 8 9]
[10 11 12 13 14 15 16 17 18 19]
[20 21 22 23 24 25 26 27 28 29]
[30 31 32 33 34 35 36 37 38 39]
[40 41 42 43 44 45 46 47 48 49]
或者,要对未来进行一步密集预测,您可以将特征和标签相对彼此移动一步:
def dense_1_step(batch):
  # Shift features and labels one step relative to each other.
  return batch[:-1], batch[1:]

predict_dense_1_step = batches.map(dense_1_step)

for features, label in predict_dense_1_step.take(3):
  print(features.numpy(), " => ", label.numpy())
[0 1 2 3 4 5 6 7 8]  =>  [1 2 3 4 5 6 7 8 9]
[10 11 12 13 14 15 16 17 18]  =>  [11 12 13 14 15 16 17 18 19]
[20 21 22 23 24 25 26 27 28]  =>  [21 22 23 24 25 26 27 28 29]
要预测整个窗口而非一个固定偏移量,您可以将批次分成两部分:
batches = range_ds.batch(15, drop_remainder=True)

def label_next_5_steps(batch):
  return (batch[:-5],   # Inputs: All except the last 5 steps
          batch[-5:])   # Labels: The last 5 steps

predict_5_steps = batches.map(label_next_5_steps)

for features, label in predict_5_steps.take(3):
  print(features.numpy(), " => ", label.numpy())
[0 1 2 3 4 5 6 7 8 9]  =>  [10 11 12 13 14]
[15 16 17 18 19 20 21 22 23 24]  =>  [25 26 27 28 29]
[30 31 32 33 34 35 36 37 38 39]  =>  [40 41 42 43 44]
要允许一个批次的特征和另一批次的标签部分重叠,请使用 Dataset.zip:
feature_length = 10
label_length = 3

features = range_ds.batch(feature_length, drop_remainder=True)
labels = range_ds.batch(feature_length).skip(1).map(lambda labels: labels[:label_length])

predicted_steps = tf.data.Dataset.zip((features, labels))

for features, label in predicted_steps.take(5):
  print(features.numpy(), " => ", label.numpy())
[0 1 2 3 4 5 6 7 8 9]  =>  [10 11 12]
[10 11 12 13 14 15 16 17 18 19]  =>  [20 21 22]
[20 21 22 23 24 25 26 27 28 29]  =>  [30 31 32]
[30 31 32 33 34 35 36 37 38 39]  =>  [40 41 42]
[40 41 42 43 44 45 46 47 48 49]  =>  [50 51 52]
使用 window
尽管使用 Dataset.batch 奏效,某些情况可能需要更精细的控制。Dataset.window 方法可以为您提供完全控制,但需要注意:它返回的是由 Datasets 组成的 Dataset。请参阅数据集结构部分以了解详情。
window_size = 5

windows = range_ds.window(window_size, shift=1)
for sub_ds in windows.take(5):
  print(sub_ds)
<_VariantDataset element_spec=TensorSpec(shape=(), dtype=tf.int64, name=None)>
<_VariantDataset element_spec=TensorSpec(shape=(), dtype=tf.int64, name=None)>
<_VariantDataset element_spec=TensorSpec(shape=(), dtype=tf.int64, name=None)>
<_VariantDataset element_spec=TensorSpec(shape=(), dtype=tf.int64, name=None)>
<_VariantDataset element_spec=TensorSpec(shape=(), dtype=tf.int64, name=None)>
Dataset.flat_map 方法可以获取由数据集组成的数据集,并将其合并为一个数据集:
for x in windows.flat_map(lambda x: x).take(30):
   print(x.numpy(), end=' ')
0 1 2 3 4 1 2 3 4 5 2 3 4 5 6 3 4 5 6 7 4 5 6 7 8 5 6 7 8 9
在几乎所有情况下,您都需要先 Dataset.batch 数据集:
def sub_to_batch(sub):
  return sub.batch(window_size, drop_remainder=True)

for example in windows.flat_map(sub_to_batch).take(5):
  print(example.numpy())
[0 1 2 3 4]
[1 2 3 4 5]
[2 3 4 5 6]
[3 4 5 6 7]
[4 5 6 7 8]
现在,您可以看到 shift 参数控制着每个窗口的移动量。
将上述内容整合起来,您就可以编写出以下函数:
def make_window_dataset(ds, window_size=5, shift=1, stride=1):
  windows = ds.window(window_size, shift=shift, stride=stride)

  def sub_to_batch(sub):
    return sub.batch(window_size, drop_remainder=True)

  windows = windows.flat_map(sub_to_batch)
  return windows
ds = make_window_dataset(range_ds, window_size=10, shift = 5, stride=3)

for example in ds.take(10):
  print(example.numpy())
[ 0  3  6  9 12 15 18 21 24 27]
[ 5  8 11 14 17 20 23 26 29 32]
[10 13 16 19 22 25 28 31 34 37]
[15 18 21 24 27 30 33 36 39 42]
[20 23 26 29 32 35 38 41 44 47]
[25 28 31 34 37 40 43 46 49 52]
[30 33 36 39 42 45 48 51 54 57]
[35 38 41 44 47 50 53 56 59 62]
[40 43 46 49 52 55 58 61 64 67]
[45 48 51 54 57 60 63 66 69 72]
然后,可以像之前一样轻松提取标签:
dense_labels_ds = ds.map(dense_1_step)

for inputs,labels in dense_labels_ds.take(3):
  print(inputs.numpy(), "=>", labels.numpy())
[ 0  3  6  9 12 15 18 21 24] => [ 3  6  9 12 15 18 21 24 27]
[ 5  8 11 14 17 20 23 26 29] => [ 8 11 14 17 20 23 26 29 32]
[10 13 16 19 22 25 28 31 34] => [13 16 19 22 25 28 31 34 37]
重采样
在处理类非常不平衡的数据集时,您可能需要对数据集重新采样。tf.data 为此提供了两种方法。信用卡欺诈数据集就是此类问题一个很好的例子。
注:请转到不平衡数据分类了解完整教程。
zip_path = tf.keras.utils.get_file(
    origin='https://storage.googleapis.com/download.tensorflow.org/data/creditcard.zip',
    fname='creditcard.zip',
    extract=True)

csv_path = zip_path.replace('.zip', '.csv')
Downloading data from https://storage.googleapis.com/download.tensorflow.org/data/creditcard.zip
69155632/69155632 [==============================] - 1s 0us/step
creditcard_ds = tf.data.experimental.make_csv_dataset(
    csv_path, batch_size=1024, label_name="Class",
    # Set the column types: 30 floats and an int.
    column_defaults=[float()]*30+[int()])
现在,检查类的分布,它是高度倾斜的:
def count(counts, batch):
  features, labels = batch
  class_1 = labels == 1
  class_1 = tf.cast(class_1, tf.int32)

  class_0 = labels == 0
  class_0 = tf.cast(class_0, tf.int32)

  counts['class_0'] += tf.reduce_sum(class_0)
  counts['class_1'] += tf.reduce_sum(class_1)

  return counts
counts = creditcard_ds.take(10).reduce(
    initial_state={'class_0': 0, 'class_1': 0},
    reduce_func = count)

counts = np.array([counts['class_0'].numpy(),
                   counts['class_1'].numpy()]).astype(np.float32)

fractions = counts/counts.sum()
print(fractions)
[0.9956 0.0044]
使用不平衡的数据集进行训练的一种常用方式是使其平衡。tf.data 包括一些能够让此工作流变得可行的方法:
数据集采样
对数据集重新采样的一种方式是使用 sample_from_datasets。当每个类都有单独的 tf.data.Dataset 时,这种方式更加适用。
下面用过滤器从信用卡欺诈数据中生成一个重采样数据集:
negative_ds = (
  creditcard_ds
    .unbatch()
    .filter(lambda features, label: label==0)
    .repeat())
positive_ds = (
  creditcard_ds
    .unbatch()
    .filter(lambda features, label: label==1)
    .repeat())
for features, label in positive_ds.batch(10).take(1):
  print(label.numpy())
[1 1 1 1 1 1 1 1 1 1]
要使用 tf.data.Dataset.sample_from_datasets 传递数据集以及每个数据集的权重,请运行以下代码:
balanced_ds = tf.data.Dataset.sample_from_datasets(
    [negative_ds, positive_ds], [0.5, 0.5]).batch(10)
现在,数据集为每个类生成样本的概率是 50/50:
for features, labels in balanced_ds.take(10):
  print(labels.numpy())
[1 1 1 1 0 1 1 1 1 1]
[0 1 0 1 1 1 1 0 1 0]
[0 1 0 0 0 0 1 0 1 1]
[0 0 0 1 1 0 1 1 1 0]
[0 1 1 0 0 1 1 1 0 0]
[0 1 0 1 0 1 0 1 0 1]
[0 1 1 1 1 0 1 0 0 0]
[0 0 1 0 0 1 1 1 1 0]
[0 0 1 1 0 0 0 1 1 1]
[0 0 0 0 0 1 0 1 0 1]
拒绝重采样
上述 Dataset.sample_from_datasets 方式的一个问题是每个类需要一个单独的 tf.data.Dataset。您可以使用 Dataset.filter 创建这两个数据集,但这会导致所有数据被加载两次。
可以将 tf.data.Dataset.rejection_resample 方法应用于数据集以使其重新平衡,而且只需加载一次数据。元素将被删除或重复,以实现平衡。
rejection_resample 需要一个 class_func 参数。这个 class_func 参数会被应用至每个数据集元素,并且会被用来确定某个样本属于哪一类,以实现平衡的目的。
这里的目标是平衡标签分布,而 creditcard_ds 的元素已经形成 (features, label) 对。因此,class_func 只需返回这些标签:
def class_func(features, label):
  return label
重采样方法会处理单个样本,因此您必须在应用该方法前 unbatch 数据集。
该方法需要一个目标分布,以及一个可选的初始分布估计作为输入:
resample_ds = (
    creditcard_ds
    .unbatch()
    .rejection_resample(class_func, target_dist=[0.5,0.5],
                        initial_dist=fractions)
    .batch(10))
WARNING:tensorflow:From /tmpfs/src/tf_docs_env/lib/python3.9/site-packages/tensorflow/python/data/ops/dataset_ops.py:6041: Print (from tensorflow.python.ops.logging_ops) is deprecated and will be removed after 2018-08-20.
Instructions for updating:
Use tf.print instead of tf.Print. Note that tf.print returns a no-output operator that directly prints the output. Outside of defuns or eager mode, this operator will not be executed unless it is directly specified in session.run or used as a control dependency for other operators. This is only a concern in graph mode. Below is an example of how to ensure tf.print executes in graph mode:
rejection_resample 方法会返回 (class, example) 对,其中的 class 为 class_func 的输出。在此例中,example 已经形成 (feature, label) 对,因此请使用 map 删除多余的标签副本:
balanced_ds = resample_ds.map(lambda extra_label, features_and_label: features_and_label)
现在,数据集为每个类生成样本的概率是 50/50:
for features, labels in balanced_ds.take(10):
  print(labels.numpy())
Proportion of examples rejected by sampler is high: [0.995605469][0.995605469 0.00439453125][0 1]
Proportion of examples rejected by sampler is high: [0.995605469][0.995605469 0.00439453125][0 1]
Proportion of examples rejected by sampler is high: [0.995605469][0.995605469 0.00439453125][0 1]
Proportion of examples rejected by sampler is high: [0.995605469][0.995605469 0.00439453125][0 1]
Proportion of examples rejected by sampler is high: [0.995605469][0.995605469 0.00439453125][0 1]
Proportion of examples rejected by sampler is high: [0.995605469][0.995605469 0.00439453125][0 1]
Proportion of examples rejected by sampler is high: [0.995605469][0.995605469 0.00439453125][0 1]
Proportion of examples rejected by sampler is high: [0.995605469][0.995605469 0.00439453125][0 1]
Proportion of examples rejected by sampler is high: [0.995605469][0.995605469 0.00439453125][0 1]
Proportion of examples rejected by sampler is high: [0.995605469][0.995605469 0.00439453125][0 1]
[0 1 1 1 1 1 0 1 0 1]
[0 1 0 1 0 1 1 0 1 0]
[0 0 0 0 1 1 1 0 1 0]
[0 0 1 1 1 0 1 1 0 1]
[1 0 1 0 1 0 0 1 0 0]
[1 0 0 1 0 1 0 0 1 0]
[1 1 1 1 1 1 1 0 0 0]
[1 0 1 1 1 1 1 1 0 0]
[1 0 1 1 0 1 0 0 0 1]
[0 1 0 0 0 0 1 1 1 0]
迭代器检查点操作
TensorFlow 支持获取检查点 ,这样当训练过程重启时,可以还原至最新的检查点,从而恢复大部分进度。除了可以对模型变量进行检查点操作外,您还可以为数据集迭代器的进度设置检查点。如果您有一个很大的数据集,并且不想在每次重启后都从头开始,此功能会非常有用。但是请注意,迭代器检查点可能会很大,因为像 Dataset.shuffle 和 Dataset.prefetch 之类的转换需要在迭代器内缓冲元素。
要在检查点中包含迭代器,请将迭代器传递至 tf.train.Checkpoint 构造函数。
range_ds = tf.data.Dataset.range(20)

iterator = iter(range_ds)
ckpt = tf.train.Checkpoint(step=tf.Variable(0), iterator=iterator)
manager = tf.train.CheckpointManager(ckpt, '/tmp/my_ckpt', max_to_keep=3)

print([next(iterator).numpy() for _ in range(5)])

save_path = manager.save()

print([next(iterator).numpy() for _ in range(5)])

ckpt.restore(manager.latest_checkpoint)

print([next(iterator).numpy() for _ in range(5)])
[0, 1, 2, 3, 4]
[5, 6, 7, 8, 9]
[5, 6, 7, 8, 9]
注:无法为依赖于外部状态的迭代器(例如 tf.py_function)设置检查点。尝试这样做将引发外部状态异常。
结合使用 tf.data 与 tf.keras
tf.keras API 在创建和执行机器学习模型的许多方面进行了简化。它的 Model.fit、Model.evaluate 和 Model.predict API 支持将数据集作为输入。下面是一个快速的数据集和模型设置:
train, test = tf.keras.datasets.fashion_mnist.load_data()

images, labels = train
images = images/255.0
labels = labels.astype(np.int32)
fmnist_train_ds = tf.data.Dataset.from_tensor_slices((images, labels))
fmnist_train_ds = fmnist_train_ds.shuffle(5000).batch(32)

model = tf.keras.Sequential([
  tf.keras.layers.Flatten(),
  tf.keras.layers.Dense(10)
])

model.compile(optimizer='adam',
              loss=tf.keras.losses.SparseCategoricalCrossentropy(from_logits=True),
              metrics=['accuracy'])
只需向 Model.fit 和 Model.evaluate 传递一个由 (feature, label) 对组成的数据集:
model.fit(fmnist_train_ds, epochs=2)
Epoch 1/2
1875/1875 [==============================] - 5s 2ms/step - loss: 0.6031 - accuracy: 0.7962
Epoch 2/2
1875/1875 [==============================] - 4s 2ms/step - loss: 0.4614 - accuracy: 0.8425
<keras.callbacks.History at 0x7f7e6803a4f0>
如果您要传递一个无限大的数据集(比如通过调用 Dataset.repeat),您只需要同时传递 steps_per_epoch 参数:
model.fit(fmnist_train_ds.repeat(), epochs=2, steps_per_epoch=20)
Epoch 1/2
20/20 [==============================] - 0s 2ms/step - loss: 0.3798 - accuracy: 0.8578
Epoch 2/2
20/20 [==============================] - 0s 2ms/step - loss: 0.4668 - accuracy: 0.8500
<keras.callbacks.History at 0x7f7dc81ab610>
对于评估,可以传递评估步数:
loss, accuracy = model.evaluate(fmnist_train_ds)
print("Loss :", loss)
print("Accuracy :", accuracy)
1875/1875 [==============================] - 3s 2ms/step - loss: 0.4577 - accuracy: 0.8411
Loss : 0.4576539099216461
Accuracy : 0.8410833477973938
对于长数据集,可以设置要评估的步数:
loss, accuracy = model.evaluate(fmnist_train_ds.repeat(), steps=10)
print("Loss :", loss)
print("Accuracy :", accuracy)
10/10 [==============================] - 0s 2ms/step - loss: 0.4304 - accuracy: 0.8406
Loss : 0.43044623732566833
Accuracy : 0.840624988079071
调用 Model.predict 时不需要标签。
predict_ds = tf.data.Dataset.from_tensor_slices(images).batch(32)
result = model.predict(predict_ds, steps = 10)
print(result.shape)
10/10 [==============================] - 0s 1ms/step
(320, 10)
但是,如果您传递了包含标签的数据集,则标签会被忽略:
result = model.predict(fmnist_train_ds, steps = 10)
print(result.shape)
10/10 [==============================] - 0s 1ms/step
(320, 10)
