この「スタンドアロン」ノートブックは、TFX / MLMDコンテキストなしでModelCardToolkitを使用する方法を示しています。 TFX / MLMDとモデルカードToolkitを使用する方法については、確認してくださいMLMDモデルカードのツールキットデモを。
 TensorFlow.orgで表示 TensorFlow.orgで表示 |  GoogleColabで実行 GoogleColabで実行 |  GitHubで表示 GitHubで表示 |  ノートブックをダウンロード ノートブックをダウンロード |
目的
このノートブックは、Jupyter / Colab環境でModelCardToolkitを使用してモデルカードを生成する方法を示しています。あなたは、でモデルカードについての詳細を学ぶことができhttps://modelcards.withgoogle.com/about
このデモではKerasモデルを使用しています。ただし、以下のロジックは、他のMLフレームワークにも一般的に適用されます。
設定
まず、a)必要なパッケージをインストールしてインポートし、b)データをダウンロードする必要があります。
Pip 20.2にアップグレードし、Model CardToolkitをインストールします
pip install --upgrade pip==20.2pip install 'model-card-toolkit>=1.0.0,<1.1'pip install 'tensorflow>=2.3.1'
ランタイムを再起動しましたか?
上記のセルを初めて実行するときにGoogleColabを使用している場合は、ランタイムを再起動する必要があります([ランタイム]> [ランタイムの再起動...])。これは、Colabがパッケージをロードする方法が原因です。
輸入
import tensorflow as tf
import numpy as np
import model_card_toolkit as mctlib
from model_card_toolkit.documentation.examples import cats_vs_dogs
from model_card_toolkit.utils.graphics import figure_to_base64str
import tempfile
import matplotlib.pyplot as plt
from IPython import display
import requests
import os
import zipfile
モデル
私たちは、オフベースのアーキテクチャを持つpretrainedモデルを使用しますMobileNetV2 、人気の16層の画像分類モデル。我々のモデルは、使用してビトウィーンズの猫や犬を区別するように訓練された犬対猫をセット。モデルのトレーニングはに基づいていたチュートリアルを学習TensorFlow転送。
URL = 'https://storage.googleapis.com/cats_vs_dogs_model/cats_vs_dogs_model.zip'
BASE_PATH = tempfile.mkdtemp()
ZIP_PATH = os.path.join(BASE_PATH, 'cats_vs_dogs_model.zip')
MODEL_PATH = os.path.join(BASE_PATH,'cats_vs_dogs_model')

r = requests.get(URL, allow_redirects=True)
open(ZIP_PATH, 'wb').write(r.content)

with zipfile.ZipFile(ZIP_PATH, 'r') as zip_ref:
    zip_ref.extractall(BASE_PATH)

model = tf.keras.models.load_model(MODEL_PATH)
WARNING:tensorflow:SavedModel saved prior to TF 2.5 detected when loading Keras model. Please ensure that you are saving the model with model.save() or tf.keras.models.save_model(), *NOT* tf.saved_model.save(). To confirm, there should be a file named "keras_metadata.pb" in the SavedModel directory.
WARNING:tensorflow:SavedModel saved prior to TF 2.5 detected when loading Keras model. Please ensure that you are saving the model with model.save() or tf.keras.models.save_model(), *NOT* tf.saved_model.save(). To confirm, there should be a file named "keras_metadata.pb" in the SavedModel directory.
データセット
cats-vs-dogsデータセットでは、label = 0は猫に対応し、label = 1は犬に対応します。
def compute_accuracy(data):
  x = np.stack(data['examples'])
  y = np.asarray(data['labels'])
  _, metric = model.evaluate(x, y)
  return metric
examples = cats_vs_dogs.get_data()
print('num validation examples:', len(examples['combined']['examples']))
print('num cat examples:', len(examples['cat']['examples']))
print('num dog examples:', len(examples['dog']['examples']))
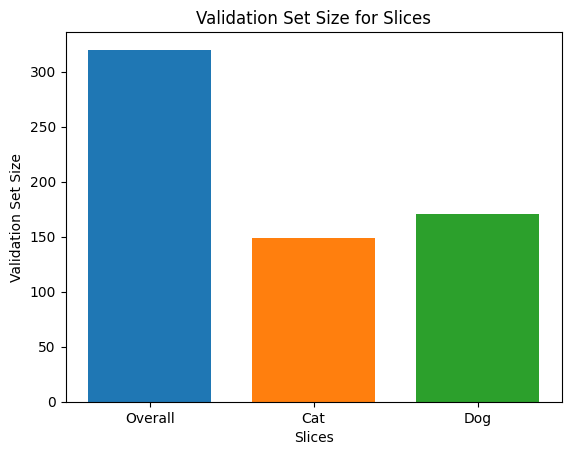
num validation examples: 320
num cat examples: 149
num dog examples: 171
2022-01-07 19:54:14.702877: W tensorflow/core/kernels/data/cache_dataset_ops.cc:768] The calling iterator did not fully read the dataset being cached. In order to avoid unexpected truncation of the dataset, the partially cached contents of the dataset  will be discarded. This can happen if you have an input pipeline similar to `dataset.cache().take(k).repeat()`. You should use `dataset.take(k).cache().repeat()` instead.
accuracy = compute_accuracy(examples['combined'])
cat_accuracy = compute_accuracy(examples['cat'])
dog_accuracy = compute_accuracy(examples['dog'])
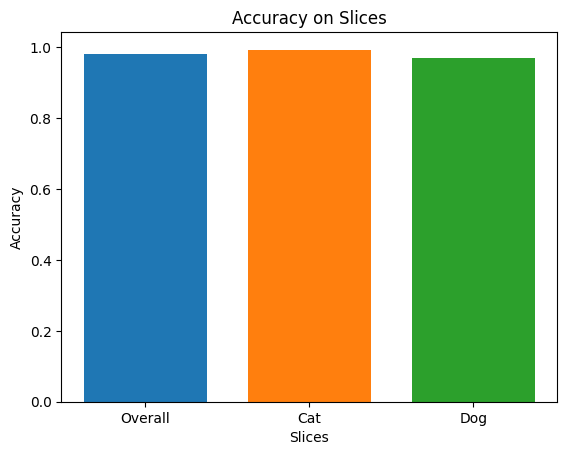
10/10 [==============================] - 9s 12ms/step - loss: 0.0794 - binary_accuracy: 0.9812
5/5 [==============================] - 1s 41ms/step - loss: 0.0608 - binary_accuracy: 0.9933
6/6 [==============================] - 0s 34ms/step - loss: 0.0956 - binary_accuracy: 0.9708
モデルカードツールキットを使用する
モデルカードツールキットを初期化します
最初のステップは、初期化することであるModelCardToolkit含む資産を維持オブジェクト、モデルのカードJSONファイルとモデルカードのドキュメントを。コールModelCardToolkit.scaffold_assets()これらの資産を生成して返すようにModelCardオブジェクトを。
# https://github.com/tensorflow/model-card-toolkit/blob/master/model_card_toolkit/model_card_toolkit.py
model_card_dir = tempfile.mkdtemp()
mct = mctlib.ModelCardToolkit(model_card_dir)

# https://github.com/tensorflow/model-card-toolkit/blob/master/model_card_toolkit/model_card.py
model_card = mct.scaffold_assets()
モデルカードに注釈を付ける
ModelCardによって返されるオブジェクトscaffold_assets()直接変更することができる多くのフィールドを有します。これらのフィールドは、最終的に生成されたモデルカードドキュメントに表示されます。総合的な一覧については、 model_card.pyを。参照ドキュメントの詳細については。
テキストフィールド
モデルの詳細
model_card.model_details 、次のような多くの基本的なメタデータフィールドが含まname 、 owners 、およびversion 。あなたには、あなたのモデルの説明を提供することができますoverviewフィールド。
model_card.model_details.name = 'Fine-tuned MobileNetV2 Model for Cats vs. Dogs'
model_card.model_details.overview = (
    'This model distinguishes cat and dog images. It uses the MobileNetV2 '
    'architecture (https://arxiv.org/abs/1801.04381) and is trained on the '
    'Cats vs Dogs dataset '
    '(https://www.tensorflow.org/datasets/catalog/cats_vs_dogs). This model '
    'performed with high accuracy on both Cat and Dog images.'
)
model_card.model_details.owners = [
  mctlib.Owner(name='Model Cards Team', contact='model-cards@google.com')
]
model_card.model_details.version = mctlib.Version(name='v1.0', date='08/28/2020')
model_card.model_details.references = [
    mctlib.Reference(reference='https://www.tensorflow.org/guide/keras/transfer_learning'),
    mctlib.Reference(reference='https://arxiv.org/abs/1801.04381'),
]
model_card.model_details.licenses = [mctlib.License(identifier='Apache-2.0')]
model_card.model_details.citations = [mctlib.Citation(citation='https://github.com/tensorflow/model-card-toolkit/blob/master/model_card_toolkit/documentation/examples/Standalone_Model_Card_Toolkit_Demo.ipynb')]
定量分析
model_card.quantitative_analysis 、モデルのパフォーマンスメトリックに関する情報が含まれています。
以下では、データセットに基づいて構築された仮想モデルの合成パフォーマンスメトリック値をいくつか作成します。
model_card.quantitative_analysis.performance_metrics = [
  mctlib.PerformanceMetric(type='accuracy', value=str(accuracy)),
  mctlib.PerformanceMetric(type='accuracy', value=str(cat_accuracy), slice='cat'),
  mctlib.PerformanceMetric(type='accuracy', value=str(dog_accuracy), slice='Dog'),
]
考慮事項
model_card.considerationsあなたのモデルに関する情報が含まれている資格-適切なユースケースは何ですか、ユーザーがなど、アプリケーションの倫理的配慮はどのようなもの、心に留めておくべきであるとの制限は何ですか
model_card.considerations.use_cases = [
    mctlib.UseCase(description='This model classifies images of cats and dogs.')
]
model_card.considerations.limitations = [
    mctlib.Limitation(description='This model is not able to classify images of other classes.')
]
model_card.considerations.ethical_considerations = [mctlib.Risk(
    name=
        'While distinguishing between cats and dogs is generally agreed to be '
        'a benign application of machine learning, harmful results can occur '
        'when the model attempts to classify images that don’t contain cats or '
        'dogs.',
    mitigation_strategy=
        'Avoid application on non-dog and non-cat images.'
)]
グラフフィールド
多くの場合、レポートでは、モデルのトレーニングデータ、および評価データ全体でのパフォーマンスに関する情報を提供することがベストプラクティスです。モデルカードツールキットを使用すると、ユーザーはこの情報をモデルカードでレンダリングされた視覚化でエンコードできます。
model_card -グラフのための3つのセクションがあるmodel_card.model_parameters.data.train.graphicsトレーニングデータセットの統計情報について、 model_card.model_parameters.data.eval.graphics評価データセットの統計情報について、およびmodel_card.quantitative_analysis.graphicsモデルの性能の定量分析のために。
グラフは次のように保存されているbase64で文字列。あなたが持っている場合はmatplotlibのの姿を、あなたとbase64文字列に変換することができmodel_card_toolkit.utils.graphics.figure_to_base64str()
# Validation Set Size Bar Chart
fig, ax = plt.subplots()
width = 0.75
rects0 = ax.bar(0, len(examples['combined']['examples']), width, label='Overall')
rects1 = ax.bar(1, len(examples['cat']['examples']), width, label='Cat')
rects2 = ax.bar(2, len(examples['dog']['examples']), width, label='Dog')
ax.set_xticks(np.arange(3))
ax.set_xticklabels(['Overall', 'Cat', 'Dog'])
ax.set_ylabel('Validation Set Size')
ax.set_xlabel('Slices')
ax.set_title('Validation Set Size for Slices')
validation_set_size_barchart = figure_to_base64str(fig)

# Acuracy Bar Chart
fig, ax = plt.subplots()
width = 0.75
rects0 = ax.bar(0, accuracy, width, label='Overall')
rects1 = ax.bar(1, cat_accuracy, width, label='Cat')
rects2 = ax.bar(2, dog_accuracy, width, label='Dog')
ax.set_xticks(np.arange(3))
ax.set_xticklabels(['Overall', 'Cat', 'Dog'])
ax.set_ylabel('Accuracy')
ax.set_xlabel('Slices')
ax.set_title('Accuracy on Slices')
accuracy_barchart = figure_to_base64str(fig)

今、私たちは、私たちにそれらを追加することができますModelCard 。
model_card.model_parameters.data.append(mctlib.Dataset())
model_card.model_parameters.data[0].graphics.collection = [
  mctlib.Graphic(name='Validation Set Size', image=validation_set_size_barchart),
]
model_card.quantitative_analysis.graphics.collection = [
  mctlib.Graphic(name='Accuracy', image=accuracy_barchart),
]
モデルカードを生成する
モデルカードドキュメントを生成しましょう。利用可能なフォーマットはで保存されているmodel_card_toolkit /テンプレート。ここでは、HTML形式とMarkdown形式について説明します。
まず、更新する必要がありModelCardToolkit最新ModelCard 。
mct.update_model_card(model_card)
さて、 ModelCardToolkitとモデルカードのドキュメントを生成することができますModelCardToolkit.export_format() 。
# Generate a model card document in HTML (default)
html_doc = mct.export_format()

# Display the model card document in HTML
display.display(display.HTML(html_doc))
Markdownなどの他の形式でモデルカードを出力することもできます。
# Generate a model card document in Markdown
md_path = os.path.join(model_card_dir, 'template/md/default_template.md.jinja')
md_doc = mct.export_format(template_path=md_path, output_file='model_card.md')

# Display the model card document in Markdown
display.display(display.Markdown(md_doc))
猫と犬の微調整されたMobileNetV2モデルのモデルカード
モデルの詳細
概要
このモデルは、猫と犬の画像を区別します。それはMobileNetV2アーキテクチャ(使用https://arxiv.org/abs/1801.04381を)と犬のデータセット(VS猫に訓練されhttps://www.tensorflow.org/datasets/catalog/cats_vs_dogs )。このモデルは、猫と犬の両方の画像で高精度で実行されました。
バージョン
名前:v1.0
日付:2020年8月28日
所有者
- モデルカードチーム、model-cards @ google.com
ライセンス
- Apache-2.0
参考文献
引用
考慮事項
ユースケース
- このモデルは、猫と犬の画像を分類します。
制限事項
- このモデルは、他のクラスの画像を分類することはできません。
倫理的配慮
- リスク:猫と犬を区別することは機械学習の良性のアプリケーションであると一般に認められていますが、モデルが猫や犬を含まない画像を分類しようとすると、有害な結果が生じる可能性があります。
- 緩和戦略:犬や猫以外の画像への適用は避けてください。
グラフィックス
検証セットのサイズ
正確さ
指標
| 名前 | 価値 |
|---|---|
| 正確さ | 0.981249988079071 |
| 正確さ、猫 | 0.9932885766029358 |
| 正確さ、犬 | 0.9707602262496948 |
