
|
|
|
 View source on GitHub View source on GitHub
|
|
The tf.data API enables you to build complex input pipelines from simple,
reusable pieces. For example, the pipeline for an image model might aggregate
data from files in a distributed file system, apply random perturbations to each
image, and merge randomly selected images into a batch for training. The
pipeline for a text model might involve extracting symbols from raw text data,
converting them to embedding identifiers with a lookup table, and batching
together sequences of different lengths. The tf.data API makes it possible to
handle large amounts of data, read from different data formats, and perform
complex transformations.
The tf.data API introduces a tf.data.Dataset abstraction that represents a
sequence of elements, in which each element consists of one or more components.
For example, in an image pipeline, an element might be a single training
example, with a pair of tensor components representing the image and its label.
There are two distinct ways to create a dataset:
A data source constructs a
Datasetfrom data stored in memory or in one or more files.A data transformation constructs a dataset from one or more
tf.data.Datasetobjects.
import tensorflow as tf
2024-08-15 01:37:36.963860: E external/local_xla/xla/stream_executor/cuda/cuda_fft.cc:485] Unable to register cuFFT factory: Attempting to register factory for plugin cuFFT when one has already been registered
2024-08-15 01:37:36.985171: E external/local_xla/xla/stream_executor/cuda/cuda_dnn.cc:8454] Unable to register cuDNN factory: Attempting to register factory for plugin cuDNN when one has already been registered
2024-08-15 01:37:36.991452: E external/local_xla/xla/stream_executor/cuda/cuda_blas.cc:1452] Unable to register cuBLAS factory: Attempting to register factory for plugin cuBLAS when one has already been registered
import pathlib
import os
import matplotlib.pyplot as plt
import pandas as pd
import numpy as np

np.set_printoptions(precision=4)
Basic mechanics
To create an input pipeline, you must start with a data source. For example,
to construct a Dataset from data in memory, you can use
tf.data.Dataset.from_tensors() or tf.data.Dataset.from_tensor_slices().
Alternatively, if your input data is stored in a file in the recommended
TFRecord format, you can use tf.data.TFRecordDataset().
Once you have a Dataset object, you can transform it into a new Dataset by
chaining method calls on the tf.data.Dataset object. For example, you can
apply per-element transformations such as Dataset.map, and multi-element
transformations such as Dataset.batch. Refer to the documentation for
tf.data.Dataset for a complete list of transformations.
The Dataset object is a Python iterable. This makes it possible to consume its
elements using a for loop:
dataset = tf.data.Dataset.from_tensor_slices([8, 3, 0, 8, 2, 1])
dataset
WARNING: All log messages before absl::InitializeLog() is called are written to STDERR
I0000 00:00:1723685859.835217   44933 cuda_executor.cc:1015] successful NUMA node read from SysFS had negative value (-1), but there must be at least one NUMA node, so returning NUMA node zero. See more at https://github.com/torvalds/linux/blob/v6.0/Documentation/ABI/testing/sysfs-bus-pci#L344-L355
I0000 00:00:1723685859.839003   44933 cuda_executor.cc:1015] successful NUMA node read from SysFS had negative value (-1), but there must be at least one NUMA node, so returning NUMA node zero. See more at https://github.com/torvalds/linux/blob/v6.0/Documentation/ABI/testing/sysfs-bus-pci#L344-L355
I0000 00:00:1723685859.842691   44933 cuda_executor.cc:1015] successful NUMA node read from SysFS had negative value (-1), but there must be at least one NUMA node, so returning NUMA node zero. See more at https://github.com/torvalds/linux/blob/v6.0/Documentation/ABI/testing/sysfs-bus-pci#L344-L355
I0000 00:00:1723685859.846561   44933 cuda_executor.cc:1015] successful NUMA node read from SysFS had negative value (-1), but there must be at least one NUMA node, so returning NUMA node zero. See more at https://github.com/torvalds/linux/blob/v6.0/Documentation/ABI/testing/sysfs-bus-pci#L344-L355
I0000 00:00:1723685859.858030   44933 cuda_executor.cc:1015] successful NUMA node read from SysFS had negative value (-1), but there must be at least one NUMA node, so returning NUMA node zero. See more at https://github.com/torvalds/linux/blob/v6.0/Documentation/ABI/testing/sysfs-bus-pci#L344-L355
I0000 00:00:1723685859.861635   44933 cuda_executor.cc:1015] successful NUMA node read from SysFS had negative value (-1), but there must be at least one NUMA node, so returning NUMA node zero. See more at https://github.com/torvalds/linux/blob/v6.0/Documentation/ABI/testing/sysfs-bus-pci#L344-L355
I0000 00:00:1723685859.865105   44933 cuda_executor.cc:1015] successful NUMA node read from SysFS had negative value (-1), but there must be at least one NUMA node, so returning NUMA node zero. See more at https://github.com/torvalds/linux/blob/v6.0/Documentation/ABI/testing/sysfs-bus-pci#L344-L355
I0000 00:00:1723685859.868512   44933 cuda_executor.cc:1015] successful NUMA node read from SysFS had negative value (-1), but there must be at least one NUMA node, so returning NUMA node zero. See more at https://github.com/torvalds/linux/blob/v6.0/Documentation/ABI/testing/sysfs-bus-pci#L344-L355
I0000 00:00:1723685859.871403   44933 cuda_executor.cc:1015] successful NUMA node read from SysFS had negative value (-1), but there must be at least one NUMA node, so returning NUMA node zero. See more at https://github.com/torvalds/linux/blob/v6.0/Documentation/ABI/testing/sysfs-bus-pci#L344-L355
I0000 00:00:1723685859.874859   44933 cuda_executor.cc:1015] successful NUMA node read from SysFS had negative value (-1), but there must be at least one NUMA node, so returning NUMA node zero. See more at https://github.com/torvalds/linux/blob/v6.0/Documentation/ABI/testing/sysfs-bus-pci#L344-L355
I0000 00:00:1723685859.878307   44933 cuda_executor.cc:1015] successful NUMA node read from SysFS had negative value (-1), but there must be at least one NUMA node, so returning NUMA node zero. See more at https://github.com/torvalds/linux/blob/v6.0/Documentation/ABI/testing/sysfs-bus-pci#L344-L355
I0000 00:00:1723685859.881840   44933 cuda_executor.cc:1015] successful NUMA node read from SysFS had negative value (-1), but there must be at least one NUMA node, so returning NUMA node zero. See more at https://github.com/torvalds/linux/blob/v6.0/Documentation/ABI/testing/sysfs-bus-pci#L344-L355
I0000 00:00:1723685861.098140   44933 cuda_executor.cc:1015] successful NUMA node read from SysFS had negative value (-1), but there must be at least one NUMA node, so returning NUMA node zero. See more at https://github.com/torvalds/linux/blob/v6.0/Documentation/ABI/testing/sysfs-bus-pci#L344-L355
I0000 00:00:1723685861.100277   44933 cuda_executor.cc:1015] successful NUMA node read from SysFS had negative value (-1), but there must be at least one NUMA node, so returning NUMA node zero. See more at https://github.com/torvalds/linux/blob/v6.0/Documentation/ABI/testing/sysfs-bus-pci#L344-L355
I0000 00:00:1723685861.102280   44933 cuda_executor.cc:1015] successful NUMA node read from SysFS had negative value (-1), but there must be at least one NUMA node, so returning NUMA node zero. See more at https://github.com/torvalds/linux/blob/v6.0/Documentation/ABI/testing/sysfs-bus-pci#L344-L355
I0000 00:00:1723685861.104281   44933 cuda_executor.cc:1015] successful NUMA node read from SysFS had negative value (-1), but there must be at least one NUMA node, so returning NUMA node zero. See more at https://github.com/torvalds/linux/blob/v6.0/Documentation/ABI/testing/sysfs-bus-pci#L344-L355
I0000 00:00:1723685861.106309   44933 cuda_executor.cc:1015] successful NUMA node read from SysFS had negative value (-1), but there must be at least one NUMA node, so returning NUMA node zero. See more at https://github.com/torvalds/linux/blob/v6.0/Documentation/ABI/testing/sysfs-bus-pci#L344-L355
I0000 00:00:1723685861.108307   44933 cuda_executor.cc:1015] successful NUMA node read from SysFS had negative value (-1), but there must be at least one NUMA node, so returning NUMA node zero. See more at https://github.com/torvalds/linux/blob/v6.0/Documentation/ABI/testing/sysfs-bus-pci#L344-L355
I0000 00:00:1723685861.110218   44933 cuda_executor.cc:1015] successful NUMA node read from SysFS had negative value (-1), but there must be at least one NUMA node, so returning NUMA node zero. See more at https://github.com/torvalds/linux/blob/v6.0/Documentation/ABI/testing/sysfs-bus-pci#L344-L355
I0000 00:00:1723685861.112117   44933 cuda_executor.cc:1015] successful NUMA node read from SysFS had negative value (-1), but there must be at least one NUMA node, so returning NUMA node zero. See more at https://github.com/torvalds/linux/blob/v6.0/Documentation/ABI/testing/sysfs-bus-pci#L344-L355
I0000 00:00:1723685861.114046   44933 cuda_executor.cc:1015] successful NUMA node read from SysFS had negative value (-1), but there must be at least one NUMA node, so returning NUMA node zero. See more at https://github.com/torvalds/linux/blob/v6.0/Documentation/ABI/testing/sysfs-bus-pci#L344-L355
I0000 00:00:1723685861.116014   44933 cuda_executor.cc:1015] successful NUMA node read from SysFS had negative value (-1), but there must be at least one NUMA node, so returning NUMA node zero. See more at https://github.com/torvalds/linux/blob/v6.0/Documentation/ABI/testing/sysfs-bus-pci#L344-L355
I0000 00:00:1723685861.117904   44933 cuda_executor.cc:1015] successful NUMA node read from SysFS had negative value (-1), but there must be at least one NUMA node, so returning NUMA node zero. See more at https://github.com/torvalds/linux/blob/v6.0/Documentation/ABI/testing/sysfs-bus-pci#L344-L355
I0000 00:00:1723685861.119808   44933 cuda_executor.cc:1015] successful NUMA node read from SysFS had negative value (-1), but there must be at least one NUMA node, so returning NUMA node zero. See more at https://github.com/torvalds/linux/blob/v6.0/Documentation/ABI/testing/sysfs-bus-pci#L344-L355
I0000 00:00:1723685861.158075   44933 cuda_executor.cc:1015] successful NUMA node read from SysFS had negative value (-1), but there must be at least one NUMA node, so returning NUMA node zero. See more at https://github.com/torvalds/linux/blob/v6.0/Documentation/ABI/testing/sysfs-bus-pci#L344-L355
I0000 00:00:1723685861.160123   44933 cuda_executor.cc:1015] successful NUMA node read from SysFS had negative value (-1), but there must be at least one NUMA node, so returning NUMA node zero. See more at https://github.com/torvalds/linux/blob/v6.0/Documentation/ABI/testing/sysfs-bus-pci#L344-L355
I0000 00:00:1723685861.162060   44933 cuda_executor.cc:1015] successful NUMA node read from SysFS had negative value (-1), but there must be at least one NUMA node, so returning NUMA node zero. See more at https://github.com/torvalds/linux/blob/v6.0/Documentation/ABI/testing/sysfs-bus-pci#L344-L355
I0000 00:00:1723685861.163993   44933 cuda_executor.cc:1015] successful NUMA node read from SysFS had negative value (-1), but there must be at least one NUMA node, so returning NUMA node zero. See more at https://github.com/torvalds/linux/blob/v6.0/Documentation/ABI/testing/sysfs-bus-pci#L344-L355
I0000 00:00:1723685861.165963   44933 cuda_executor.cc:1015] successful NUMA node read from SysFS had negative value (-1), but there must be at least one NUMA node, so returning NUMA node zero. See more at https://github.com/torvalds/linux/blob/v6.0/Documentation/ABI/testing/sysfs-bus-pci#L344-L355
I0000 00:00:1723685861.167940   44933 cuda_executor.cc:1015] successful NUMA node read from SysFS had negative value (-1), but there must be at least one NUMA node, so returning NUMA node zero. See more at https://github.com/torvalds/linux/blob/v6.0/Documentation/ABI/testing/sysfs-bus-pci#L344-L355
I0000 00:00:1723685861.169863   44933 cuda_executor.cc:1015] successful NUMA node read from SysFS had negative value (-1), but there must be at least one NUMA node, so returning NUMA node zero. See more at https://github.com/torvalds/linux/blob/v6.0/Documentation/ABI/testing/sysfs-bus-pci#L344-L355
I0000 00:00:1723685861.171778   44933 cuda_executor.cc:1015] successful NUMA node read from SysFS had negative value (-1), but there must be at least one NUMA node, so returning NUMA node zero. See more at https://github.com/torvalds/linux/blob/v6.0/Documentation/ABI/testing/sysfs-bus-pci#L344-L355
I0000 00:00:1723685861.173638   44933 cuda_executor.cc:1015] successful NUMA node read from SysFS had negative value (-1), but there must be at least one NUMA node, so returning NUMA node zero. See more at https://github.com/torvalds/linux/blob/v6.0/Documentation/ABI/testing/sysfs-bus-pci#L344-L355
I0000 00:00:1723685861.176135   44933 cuda_executor.cc:1015] successful NUMA node read from SysFS had negative value (-1), but there must be at least one NUMA node, so returning NUMA node zero. See more at https://github.com/torvalds/linux/blob/v6.0/Documentation/ABI/testing/sysfs-bus-pci#L344-L355
I0000 00:00:1723685861.178420   44933 cuda_executor.cc:1015] successful NUMA node read from SysFS had negative value (-1), but there must be at least one NUMA node, so returning NUMA node zero. See more at https://github.com/torvalds/linux/blob/v6.0/Documentation/ABI/testing/sysfs-bus-pci#L344-L355
I0000 00:00:1723685861.180782   44933 cuda_executor.cc:1015] successful NUMA node read from SysFS had negative value (-1), but there must be at least one NUMA node, so returning NUMA node zero. See more at https://github.com/torvalds/linux/blob/v6.0/Documentation/ABI/testing/sysfs-bus-pci#L344-L355
<_TensorSliceDataset element_spec=TensorSpec(shape=(), dtype=tf.int32, name=None)>
for elem in dataset:
  print(elem.numpy())
8
3
0
8
2
1
Or by explicitly creating a Python iterator using iter and consuming its
elements using next:
it = iter(dataset)

print(next(it).numpy())
8
Alternatively, dataset elements can be consumed using the reduce
transformation, which reduces all elements to produce a single result. The
following example illustrates how to use the reduce transformation to compute
the sum of a dataset of integers.
print(dataset.reduce(0, lambda state, value: state + value).numpy())
22
Dataset structure
A dataset produces a sequence of elements, where each element is
the same (nested) structure of components. Individual components
of the structure can be of any type representable by
tf.TypeSpec, including tf.Tensor, tf.sparse.SparseTensor,
tf.RaggedTensor, tf.TensorArray, or tf.data.Dataset.
The Python constructs that can be used to express the (nested)
structure of elements include tuple, dict, NamedTuple, and
OrderedDict. In particular, list is not a valid construct for
expressing the structure of dataset elements. This is because
early tf.data users felt strongly about list inputs (for example, when passed
to tf.data.Dataset.from_tensors) being automatically packed as
tensors and list outputs (for example, return values of user-defined
functions) being coerced into a tuple. As a consequence, if you
would like a list input to be treated as a structure, you need
to convert it into tuple and if you would like a list output
to be a single component, then you need to explicitly pack it
using tf.stack.
The Dataset.element_spec property allows you to inspect the type
of each element component. The property returns a nested structure
of tf.TypeSpec objects, matching the structure of the element,
which may be a single component, a tuple of components, or a nested
tuple of components. For example:
dataset1 = tf.data.Dataset.from_tensor_slices(tf.random.uniform([4, 10]))

dataset1.element_spec
TensorSpec(shape=(10,), dtype=tf.float32, name=None)
dataset2 = tf.data.Dataset.from_tensor_slices(
   (tf.random.uniform([4]),
    tf.random.uniform([4, 100], maxval=100, dtype=tf.int32)))

dataset2.element_spec
(TensorSpec(shape=(), dtype=tf.float32, name=None),
 TensorSpec(shape=(100,), dtype=tf.int32, name=None))
dataset3 = tf.data.Dataset.zip((dataset1, dataset2))

dataset3.element_spec
(TensorSpec(shape=(10,), dtype=tf.float32, name=None),
 (TensorSpec(shape=(), dtype=tf.float32, name=None),
  TensorSpec(shape=(100,), dtype=tf.int32, name=None)))
# Dataset containing a sparse tensor.
dataset4 = tf.data.Dataset.from_tensors(tf.SparseTensor(indices=[[0, 0], [1, 2]], values=[1, 2], dense_shape=[3, 4]))

dataset4.element_spec
SparseTensorSpec(TensorShape([3, 4]), tf.int32)
# Use value_type to see the type of value represented by the element spec
dataset4.element_spec.value_type
tensorflow.python.framework.sparse_tensor.SparseTensor
The Dataset transformations support datasets of any structure. When using the
Dataset.map, and Dataset.filter transformations,
which apply a function to each element, the element structure determines the
arguments of the function:
dataset1 = tf.data.Dataset.from_tensor_slices(
    tf.random.uniform([4, 10], minval=1, maxval=10, dtype=tf.int32))

dataset1
<_TensorSliceDataset element_spec=TensorSpec(shape=(10,), dtype=tf.int32, name=None)>
for z in dataset1:
  print(z.numpy())
[3 4 1 6 1 8 5 8 9 4]
[2 7 6 9 2 6 6 4 9 7]
[8 7 9 6 3 4 5 8 4 4]
[2 1 1 1 3 9 7 8 6 8]
dataset2 = tf.data.Dataset.from_tensor_slices(
   (tf.random.uniform([4]),
    tf.random.uniform([4, 100], maxval=100, dtype=tf.int32)))

dataset2
<_TensorSliceDataset element_spec=(TensorSpec(shape=(), dtype=tf.float32, name=None), TensorSpec(shape=(100,), dtype=tf.int32, name=None))>
dataset3 = tf.data.Dataset.zip((dataset1, dataset2))

dataset3
<_ZipDataset element_spec=(TensorSpec(shape=(10,), dtype=tf.int32, name=None), (TensorSpec(shape=(), dtype=tf.float32, name=None), TensorSpec(shape=(100,), dtype=tf.int32, name=None)))>
for a, (b,c) in dataset3:
  print('shapes: {a.shape}, {b.shape}, {c.shape}'.format(a=a, b=b, c=c))
shapes: (10,), (), (100,)
shapes: (10,), (), (100,)
shapes: (10,), (), (100,)
shapes: (10,), (), (100,)
Reading input data
Consuming NumPy arrays
Refer to the Loading NumPy arrays tutorial for more examples.
If all of your input data fits in memory, the simplest way to create a Dataset
from them is to convert them to tf.Tensor objects and use
Dataset.from_tensor_slices.
train, test = tf.keras.datasets.fashion_mnist.load_data()
Downloading data from https://storage.googleapis.com/tensorflow/tf-keras-datasets/train-labels-idx1-ubyte.gz
29515/29515 ━━━━━━━━━━━━━━━━━━━━ 0s 0us/step
Downloading data from https://storage.googleapis.com/tensorflow/tf-keras-datasets/train-images-idx3-ubyte.gz
26421880/26421880 ━━━━━━━━━━━━━━━━━━━━ 0s 0us/step
Downloading data from https://storage.googleapis.com/tensorflow/tf-keras-datasets/t10k-labels-idx1-ubyte.gz
5148/5148 ━━━━━━━━━━━━━━━━━━━━ 0s 0us/step
Downloading data from https://storage.googleapis.com/tensorflow/tf-keras-datasets/t10k-images-idx3-ubyte.gz
4422102/4422102 ━━━━━━━━━━━━━━━━━━━━ 0s 0us/step
images, labels = train
images = images/255

dataset = tf.data.Dataset.from_tensor_slices((images, labels))
dataset
<_TensorSliceDataset element_spec=(TensorSpec(shape=(28, 28), dtype=tf.float64, name=None), TensorSpec(shape=(), dtype=tf.uint8, name=None))>
Consuming Python generators
Another common data source that can easily be ingested as a tf.data.Dataset is the python generator.
def count(stop):
  i = 0
  while i<stop:
    yield i
    i += 1
for n in count(5):
  print(n)
0
1
2
3
4
The Dataset.from_generator constructor converts the python generator to a fully functional tf.data.Dataset.
The constructor takes a callable as input, not an iterator. This allows it to restart the generator when it reaches the end. It takes an optional args argument, which is passed as the callable's arguments.
The output_types argument is required because tf.data builds a tf.Graph internally, and graph edges require a tf.dtype.
ds_counter = tf.data.Dataset.from_generator(count, args=[25], output_types=tf.int32, output_shapes = (), )
for count_batch in ds_counter.repeat().batch(10).take(10):
  print(count_batch.numpy())
[0 1 2 3 4 5 6 7 8 9]
[10 11 12 13 14 15 16 17 18 19]
[20 21 22 23 24  0  1  2  3  4]
[ 5  6  7  8  9 10 11 12 13 14]
[15 16 17 18 19 20 21 22 23 24]
[0 1 2 3 4 5 6 7 8 9]
[10 11 12 13 14 15 16 17 18 19]
[20 21 22 23 24  0  1  2  3  4]
[ 5  6  7  8  9 10 11 12 13 14]
[15 16 17 18 19 20 21 22 23 24]
The output_shapes argument is not required but is highly recommended as many TensorFlow operations do not support tensors with an unknown rank. If the length of a particular axis is unknown or variable, set it as None in the output_shapes.
It's also important to note that the output_shapes and output_types follow the same nesting rules as other dataset methods.
Here is an example generator that demonstrates both aspects: it returns tuples of arrays, where the second array is a vector with unknown length.
def gen_series():
  i = 0
  while True:
    size = np.random.randint(0, 10)
    yield i, np.random.normal(size=(size,))
    i += 1
for i, series in gen_series():
  print(i, ":", str(series))
  if i > 5:
    break
0 : [1.1274]
1 : [-0.5822  0.8497 -1.3594  0.2083 -0.3007  1.2171 -0.3551]
2 : [-1.2016 -0.1085  0.4088  0.0801  1.4901 -2.3102]
3 : [ 0.5816 -0.6447 -0.9673  0.5282  0.52   -0.2634  0.3001  0.8753]
4 : [ 0.0888  0.071   1.26   -0.347  -0.2643 -1.0757  0.4192]
5 : [ 0.4911  0.8377  0.3576 -0.0351  0.9663]
6 : [-0.1996  0.5808  0.4589  1.8229 -0.5712]
The first output is an int32 the second is a float32.
The first item is a scalar, shape (), and the second is a vector of unknown length, shape (None,)
ds_series = tf.data.Dataset.from_generator(
    gen_series,
    output_types=(tf.int32, tf.float32),
    output_shapes=((), (None,)))

ds_series
<_FlatMapDataset element_spec=(TensorSpec(shape=(), dtype=tf.int32, name=None), TensorSpec(shape=(None,), dtype=tf.float32, name=None))>
Now it can be used like a regular tf.data.Dataset. Note that when batching a dataset with a variable shape, you need to use Dataset.padded_batch.
ds_series_batch = ds_series.shuffle(20).padded_batch(10)

ids, sequence_batch = next(iter(ds_series_batch))
print(ids.numpy())
print()
print(sequence_batch.numpy())
[ 5 19 20 11  4 10 17  8 27 18]

[[-0.7479  0.867  -0.0558 -1.0825 -0.4113  0.0312  0.    ]
 [-1.0498 -0.3941  0.      0.      0.      0.      0.    ]
 [-0.2709  0.0236  0.0746  0.3704  0.      0.      0.    ]
 [ 1.6525 -0.861   0.5642  0.9961  0.7463  0.      0.    ]
 [ 0.4122 -0.118   1.5491  1.9578  0.      0.      0.    ]
 [-1.6237  1.3636 -0.2079  0.      0.      0.      0.    ]
 [ 0.      0.      0.      0.      0.      0.      0.    ]
 [ 0.      0.      0.      0.      0.      0.      0.    ]
 [-1.3268  0.9881  0.531   0.      0.      0.      0.    ]
 [ 0.0284 -1.4974 -0.545  -1.2795  0.7032  1.4058  0.1412]]
For a more realistic example, try wrapping preprocessing.image.ImageDataGenerator as a tf.data.Dataset.
First download the data:
flowers = tf.keras.utils.get_file(
    'flower_photos',
    'https://storage.googleapis.com/download.tensorflow.org/example_images/flower_photos.tgz',
    untar=True)
Downloading data from https://storage.googleapis.com/download.tensorflow.org/example_images/flower_photos.tgz
228813984/228813984 ━━━━━━━━━━━━━━━━━━━━ 2s 0us/step
Create the image.ImageDataGenerator
img_gen = tf.keras.preprocessing.image.ImageDataGenerator(rescale=1./255, rotation_range=20)
images, labels = next(img_gen.flow_from_directory(flowers))
Found 3670 images belonging to 5 classes.
print(images.dtype, images.shape)
print(labels.dtype, labels.shape)
float32 (32, 256, 256, 3)
float32 (32, 5)
ds = tf.data.Dataset.from_generator(
    lambda: img_gen.flow_from_directory(flowers),
    output_types=(tf.float32, tf.float32),
    output_shapes=([32,256,256,3], [32,5])
)

ds.element_spec
(TensorSpec(shape=(32, 256, 256, 3), dtype=tf.float32, name=None),
 TensorSpec(shape=(32, 5), dtype=tf.float32, name=None))
for images, labels in ds.take(1):
  print('images.shape: ', images.shape)
  print('labels.shape: ', labels.shape)
Found 3670 images belonging to 5 classes.
images.shape:  (32, 256, 256, 3)
labels.shape:  (32, 5)
Consuming TFRecord data
Refer to the Loading TFRecords tutorial for an end-to-end example.
The tf.data API supports a variety of file formats so that you can process
large datasets that do not fit in memory. For example, the TFRecord file format
is a simple record-oriented binary format that many TensorFlow applications use
for training data. The tf.data.TFRecordDataset class enables you to
stream over the contents of one or more TFRecord files as part of an input
pipeline.
Here is an example using the test file from the French Street Name Signs (FSNS).
# Creates a dataset that reads all of the examples from two files.
fsns_test_file = tf.keras.utils.get_file("fsns.tfrec", "https://storage.googleapis.com/download.tensorflow.org/data/fsns-20160927/testdata/fsns-00000-of-00001")
Downloading data from https://storage.googleapis.com/download.tensorflow.org/data/fsns-20160927/testdata/fsns-00000-of-00001
7904079/7904079 ━━━━━━━━━━━━━━━━━━━━ 0s 0us/step
The filenames argument to the TFRecordDataset initializer can either be a
string, a list of strings, or a tf.Tensor of strings. Therefore if you have
two sets of files for training and validation purposes, you can create a factory
method that produces the dataset, taking filenames as an input argument:
dataset = tf.data.TFRecordDataset(filenames = [fsns_test_file])
dataset
<TFRecordDatasetV2 element_spec=TensorSpec(shape=(), dtype=tf.string, name=None)>
Many TensorFlow projects use serialized tf.train.Example records in their TFRecord files. These need to be decoded before they can be inspected:
raw_example = next(iter(dataset))
parsed = tf.train.Example.FromString(raw_example.numpy())

parsed.features.feature['image/text']
bytes_list {
  value: "Rue Perreyon"
}
Consuming text data
Refer to the Load text tutorial for an end-to-end example.
Many datasets are distributed as one or more text files. The
tf.data.TextLineDataset provides an easy way to extract lines from one or more
text files. Given one or more filenames, a TextLineDataset will produce one
string-valued element per line of those files.
directory_url = 'https://storage.googleapis.com/download.tensorflow.org/data/illiad/'
file_names = ['cowper.txt', 'derby.txt', 'butler.txt']

file_paths = [
    tf.keras.utils.get_file(file_name, directory_url + file_name)
    for file_name in file_names
]
Downloading data from https://storage.googleapis.com/download.tensorflow.org/data/illiad/cowper.txt
815980/815980 ━━━━━━━━━━━━━━━━━━━━ 0s 0us/step
Downloading data from https://storage.googleapis.com/download.tensorflow.org/data/illiad/derby.txt
809730/809730 ━━━━━━━━━━━━━━━━━━━━ 0s 0us/step
Downloading data from https://storage.googleapis.com/download.tensorflow.org/data/illiad/butler.txt
807992/807992 ━━━━━━━━━━━━━━━━━━━━ 0s 0us/step
dataset = tf.data.TextLineDataset(file_paths)
Here are the first few lines of the first file:
for line in dataset.take(5):
  print(line.numpy())
b"\xef\xbb\xbfAchilles sing, O Goddess! Peleus' son;"
b'His wrath pernicious, who ten thousand woes'
b"Caused to Achaia's host, sent many a soul"
b'Illustrious into Ades premature,'
b'And Heroes gave (so stood the will of Jove)'
To alternate lines between files use Dataset.interleave. This makes it easier to shuffle files together. Here are the first, second and third lines from each translation:
files_ds = tf.data.Dataset.from_tensor_slices(file_paths)
lines_ds = files_ds.interleave(tf.data.TextLineDataset, cycle_length=3)

for i, line in enumerate(lines_ds.take(9)):
  if i % 3 == 0:
    print()
  print(line.numpy())
b"\xef\xbb\xbfAchilles sing, O Goddess! Peleus' son;"
b"\xef\xbb\xbfOf Peleus' son, Achilles, sing, O Muse,"
b'\xef\xbb\xbfSing, O goddess, the anger of Achilles son of Peleus, that brought'

b'His wrath pernicious, who ten thousand woes'
b'The vengeance, deep and deadly; whence to Greece'
b'countless ills upon the Achaeans. Many a brave soul did it send'

b"Caused to Achaia's host, sent many a soul"
b'Unnumbered ills arose; which many a soul'
b'hurrying down to Hades, and many a hero did it yield a prey to dogs and'
By default, a TextLineDataset yields every line of each file, which may
not be desirable, for example, if the file starts with a header line, or contains comments. These lines can be removed using the Dataset.skip() or
Dataset.filter transformations. Here, you skip the first line, then filter to
find only survivors.
titanic_file = tf.keras.utils.get_file("train.csv", "https://storage.googleapis.com/tf-datasets/titanic/train.csv")
titanic_lines = tf.data.TextLineDataset(titanic_file)
Downloading data from https://storage.googleapis.com/tf-datasets/titanic/train.csv
30874/30874 ━━━━━━━━━━━━━━━━━━━━ 0s 0us/step
for line in titanic_lines.take(10):
  print(line.numpy())
b'survived,sex,age,n_siblings_spouses,parch,fare,class,deck,embark_town,alone'
b'0,male,22.0,1,0,7.25,Third,unknown,Southampton,n'
b'1,female,38.0,1,0,71.2833,First,C,Cherbourg,n'
b'1,female,26.0,0,0,7.925,Third,unknown,Southampton,y'
b'1,female,35.0,1,0,53.1,First,C,Southampton,n'
b'0,male,28.0,0,0,8.4583,Third,unknown,Queenstown,y'
b'0,male,2.0,3,1,21.075,Third,unknown,Southampton,n'
b'1,female,27.0,0,2,11.1333,Third,unknown,Southampton,n'
b'1,female,14.0,1,0,30.0708,Second,unknown,Cherbourg,n'
b'1,female,4.0,1,1,16.7,Third,G,Southampton,n'
def survived(line):
  return tf.not_equal(tf.strings.substr(line, 0, 1), "0")

survivors = titanic_lines.skip(1).filter(survived)
for line in survivors.take(10):
  print(line.numpy())
b'1,female,38.0,1,0,71.2833,First,C,Cherbourg,n'
b'1,female,26.0,0,0,7.925,Third,unknown,Southampton,y'
b'1,female,35.0,1,0,53.1,First,C,Southampton,n'
b'1,female,27.0,0,2,11.1333,Third,unknown,Southampton,n'
b'1,female,14.0,1,0,30.0708,Second,unknown,Cherbourg,n'
b'1,female,4.0,1,1,16.7,Third,G,Southampton,n'
b'1,male,28.0,0,0,13.0,Second,unknown,Southampton,y'
b'1,female,28.0,0,0,7.225,Third,unknown,Cherbourg,y'
b'1,male,28.0,0,0,35.5,First,A,Southampton,y'
b'1,female,38.0,1,5,31.3875,Third,unknown,Southampton,n'
Consuming CSV data
Refer to the Loading CSV Files and Loading Pandas DataFrames tutorials for more examples.
The CSV file format is a popular format for storing tabular data in plain text.
For example:
titanic_file = tf.keras.utils.get_file("train.csv", "https://storage.googleapis.com/tf-datasets/titanic/train.csv")
df = pd.read_csv(titanic_file)
df.head()
If your data fits in memory the same Dataset.from_tensor_slices method works on dictionaries, allowing this data to be easily imported:
titanic_slices = tf.data.Dataset.from_tensor_slices(dict(df))

for feature_batch in titanic_slices.take(1):
  for key, value in feature_batch.items():
    print("  {!r:20s}: {}".format(key, value))
'survived'          : 0
  'sex'               : b'male'
  'age'               : 22.0
  'n_siblings_spouses': 1
  'parch'             : 0
  'fare'              : 7.25
  'class'             : b'Third'
  'deck'              : b'unknown'
  'embark_town'       : b'Southampton'
  'alone'             : b'n'
A more scalable approach is to load from disk as necessary.
The tf.data module provides methods to extract records from one or more CSV files that comply with RFC 4180.
The tf.data.experimental.make_csv_dataset function is the high-level interface for reading sets of CSV files. It supports column type inference and many other features, like batching and shuffling, to make usage simple.
titanic_batches = tf.data.experimental.make_csv_dataset(
    titanic_file, batch_size=4,
    label_name="survived")
for feature_batch, label_batch in titanic_batches.take(1):
  print("'survived': {}".format(label_batch))
  print("features:")
  for key, value in feature_batch.items():
    print("  {!r:20s}: {}".format(key, value))
'survived': [0 0 0 0]
features:
  'sex'               : [b'male' b'male' b'male' b'male']
  'age'               : [28. 46. 28. 26.]
  'n_siblings_spouses': [0 1 0 0]
  'parch'             : [1 0 0 0]
  'fare'              : [33.     61.175   8.05    7.8875]
  'class'             : [b'Second' b'First' b'Third' b'Third']
  'deck'              : [b'unknown' b'E' b'unknown' b'unknown']
  'embark_town'       : [b'Southampton' b'Southampton' b'Southampton' b'Southampton']
  'alone'             : [b'n' b'n' b'y' b'y']
You can use the select_columns argument if you only need a subset of columns.
titanic_batches = tf.data.experimental.make_csv_dataset(
    titanic_file, batch_size=4,
    label_name="survived", select_columns=['class', 'fare', 'survived'])
for feature_batch, label_batch in titanic_batches.take(1):
  print("'survived': {}".format(label_batch))
  for key, value in feature_batch.items():
    print("  {!r:20s}: {}".format(key, value))
'survived': [1 1 0 0]
  'fare'              : [10.5   35.5   12.875 29.125]
  'class'             : [b'Second' b'First' b'Second' b'Third']
There is also a lower-level experimental.CsvDataset class which provides finer grained control. It does not support column type inference. Instead you must specify the type of each column.
titanic_types  = [tf.int32, tf.string, tf.float32, tf.int32, tf.int32, tf.float32, tf.string, tf.string, tf.string, tf.string]
dataset = tf.data.experimental.CsvDataset(titanic_file, titanic_types , header=True)

for line in dataset.take(10):
  print([item.numpy() for item in line])
[0, b'male', 22.0, 1, 0, 7.25, b'Third', b'unknown', b'Southampton', b'n']
[1, b'female', 38.0, 1, 0, 71.2833, b'First', b'C', b'Cherbourg', b'n']
[1, b'female', 26.0, 0, 0, 7.925, b'Third', b'unknown', b'Southampton', b'y']
[1, b'female', 35.0, 1, 0, 53.1, b'First', b'C', b'Southampton', b'n']
[0, b'male', 28.0, 0, 0, 8.4583, b'Third', b'unknown', b'Queenstown', b'y']
[0, b'male', 2.0, 3, 1, 21.075, b'Third', b'unknown', b'Southampton', b'n']
[1, b'female', 27.0, 0, 2, 11.1333, b'Third', b'unknown', b'Southampton', b'n']
[1, b'female', 14.0, 1, 0, 30.0708, b'Second', b'unknown', b'Cherbourg', b'n']
[1, b'female', 4.0, 1, 1, 16.7, b'Third', b'G', b'Southampton', b'n']
[0, b'male', 20.0, 0, 0, 8.05, b'Third', b'unknown', b'Southampton', b'y']
If some columns are empty, this low-level interface allows you to provide default values instead of column types.
%%writefile missing.csv
1,2,3,4
,2,3,4
1,,3,4
1,2,,4
1,2,3,
,,,
Writing missing.csv
# Creates a dataset that reads all of the records from two CSV files, each with
# four float columns which may have missing values.

record_defaults = [999,999,999,999]
dataset = tf.data.experimental.CsvDataset("missing.csv", record_defaults)
dataset = dataset.map(lambda *items: tf.stack(items))
dataset
<_MapDataset element_spec=TensorSpec(shape=(4,), dtype=tf.int32, name=None)>
for line in dataset:
  print(line.numpy())
[1 2 3 4]
[999   2   3   4]
[  1 999   3   4]
[  1   2 999   4]
[  1   2   3 999]
[999 999 999 999]
By default, a CsvDataset yields every column of every line of the file,
which may not be desirable, for example if the file starts with a header line
that should be ignored, or if some columns are not required in the input.
These lines and fields can be removed with the header and select_cols
arguments respectively.
# Creates a dataset that reads all of the records from two CSV files with
# headers, extracting float data from columns 2 and 4.
record_defaults = [999, 999] # Only provide defaults for the selected columns
dataset = tf.data.experimental.CsvDataset("missing.csv", record_defaults, select_cols=[1, 3])
dataset = dataset.map(lambda *items: tf.stack(items))
dataset
<_MapDataset element_spec=TensorSpec(shape=(2,), dtype=tf.int32, name=None)>
for line in dataset:
  print(line.numpy())
[2 4]
[2 4]
[999   4]
[2 4]
[  2 999]
[999 999]
Consuming sets of files
There are many datasets distributed as a set of files, where each file is an example.
flowers_root = tf.keras.utils.get_file(
    'flower_photos',
    'https://storage.googleapis.com/download.tensorflow.org/example_images/flower_photos.tgz',
    untar=True)
flowers_root = pathlib.Path(flowers_root)
The root directory contains a directory for each class:
for item in flowers_root.glob("*"):
  print(item.name)
daisy
tulips
sunflowers
LICENSE.txt
dandelion
roses
The files in each class directory are examples:
list_ds = tf.data.Dataset.list_files(str(flowers_root/'*/*'))

for f in list_ds.take(5):
  print(f.numpy())
b'/home/kbuilder/.keras/datasets/flower_photos/tulips/4955884820_7e4ce4d7e5_m.jpg'
b'/home/kbuilder/.keras/datasets/flower_photos/dandelion/6250363717_17732e992e_n.jpg'
b'/home/kbuilder/.keras/datasets/flower_photos/tulips/14278331403_4c475f9a9b.jpg'
b'/home/kbuilder/.keras/datasets/flower_photos/dandelion/480621885_4c8b50fa11_m.jpg'
b'/home/kbuilder/.keras/datasets/flower_photos/tulips/5716293002_a8be6a6dd3_n.jpg'
Read the data using the tf.io.read_file function and extract the label from the path, returning (image, label) pairs:
def process_path(file_path):
  label = tf.strings.split(file_path, os.sep)[-2]
  return tf.io.read_file(file_path), label

labeled_ds = list_ds.map(process_path)
for image_raw, label_text in labeled_ds.take(1):
  print(repr(image_raw.numpy()[:100]))
  print()
  print(label_text.numpy())
b'\xff\xd8\xff\xe0\x00\x10JFIF\x00\x01\x01\x00\x00\x01\x00\x01\x00\x00\xff\xdb\x00C\x00\x03\x02\x02\x03\x02\x02\x03\x03\x03\x03\x04\x03\x03\x04\x05\x08\x05\x05\x04\x04\x05\n\x07\x07\x06\x08\x0c\n\x0c\x0c\x0b\n\x0b\x0b\r\x0e\x12\x10\r\x0e\x11\x0e\x0b\x0b\x10\x16\x10\x11\x13\x14\x15\x15\x15\x0c\x0f\x17\x18\x16\x14\x18\x12\x14\x15\x14\xff\xdb\x00C\x01\x03\x04\x04\x05\x04\x05'

b'dandelion'
Batching dataset elements
Simple batching
The simplest form of batching stacks n consecutive elements of a dataset into
a single element. The Dataset.batch() transformation does exactly this, with
the same constraints as the tf.stack() operator, applied to each component
of the elements: i.e., for each component i, all elements must have a tensor
of the exact same shape.
inc_dataset = tf.data.Dataset.range(100)
dec_dataset = tf.data.Dataset.range(0, -100, -1)
dataset = tf.data.Dataset.zip((inc_dataset, dec_dataset))
batched_dataset = dataset.batch(4)

for batch in batched_dataset.take(4):
  print([arr.numpy() for arr in batch])
[array([0, 1, 2, 3]), array([ 0, -1, -2, -3])]
[array([4, 5, 6, 7]), array([-4, -5, -6, -7])]
[array([ 8,  9, 10, 11]), array([ -8,  -9, -10, -11])]
[array([12, 13, 14, 15]), array([-12, -13, -14, -15])]
While tf.data tries to propagate shape information, the default settings of Dataset.batch result in an unknown batch size because the last batch may not be full. Note the Nones in the shape:
batched_dataset
<_BatchDataset element_spec=(TensorSpec(shape=(None,), dtype=tf.int64, name=None), TensorSpec(shape=(None,), dtype=tf.int64, name=None))>
Use the drop_remainder argument to ignore that last batch, and get full shape propagation:
batched_dataset = dataset.batch(7, drop_remainder=True)
batched_dataset
<_BatchDataset element_spec=(TensorSpec(shape=(7,), dtype=tf.int64, name=None), TensorSpec(shape=(7,), dtype=tf.int64, name=None))>
Batching tensors with padding
The above recipe works for tensors that all have the same size. However, many
models (including sequence models) work with input data that can have varying size
(for example, sequences of different lengths). To handle this case, the
Dataset.padded_batch transformation enables you to batch tensors of
different shapes by specifying one or more dimensions in which they may be
padded.
dataset = tf.data.Dataset.range(100)
dataset = dataset.map(lambda x: tf.fill([tf.cast(x, tf.int32)], x))
dataset = dataset.padded_batch(4, padded_shapes=(None,))

for batch in dataset.take(2):
  print(batch.numpy())
  print()
[[0 0 0]
 [1 0 0]
 [2 2 0]
 [3 3 3]]

[[4 4 4 4 0 0 0]
 [5 5 5 5 5 0 0]
 [6 6 6 6 6 6 0]
 [7 7 7 7 7 7 7]]
The Dataset.padded_batch transformation allows you to set different padding
for each dimension of each component, and it may be variable-length (signified
by None in the example above) or constant-length. It is also possible to
override the padding value, which defaults to 0.
Training workflows
Processing multiple epochs
The tf.data API offers two main ways to process multiple epochs of the same
data.
The simplest way to iterate over a dataset in multiple epochs is to use the
Dataset.repeat() transformation. First, create a dataset of titanic data:
titanic_file = tf.keras.utils.get_file("train.csv", "https://storage.googleapis.com/tf-datasets/titanic/train.csv")
titanic_lines = tf.data.TextLineDataset(titanic_file)
def plot_batch_sizes(ds):
  batch_sizes = [batch.shape[0] for batch in ds]
  plt.bar(range(len(batch_sizes)), batch_sizes)
  plt.xlabel('Batch number')
  plt.ylabel('Batch size')
Applying the Dataset.repeat() transformation with no arguments will repeat
the input indefinitely.
The Dataset.repeat transformation concatenates its
arguments without signaling the end of one epoch and the beginning of the next
epoch. Because of this a Dataset.batch applied after Dataset.repeat will yield batches that straddle epoch boundaries:
titanic_batches = titanic_lines.repeat(3).batch(128)
plot_batch_sizes(titanic_batches)
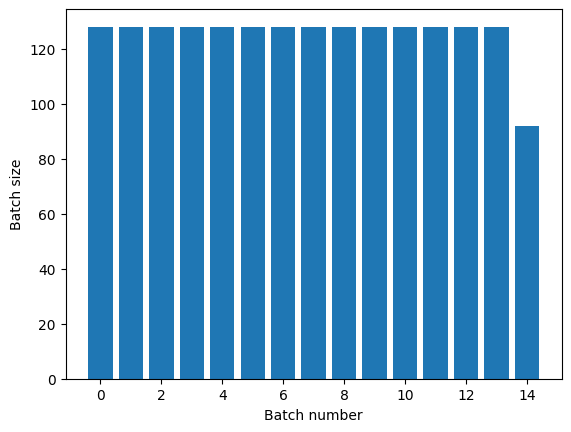
If you need clear epoch separation, put Dataset.batch before the repeat:
titanic_batches = titanic_lines.batch(128).repeat(3)

plot_batch_sizes(titanic_batches)

If you would like to perform a custom computation (for example, to collect statistics) at the end of each epoch then it's simplest to restart the dataset iteration on each epoch:
epochs = 3
dataset = titanic_lines.batch(128)

for epoch in range(epochs):
  for batch in dataset:
    print(batch.shape)
  print("End of epoch: ", epoch)
(128,)
(128,)
(128,)
(128,)
(116,)
End of epoch:  0
(128,)
(128,)
(128,)
(128,)
(116,)
End of epoch:  1
(128,)
(128,)
(128,)
(128,)
(116,)
End of epoch:  2
Randomly shuffling input data
The Dataset.shuffle() transformation maintains a fixed-size
buffer and chooses the next element uniformly at random from that buffer.
Add an index to the dataset so you can see the effect:
lines = tf.data.TextLineDataset(titanic_file)
counter = tf.data.experimental.Counter()

dataset = tf.data.Dataset.zip((counter, lines))
dataset = dataset.shuffle(buffer_size=100)
dataset = dataset.batch(20)
dataset
WARNING:tensorflow:From /tmpfs/tmp/ipykernel_44933/4092668703.py:2: CounterV2 (from tensorflow.python.data.experimental.ops.counter) is deprecated and will be removed in a future version.
Instructions for updating:
Use `tf.data.Dataset.counter(...)` instead.
<_BatchDataset element_spec=(TensorSpec(shape=(None,), dtype=tf.int64, name=None), TensorSpec(shape=(None,), dtype=tf.string, name=None))>
Since the buffer_size is 100, and the batch size is 20, the first batch contains no elements with an index over 120.
n,line_batch = next(iter(dataset))
print(n.numpy())
[ 99  18   1  29  66  88  47  30  80  46  68  44  35  40  33  95 108 105
  38 113]
As with Dataset.batch the order relative to Dataset.repeat matters.
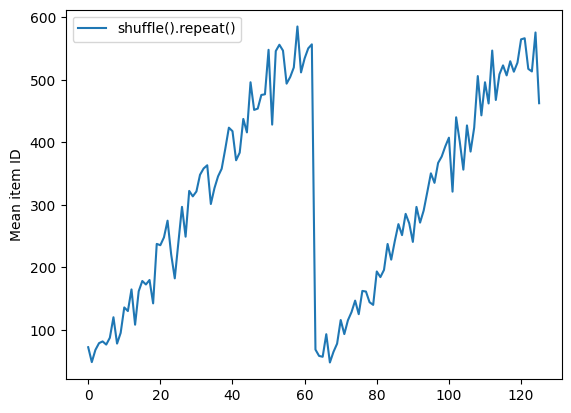
Dataset.shuffle doesn't signal the end of an epoch until the shuffle buffer is empty. So a shuffle placed before a repeat will show every element of one epoch before moving to the next:
dataset = tf.data.Dataset.zip((counter, lines))
shuffled = dataset.shuffle(buffer_size=100).batch(10).repeat(2)

print("Here are the item ID's near the epoch boundary:\n")
for n, line_batch in shuffled.skip(60).take(5):
  print(n.numpy())
Here are the item ID's near the epoch boundary:

[469 414 497 584 615 612 625 627 603 621]
[582 553 343 602 626 567 486 593 616 525]
[557 576 478 533 591 398 484 431]
[66 43 51 18 94  3 76 52 90 57]
[  0 101  71  86  56  17  33  70 110  75]
shuffle_repeat = [n.numpy().mean() for n, line_batch in shuffled]
plt.plot(shuffle_repeat, label="shuffle().repeat()")
plt.ylabel("Mean item ID")
plt.legend()
<matplotlib.legend.Legend at 0x7f373c471af0>
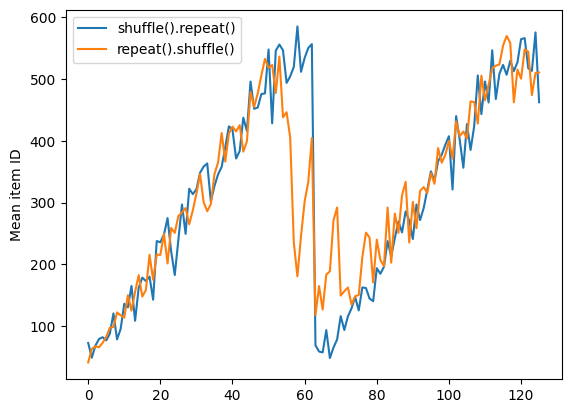
But a repeat before a shuffle mixes the epoch boundaries together:
dataset = tf.data.Dataset.zip((counter, lines))
shuffled = dataset.repeat(2).shuffle(buffer_size=100).batch(10)

print("Here are the item ID's near the epoch boundary:\n")
for n, line_batch in shuffled.skip(55).take(15):
  print(n.numpy())
Here are the item ID's near the epoch boundary:

[583 415   1 542 563   9 620 622 551 548]
[589 592 365 571  33 557 618  31 541  27]
[537  24 615  43  18 550  11   8  39 369]
[601  38 485  20 627  46  22  23 322 608]
[626 590 491  63  29 564  17  19 617  66]
[508 580  72  45  57  54 556  62  14 511]
[623  73  75  79 599 372  21  83 547  26]
[486   4   0 573  74  49   0  53  95  34]
[ 60 605  15  90  99 549  16  50  91  80]
[106 108 112 297 561  44  52  82  86  71]
[581  77 117  28 567  10  30   3  81  89]
[587  32 102   7 135  51 113 110 114 451]
[ 59  64  68 116  76 306 367 128 552 136]
[111 569 522   5  67 616 154 131 512  37]
[539 103 142  78  85   2  87  12 149 137]
repeat_shuffle = [n.numpy().mean() for n, line_batch in shuffled]

plt.plot(shuffle_repeat, label="shuffle().repeat()")
plt.plot(repeat_shuffle, label="repeat().shuffle()")
plt.ylabel("Mean item ID")
plt.legend()
<matplotlib.legend.Legend at 0x7f373c462b20>
Preprocessing data
The Dataset.map(f) transformation produces a new dataset by applying a given
function f to each element of the input dataset. It is based on the
map() function
that is commonly applied to lists (and other structures) in functional
programming languages. The function f takes the tf.Tensor objects that
represent a single element in the input, and returns the tf.Tensor objects
that will represent a single element in the new dataset. Its implementation uses
standard TensorFlow operations to transform one element into another.
This section covers common examples of how to use Dataset.map().
Decoding image data and resizing it
When training a neural network on real-world image data, it is often necessary to convert images of different sizes to a common size, so that they may be batched into a fixed size.
Rebuild the flower filenames dataset:
list_ds = tf.data.Dataset.list_files(str(flowers_root/'*/*'))
Write a function that manipulates the dataset elements.
# Reads an image from a file, decodes it into a dense tensor, and resizes it
# to a fixed shape.
def parse_image(filename):
  parts = tf.strings.split(filename, os.sep)
  label = parts[-2]

  image = tf.io.read_file(filename)
  image = tf.io.decode_jpeg(image)
  image = tf.image.convert_image_dtype(image, tf.float32)
  image = tf.image.resize(image, [128, 128])
  return image, label
Test that it works.
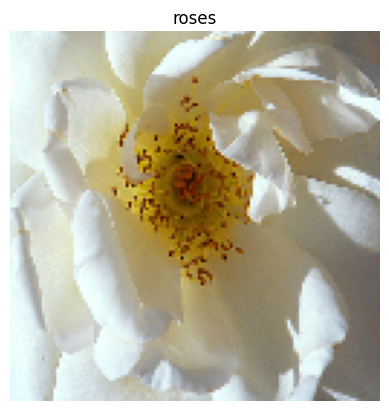
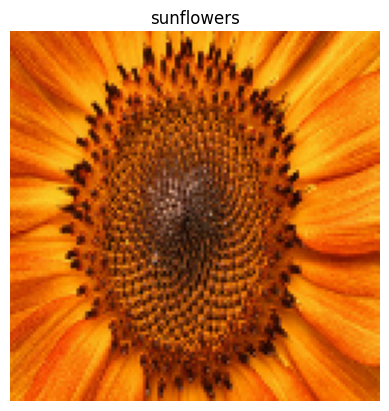
file_path = next(iter(list_ds))
image, label = parse_image(file_path)

def show(image, label):
  plt.figure()
  plt.imshow(image)
  plt.title(label.numpy().decode('utf-8'))
  plt.axis('off')

show(image, label)
Map it over the dataset.
images_ds = list_ds.map(parse_image)

for image, label in images_ds.take(2):
  show(image, label)

Applying arbitrary Python logic
For performance reasons, use TensorFlow operations for
preprocessing your data whenever possible. However, it is sometimes useful to
call external Python libraries when parsing your input data. You can use the tf.py_function operation in a Dataset.map transformation.
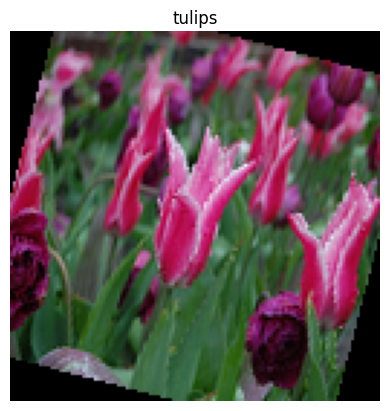
For example, if you want to apply a random rotation, the tf.image module only has tf.image.rot90, which is not very useful for image augmentation.
To demonstrate tf.py_function, try using the scipy.ndimage.rotate function instead:
import scipy.ndimage as ndimage

@tf.py_function(Tout=tf.float32)
def random_rotate_image(image):
  image = ndimage.rotate(image, np.random.uniform(-30, 30), reshape=False)
  return image
image, label = next(iter(images_ds))
image = random_rotate_image(image)
show(image, label)
Clipping input data to the valid range for imshow with RGB data ([0..1] for floats or [0..255] for integers). Got range [-0.07214577..1.0803627].
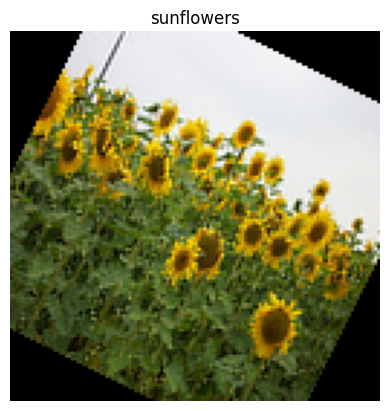
To use this function with Dataset.map the same caveats apply as with Dataset.from_generator, you need to describe the return shapes and types when you apply the function:
def tf_random_rotate_image(image, label):
  im_shape = image.shape
  image = random_rotate_image(image)
  image.set_shape(im_shape)
  return image, label
rot_ds = images_ds.map(tf_random_rotate_image)

for image, label in rot_ds.take(2):
  show(image, label)
Clipping input data to the valid range for imshow with RGB data ([0..1] for floats or [0..255] for integers). Got range [-0.014158356..1.0156134].
Clipping input data to the valid range for imshow with RGB data ([0..1] for floats or [0..255] for integers). Got range [-0.067302234..1.1018459].

Parsing tf.Example protocol buffer messages
Many input pipelines extract tf.train.Example protocol buffer messages from a
TFRecord format. Each tf.train.Example record contains one or more "features",
and the input pipeline typically converts these features into tensors.
fsns_test_file = tf.keras.utils.get_file("fsns.tfrec", "https://storage.googleapis.com/download.tensorflow.org/data/fsns-20160927/testdata/fsns-00000-of-00001")
dataset = tf.data.TFRecordDataset(filenames = [fsns_test_file])
dataset
<TFRecordDatasetV2 element_spec=TensorSpec(shape=(), dtype=tf.string, name=None)>
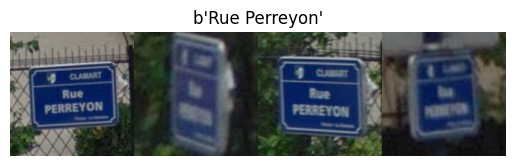
You can work with tf.train.Example protos outside of a tf.data.Dataset to understand the data:
raw_example = next(iter(dataset))
parsed = tf.train.Example.FromString(raw_example.numpy())

feature = parsed.features.feature
raw_img = feature['image/encoded'].bytes_list.value[0]
img = tf.image.decode_png(raw_img)
plt.imshow(img)
plt.axis('off')
_ = plt.title(feature["image/text"].bytes_list.value[0])
raw_example = next(iter(dataset))
def tf_parse(eg):
  example = tf.io.parse_example(
      eg[tf.newaxis], {
          'image/encoded': tf.io.FixedLenFeature(shape=(), dtype=tf.string),
          'image/text': tf.io.FixedLenFeature(shape=(), dtype=tf.string)
      })
  return example['image/encoded'][0], example['image/text'][0]
img, txt = tf_parse(raw_example)
print(txt.numpy())
print(repr(img.numpy()[:20]), "...")
b'Rue Perreyon'
b'\x89PNG\r\n\x1a\n\x00\x00\x00\rIHDR\x00\x00\x02X' ...
decoded = dataset.map(tf_parse)
decoded
<_MapDataset element_spec=(TensorSpec(shape=(), dtype=tf.string, name=None), TensorSpec(shape=(), dtype=tf.string, name=None))>
image_batch, text_batch = next(iter(decoded.batch(10)))
image_batch.shape
TensorShape([10])
Time series windowing
For an end-to-end time series example see: Time series forecasting.
Time series data is often organized with the time axis intact.
Use a simple Dataset.range to demonstrate:
range_ds = tf.data.Dataset.range(100000)
Typically, models based on this sort of data will want a contiguous time slice.
The simplest approach would be to batch the data:
Using batch
batches = range_ds.batch(10, drop_remainder=True)

for batch in batches.take(5):
  print(batch.numpy())
[0 1 2 3 4 5 6 7 8 9]
[10 11 12 13 14 15 16 17 18 19]
[20 21 22 23 24 25 26 27 28 29]
[30 31 32 33 34 35 36 37 38 39]
[40 41 42 43 44 45 46 47 48 49]
Or to make dense predictions one step into the future, you might shift the features and labels by one step relative to each other:
def dense_1_step(batch):
  # Shift features and labels one step relative to each other.
  return batch[:-1], batch[1:]

predict_dense_1_step = batches.map(dense_1_step)

for features, label in predict_dense_1_step.take(3):
  print(features.numpy(), " => ", label.numpy())
[0 1 2 3 4 5 6 7 8]  =>  [1 2 3 4 5 6 7 8 9]
[10 11 12 13 14 15 16 17 18]  =>  [11 12 13 14 15 16 17 18 19]
[20 21 22 23 24 25 26 27 28]  =>  [21 22 23 24 25 26 27 28 29]
To predict a whole window instead of a fixed offset you can split the batches into two parts:
batches = range_ds.batch(15, drop_remainder=True)

def label_next_5_steps(batch):
  return (batch[:-5],   # Inputs: All except the last 5 steps
          batch[-5:])   # Labels: The last 5 steps

predict_5_steps = batches.map(label_next_5_steps)

for features, label in predict_5_steps.take(3):
  print(features.numpy(), " => ", label.numpy())
[0 1 2 3 4 5 6 7 8 9]  =>  [10 11 12 13 14]
[15 16 17 18 19 20 21 22 23 24]  =>  [25 26 27 28 29]
[30 31 32 33 34 35 36 37 38 39]  =>  [40 41 42 43 44]
To allow some overlap between the features of one batch and the labels of another, use Dataset.zip:
feature_length = 10
label_length = 3

features = range_ds.batch(feature_length, drop_remainder=True)
labels = range_ds.batch(feature_length).skip(1).map(lambda labels: labels[:label_length])

predicted_steps = tf.data.Dataset.zip((features, labels))

for features, label in predicted_steps.take(5):
  print(features.numpy(), " => ", label.numpy())
[0 1 2 3 4 5 6 7 8 9]  =>  [10 11 12]
[10 11 12 13 14 15 16 17 18 19]  =>  [20 21 22]
[20 21 22 23 24 25 26 27 28 29]  =>  [30 31 32]
[30 31 32 33 34 35 36 37 38 39]  =>  [40 41 42]
[40 41 42 43 44 45 46 47 48 49]  =>  [50 51 52]
Using window
While using Dataset.batch works, there are situations where you may need finer control. The Dataset.window method gives you complete control, but requires some care: it returns a Dataset of Datasets. Go to the Dataset structure section for details.
window_size = 5

windows = range_ds.window(window_size, shift=1)
for sub_ds in windows.take(5):
  print(sub_ds)
<_VariantDataset element_spec=TensorSpec(shape=(), dtype=tf.int64, name=None)>
<_VariantDataset element_spec=TensorSpec(shape=(), dtype=tf.int64, name=None)>
<_VariantDataset element_spec=TensorSpec(shape=(), dtype=tf.int64, name=None)>
<_VariantDataset element_spec=TensorSpec(shape=(), dtype=tf.int64, name=None)>
<_VariantDataset element_spec=TensorSpec(shape=(), dtype=tf.int64, name=None)>
The Dataset.flat_map method can take a dataset of datasets and flatten it into a single dataset:
for x in windows.flat_map(lambda x: x).take(30):
   print(x.numpy(), end=' ')
0 1 2 3 4 1 2 3 4 5 2 3 4 5 6 3 4 5 6 7 4 5 6 7 8 5 6 7 8 9
In nearly all cases, you will want to Dataset.batch the dataset first:
def sub_to_batch(sub):
  return sub.batch(window_size, drop_remainder=True)

for example in windows.flat_map(sub_to_batch).take(5):
  print(example.numpy())
[0 1 2 3 4]
[1 2 3 4 5]
[2 3 4 5 6]
[3 4 5 6 7]
[4 5 6 7 8]
Now, you can see that the shift argument controls how much each window moves over.
Putting this together you might write this function:
def make_window_dataset(ds, window_size=5, shift=1, stride=1):
  windows = ds.window(window_size, shift=shift, stride=stride)

  def sub_to_batch(sub):
    return sub.batch(window_size, drop_remainder=True)

  windows = windows.flat_map(sub_to_batch)
  return windows
ds = make_window_dataset(range_ds, window_size=10, shift = 5, stride=3)

for example in ds.take(10):
  print(example.numpy())
[ 0  3  6  9 12 15 18 21 24 27]
[ 5  8 11 14 17 20 23 26 29 32]
[10 13 16 19 22 25 28 31 34 37]
[15 18 21 24 27 30 33 36 39 42]
[20 23 26 29 32 35 38 41 44 47]
[25 28 31 34 37 40 43 46 49 52]
[30 33 36 39 42 45 48 51 54 57]
[35 38 41 44 47 50 53 56 59 62]
[40 43 46 49 52 55 58 61 64 67]
[45 48 51 54 57 60 63 66 69 72]
Then it's easy to extract labels, as before:
dense_labels_ds = ds.map(dense_1_step)

for inputs,labels in dense_labels_ds.take(3):
  print(inputs.numpy(), "=>", labels.numpy())
[ 0  3  6  9 12 15 18 21 24] => [ 3  6  9 12 15 18 21 24 27]
[ 5  8 11 14 17 20 23 26 29] => [ 8 11 14 17 20 23 26 29 32]
[10 13 16 19 22 25 28 31 34] => [13 16 19 22 25 28 31 34 37]
Resampling
When working with a dataset that is very class-imbalanced, you may want to resample the dataset. tf.data provides two methods to do this. The credit card fraud dataset is a good example of this sort of problem.
zip_path = tf.keras.utils.get_file(
    origin='https://storage.googleapis.com/download.tensorflow.org/data/creditcard.zip',
    fname='creditcard.zip',
    extract=True)

csv_path = zip_path.replace('.zip', '.csv')
Downloading data from https://storage.googleapis.com/download.tensorflow.org/data/creditcard.zip
69155632/69155632 ━━━━━━━━━━━━━━━━━━━━ 1s 0us/step
creditcard_ds = tf.data.experimental.make_csv_dataset(
    csv_path, batch_size=1024, label_name="Class",
    # Set the column types: 30 floats and an int.
    column_defaults=[float()]*30+[int()])
Now, check the distribution of classes, it is highly skewed:
def count(counts, batch):
  features, labels = batch
  class_1 = labels == 1
  class_1 = tf.cast(class_1, tf.int32)

  class_0 = labels == 0
  class_0 = tf.cast(class_0, tf.int32)

  counts['class_0'] += tf.reduce_sum(class_0)
  counts['class_1'] += tf.reduce_sum(class_1)

  return counts
counts = creditcard_ds.take(10).reduce(
    initial_state={'class_0': 0, 'class_1': 0},
    reduce_func = count)

counts = np.array([counts['class_0'].numpy(),
                   counts['class_1'].numpy()]).astype(np.float32)

fractions = counts/counts.sum()
print(fractions)
[0.996 0.004]
A common approach to training with an imbalanced dataset is to balance it. tf.data includes a few methods which enable this workflow:
Datasets sampling
One approach to resampling a dataset is to use sample_from_datasets. This is more applicable when you have a separate tf.data.Dataset for each class.
Here, just use filter to generate them from the credit card fraud data:
negative_ds = (
  creditcard_ds
    .unbatch()
    .filter(lambda features, label: label==0)
    .repeat())
positive_ds = (
  creditcard_ds
    .unbatch()
    .filter(lambda features, label: label==1)
    .repeat())
for features, label in positive_ds.batch(10).take(1):
  print(label.numpy())
[1 1 1 1 1 1 1 1 1 1]
To use tf.data.Dataset.sample_from_datasets pass the datasets, and the weight for each:
balanced_ds = tf.data.Dataset.sample_from_datasets(
    [negative_ds, positive_ds], [0.5, 0.5]).batch(10)
Now the dataset produces examples of each class with a 50/50 probability:
for features, labels in balanced_ds.take(10):
  print(labels.numpy())
[1 0 1 0 0 1 0 1 1 0]
[1 0 0 0 0 0 0 0 1 1]
[0 0 1 0 0 1 0 0 1 0]
[0 1 1 0 1 0 0 1 1 0]
[0 1 1 0 0 0 1 1 1 1]
[1 1 1 1 1 1 0 0 0 0]
[0 1 1 0 1 0 0 1 1 1]
[1 1 0 0 0 0 0 1 0 1]
[1 1 0 1 1 1 1 0 0 1]
[0 1 1 0 0 1 0 0 0 0]
Rejection resampling
One problem with the above Dataset.sample_from_datasets approach is that
it needs a separate tf.data.Dataset per class. You could use Dataset.filter
to create those two datasets, but that results in all the data being loaded twice.
The tf.data.Dataset.rejection_resample method can be applied to a dataset to rebalance it, while only loading it once. Elements will be dropped or repeated to achieve balance.
The rejection_resample method takes a class_func argument. This class_func is applied to each dataset element, and is used to determine which class an example belongs to for the purposes of balancing.
The goal here is to balance the label distribution, and the elements of creditcard_ds are already (features, label) pairs. So the class_func just needs to return those labels:
def class_func(features, label):
  return label
The resampling method deals with individual examples, so in this case you must unbatch the dataset before applying that method.
The method needs a target distribution, and optionally an initial distribution estimate as inputs.
resample_ds = (
    creditcard_ds
    .unbatch()
    .rejection_resample(class_func, target_dist=[0.5,0.5],
                        initial_dist=fractions)
    .batch(10))
WARNING:tensorflow:From /tmpfs/src/tf_docs_env/lib/python3.9/site-packages/tensorflow/python/data/ops/dataset_ops.py:4968: Print (from tensorflow.python.ops.logging_ops) is deprecated and will be removed after 2018-08-20.
Instructions for updating:
Use tf.print instead of tf.Print. Note that tf.print returns a no-output operator that directly prints the output. Outside of defuns or eager mode, this operator will not be executed unless it is directly specified in session.run or used as a control dependency for other operators. This is only a concern in graph mode. Below is an example of how to ensure tf.print executes in graph mode:
The rejection_resample method returns (class, example) pairs where the class is the output of the class_func. In this case, the example was already a (feature, label) pair, so use map to drop the extra copy of the labels:
balanced_ds = resample_ds.map(lambda extra_label, features_and_label: features_and_label)
Now the dataset produces examples of each class with a 50/50 probability:
for features, labels in balanced_ds.take(10):
  print(labels.numpy())
Proportion of examples rejected by sampler is high: [0.995996118][0.995996118 0.00400390616][0 1]
Proportion of examples rejected by sampler is high: [0.995996118][0.995996118 0.00400390616][0 1]
Proportion of examples rejected by sampler is high: [0.995996118][0.995996118 0.00400390616][0 1]
Proportion of examples rejected by sampler is high: [0.995996118][0.995996118 0.00400390616][0 1]
Proportion of examples rejected by sampler is high: [0.995996118][0.995996118 0.00400390616][0 1]
Proportion of examples rejected by sampler is high: [0.995996118][0.995996118 0.00400390616][0 1]
Proportion of examples rejected by sampler is high: [0.995996118][0.995996118 0.00400390616][0 1]
Proportion of examples rejected by sampler is high: [0.995996118][0.995996118 0.00400390616][0 1]
Proportion of examples rejected by sampler is high: [0.995996118][0.995996118 0.00400390616][0 1]
Proportion of examples rejected by sampler is high: [0.995996118][0.995996118 0.00400390616][0 1]
[1 0 1 0 1 0 1 0 1 1]
[1 0 1 1 1 1 0 0 1 0]
[1 0 1 1 0 1 0 0 0 1]
[0 1 0 0 0 0 1 1 1 1]
[1 0 0 0 1 1 1 0 1 0]
[0 0 0 1 0 0 1 0 1 1]
[0 1 0 0 0 0 1 0 1 0]
[1 0 0 0 0 1 0 0 0 1]
[0 0 0 0 1 1 1 1 1 0]
[1 1 0 1 1 1 1 1 1 0]
Iterator Checkpointing
Tensorflow supports taking checkpoints so that when your training process restarts it can restore the latest checkpoint to recover most of its progress. In addition to checkpointing the model variables, you can also checkpoint the progress of the dataset iterator. This could be useful if you have a large dataset and don't want to start the dataset from the beginning on each restart. Note however that iterator checkpoints may be large, since transformations such as Dataset.shuffle and Dataset.prefetch require buffering elements within the iterator.
To include your iterator in a checkpoint, pass the iterator to the tf.train.Checkpoint constructor.
range_ds = tf.data.Dataset.range(20)

iterator = iter(range_ds)
ckpt = tf.train.Checkpoint(step=tf.Variable(0), iterator=iterator)
manager = tf.train.CheckpointManager(ckpt, '/tmp/my_ckpt', max_to_keep=3)

print([next(iterator).numpy() for _ in range(5)])

save_path = manager.save()

print([next(iterator).numpy() for _ in range(5)])

ckpt.restore(manager.latest_checkpoint)

print([next(iterator).numpy() for _ in range(5)])
[0, 1, 2, 3, 4]
[5, 6, 7, 8, 9]
[5, 6, 7, 8, 9]
Using tf.data with tf.keras
The tf.keras API simplifies many aspects of creating and executing machine
learning models. Its Model.fit and Model.evaluate and Model.predict APIs support datasets as inputs. Here is a quick dataset and model setup:
train, test = tf.keras.datasets.fashion_mnist.load_data()

images, labels = train
images = images/255.0
labels = labels.astype(np.int32)
fmnist_train_ds = tf.data.Dataset.from_tensor_slices((images, labels))
fmnist_train_ds = fmnist_train_ds.shuffle(5000).batch(32)

model = tf.keras.Sequential([
  tf.keras.layers.Flatten(),
  tf.keras.layers.Dense(10)
])

model.compile(optimizer='adam',
              loss=tf.keras.losses.SparseCategoricalCrossentropy(from_logits=True),
              metrics=['accuracy'])
Passing a dataset of (feature, label) pairs is all that's needed for Model.fit and Model.evaluate:
model.fit(fmnist_train_ds, epochs=2)
Epoch 1/2
WARNING: All log messages before absl::InitializeLog() is called are written to STDERR
I0000 00:00:1723685884.693688   45100 service.cc:146] XLA service 0x7f35cc006690 initialized for platform CUDA (this does not guarantee that XLA will be used). Devices:
I0000 00:00:1723685884.693721   45100 service.cc:154]   StreamExecutor device (0): Tesla T4, Compute Capability 7.5
I0000 00:00:1723685884.693725   45100 service.cc:154]   StreamExecutor device (1): Tesla T4, Compute Capability 7.5
I0000 00:00:1723685884.693728   45100 service.cc:154]   StreamExecutor device (2): Tesla T4, Compute Capability 7.5
I0000 00:00:1723685884.693731   45100 service.cc:154]   StreamExecutor device (3): Tesla T4, Compute Capability 7.5
136/1875 ━━━━━━━━━━━━━━━━━━━━ 1s 1ms/step - accuracy: 0.5241 - loss: 1.4346
I0000 00:00:1723685885.241810   45100 device_compiler.h:188] Compiled cluster using XLA!  This line is logged at most once for the lifetime of the process.
1875/1875 ━━━━━━━━━━━━━━━━━━━━ 3s 1ms/step - accuracy: 0.7449 - loss: 0.7643
Epoch 2/2
1875/1875 ━━━━━━━━━━━━━━━━━━━━ 2s 1ms/step - accuracy: 0.8381 - loss: 0.4704
<keras.src.callbacks.history.History at 0x7f373f583250>
If you pass an infinite dataset, for example by calling Dataset.repeat, you just need to also pass the steps_per_epoch argument:
model.fit(fmnist_train_ds.repeat(), epochs=2, steps_per_epoch=20)
Epoch 1/2
20/20 ━━━━━━━━━━━━━━━━━━━━ 0s 1ms/step - accuracy: 0.8254 - loss: 0.4682
Epoch 2/2
20/20 ━━━━━━━━━━━━━━━━━━━━ 0s 1ms/step - accuracy: 0.8622 - loss: 0.4263
<keras.src.callbacks.history.History at 0x7f37443e1190>
For evaluation you can pass the number of evaluation steps:
loss, accuracy = model.evaluate(fmnist_train_ds)
print("Loss :", loss)
print("Accuracy :", accuracy)
1875/1875 ━━━━━━━━━━━━━━━━━━━━ 2s 1ms/step - accuracy: 0.8504 - loss: 0.4343
Loss : 0.4353208839893341
Accuracy : 0.849216639995575
For long datasets, set the number of steps to evaluate:
loss, accuracy = model.evaluate(fmnist_train_ds.repeat(), steps=10)
print("Loss :", loss)
print("Accuracy :", accuracy)
10/10 ━━━━━━━━━━━━━━━━━━━━ 0s 2ms/step - accuracy: 0.8411 - loss: 0.5209
Loss : 0.46679750084877014
Accuracy : 0.84375
The labels are not required when calling Model.predict.
predict_ds = tf.data.Dataset.from_tensor_slices(images).batch(32)
result = model.predict(predict_ds, steps = 10)
print(result.shape)
10/10 ━━━━━━━━━━━━━━━━━━━━ 0s 1ms/step
(320, 10)
But the labels are ignored if you do pass a dataset containing them:
result = model.predict(fmnist_train_ds, steps = 10)
print(result.shape)
10/10 ━━━━━━━━━━━━━━━━━━━━ 0s 1ms/step
(320, 10)