تجسم های تحلیل مدل TensorFlow
با مجموعهها، منظم بمانید
ذخیره و طبقهبندی محتوا براساس اولویتهای شما.
خروجی اجرای یک ارزیابی یک tfma.EvalResult
است که میتوان آن را با فراخوانی tfma.view.render_slicing_metrics
(یا tfma.view.render_plot
برای نمودارها) در یک نوتبوک Jupyter مشاهده کرد.
نمای متریک
برای مشاهده معیارها، از tfma.view.render_slicing_metrics
API استفاده کنید و tfma.EvalResult
را که از اجرای ارزیابی خروجی بود، عبور دهید. نمای متریک از سه بخش تشکیل شده است:
انتخابگر معیارها
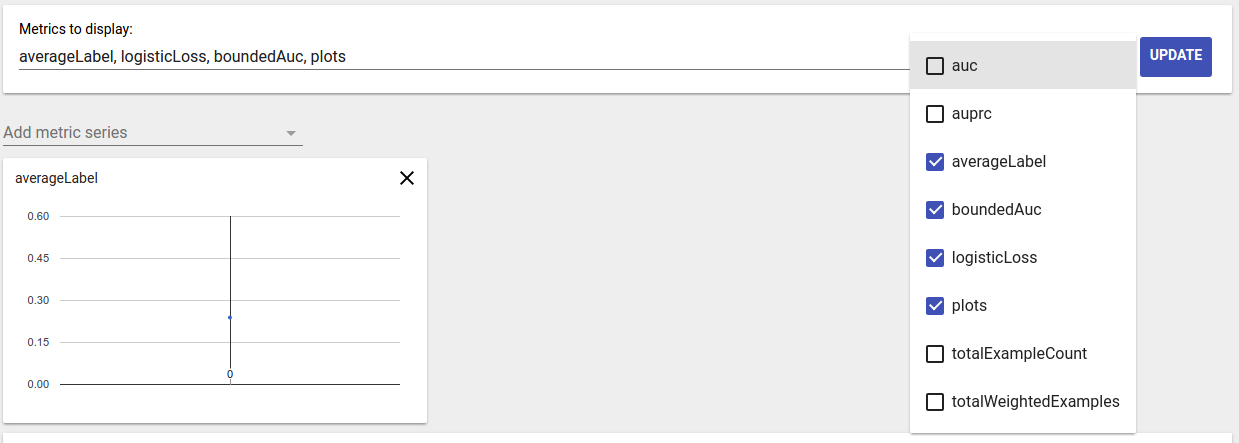
به طور پیش فرض، تمام معیارهای محاسبه شده نمایش داده می شوند و ستون ها بر اساس حروف الفبا مرتب می شوند. انتخابگر متریک به کاربر امکان می دهد معیارها را اضافه / حذف / مرتب کند. به سادگی معیارها را از منوی کشویی علامت بزنید / علامت آن را بردارید (Ctrl را برای انتخاب چندگانه نگه دارید) یا آنها را مستقیماً در کادر ورودی تایپ کنید / دوباره مرتب کنید.

تجسم متریک
هدف تجسم متریک ارائه شهود در مورد برش ها در ویژگی انتخاب شده است. یک فیلتر سریع برای فیلتر کردن برش هایی با تعداد نمونه وزنی کوچک در دسترس است.

دو نوع تجسم پشتیبانی می شود:
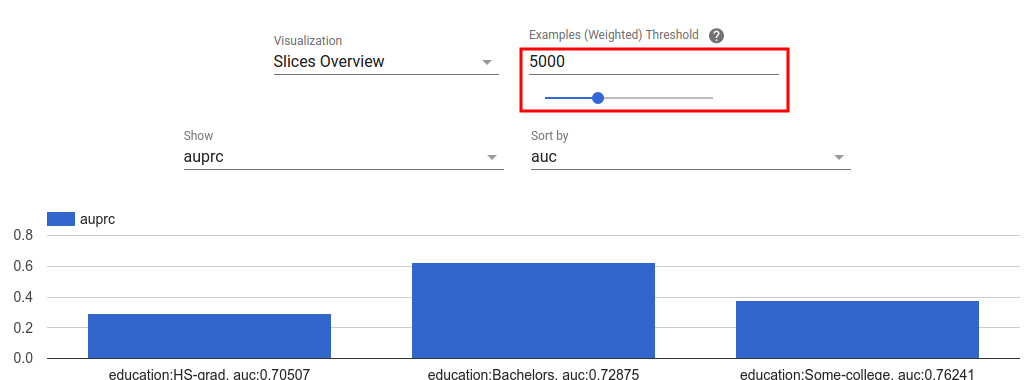
نمای کلی برش
در این نما، مقدار متریک انتخابی برای هر برش ارائه میشود و برشها را میتوان بر اساس نام برش یا مقدار متریک دیگر مرتب کرد.

وقتی تعداد برش ها کم باشد، این نمای پیش فرض است.
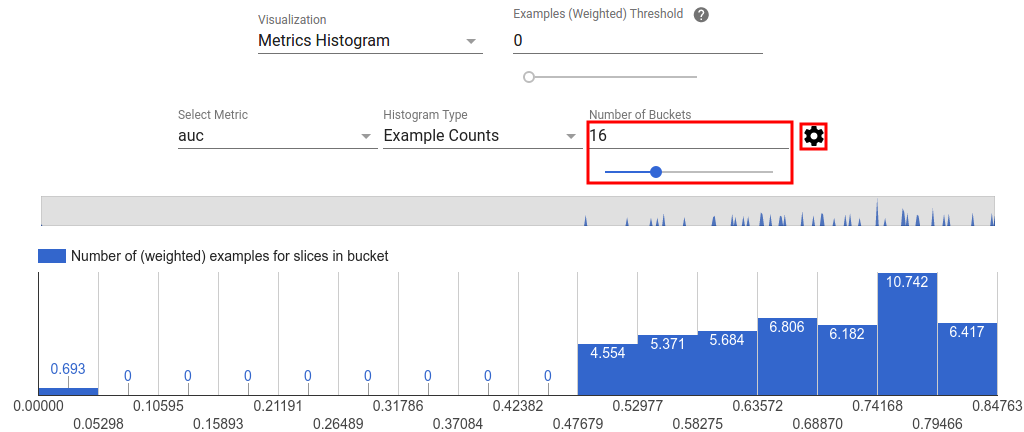
هیستوگرام متریک
در این دیدگاه، برش ها بر اساس مقادیر متریک خود به سطل ها تقسیم می شوند. مقدار(های) نمایش داده شده در هر سطل می تواند تعداد برش ها در سطل یا تعداد کل نمونه وزنی برای همه برش های سطل یا هر دو باشد.

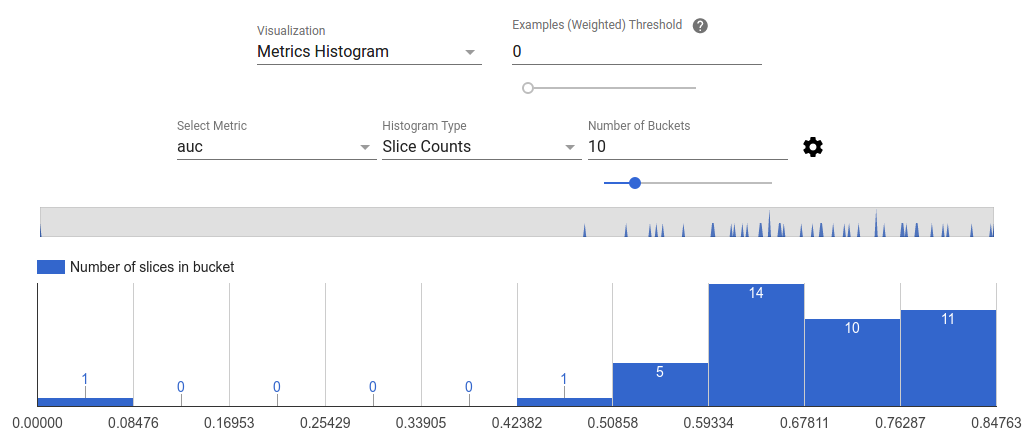
با کلیک بر روی نماد چرخ دنده می توان تعداد سطل ها را تغییر داد و مقیاس لگاریتمی را در منوی تنظیمات اعمال کرد.

همچنین امکان فیلتر کردن نقاط پرت در نمای هیستوگرام وجود دارد. به سادگی محدوده مورد نظر را در هیستوگرام همانطور که در تصویر زیر نشان داده شده است بکشید.

وقتی تعداد برش ها زیاد باشد، این نمای پیش فرض است.
جدول متریک
جدول متریک نتایج همه معیارهای انتخاب شده در انتخابگر متریک را خلاصه می کند. با کلیک بر روی نام متریک می توان آن را مرتب کرد. فقط برش هایی که فیلتر نشده اند ارائه می شوند.
نماهای طرح
هر طرح تجسم خاص خود را دارد که مختص طرح است. برای اطلاعات بیشتر، به مستندات API مربوطه برای کلاس plot مراجعه کنید. توجه داشته باشید که در TFMA، نمودارها و متریک ها هر دو تحت tfma.metrics.*
طبق قرارداد، کلاس های مربوط به نمودارها به Plot
ختم می شوند. برای مشاهده نمودارها، از tfma.view.render_plot
API استفاده کنید که tfma.EvalResult
را که از اجرای ارزیابی خروجی بود، عبور دهید.
نمودارهای سری زمانی
نمودارهای سری زمانی تشخیص روندهای یک متریک خاص را در بازه های داده یا اجرای مدل آسان می کند. برای ایجاد یک نمودار سری زمانی، چندین ارزیابی انجام دهید (خروجی را در دایرکتوری های مختلف ذخیره کنید)، و سپس با فراخوانی tfma.load_eval_results
، آنها را در یک شی tfma.EvalResults
بارگذاری کنید. سپس نتایج را می توان با استفاده از tfma.view.render_time_series
نمایش داد
برای نمایش نمودار برای یک معیار خاص، کافی است از لیست کشویی روی آن کلیک کنید. برای حذف یک نمودار، روی X در گوشه سمت راست بالا کلیک کنید.

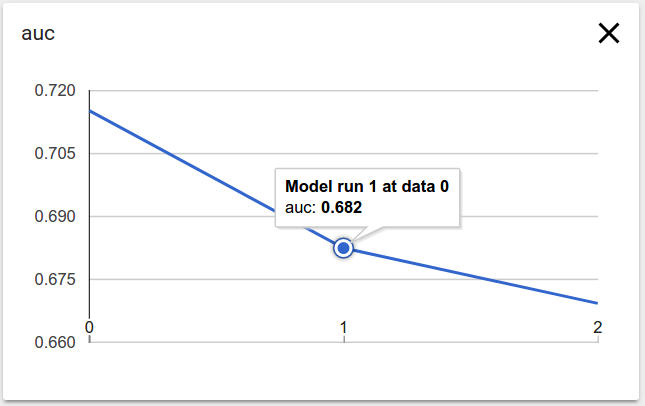
ماوس را روی هر نقطه داده ای در نمودار نشان دهید که راهنمای اجرای مدل، گستره داده و مقدار متریک را نشان می دهد.
جز در مواردی که غیر از این ذکر شده باشد،محتوای این صفحه تحت مجوز Creative Commons Attribution 4.0 License است. نمونه کدها نیز دارای مجوز Apache 2.0 License است. برای اطلاع از جزئیات، به خطمشیهای سایت Google Developers مراجعه کنید. جاوا علامت تجاری ثبتشده Oracle و/یا شرکتهای وابسته به آن است.
تاریخ آخرین بهروزرسانی 2025-07-25 بهوقت ساعت هماهنگ جهانی.
[null,null,["تاریخ آخرین بهروزرسانی 2025-07-25 بهوقت ساعت هماهنگ جهانی."],[],[],null,["# TensorFlow Model Analysis Visualizations\n\n\u003cbr /\u003e\n\nThe output of running an evaluation is a\n[`tfma.EvalResult`](https://www.tensorflow.org/tfx/model_analysis/api_docs/python/tfma/EvalResult)\nwhich can be visualized in a Jupyter notebook by calling\n[`tfma.view.render_slicing_metrics`](https://www.tensorflow.org/tfx/model_analysis/api_docs/python/tfma/view/render_slicing_metrics)\n(or\n[`tfma.view.render_plot`](https://www.tensorflow.org/tfx/model_analysis/api_docs/python/tfma/view/render_plot)\nfor plots).\n\n### Metrics View\n\nTo view metrics, use the\n[`tfma.view.render_slicing_metrics`](https://www.tensorflow.org/tfx/model_analysis/api_docs/python/tfma/view/render_slicing_metrics)\nAPI passing the [`tfma.EvalResult`](https://www.tensorflow.org/tfx/model_analysis/api_docs/python/tfma/EvalResult) that was output from the evaluation run. The\nmetrics view is composed of three parts:\n\n- Metrics Selector\n\n By default, all computed metrics are displayed and the columns are sorted\n alphabetically. Metrics selector allows the user to add / remove / reorder\n metrics. Simply check / uncheck metrics from the dropdown (hold Ctrl for\n multi-select) or type / re-arrange them directly in the input box.\n\n- Metric Visualization\n\n Metric visualization aims to provide intuition about slices in the feature\n chosen. A quick filtering is available to filter out slices with small\n weighted sample count.\n\n Two type of visualizations are supported:\n 1. Slice overview\n\n In this view, value for the chosen metric is rendered for each slice and\n the slices can be sorted by the slice name or the value of another\n metric.\n\n When the number of slices are small, this is the default view.\n 2. Metrics Histogram\n\n In this view, slices are broken down into buckets based on their metric\n values. The value(s) displayed in each bucket can be the number of\n slices in the bucket or the total weighted sample count for all slices\n in the bucket or both.\n\n The number of buckets can be changed and logarithmic scale can be\n applied in the settings menu by clicking on the gear icon.\n\n It is also possible to filter out outliers in the histogram view. Simply\n drag the desired range in the histogram as shown in the screenshot\n below.\n\n When the number of slices are large, this is the default view.\n- Metrics Table\n\n The metric table summarizes results for all metrics chosen in metrics\n selector. It can be sorted by clicking on the metric name. Only slices not\n filtered out will be rendered.\n\n### Plot Views\n\nEach plot has it own visualization that is unique to the plot. For more\ninformation, see the relevant API documentation for the plot class. Note that\nin TFMA, plots and metrics are both defined under [`tfma.metrics.*`](https://www.tensorflow.org/tfx/model_analysis/api_docs/python/tfma/api/metrics)\nBy convention the classes related to plots end in `Plot`. To view plots, use the\n[`tfma.view.render_plot`](https://www.tensorflow.org/tfx/model_analysis/api_docs/python/tfma/view/render_plot)\nAPI passing the [`tfma.EvalResult`](https://www.tensorflow.org/tfx/model_analysis/api_docs/python/tfma/EvalResult) that was output from the evaluation run.\n\n### Time Series Graphs\n\nTime series graphs make it easy to spot trends of a specific metric over data\nspans or model runs. To create a time series graph, perform multiple evaluations\n(saving the output to different directories), and then load them into a\n`tfma.EvalResults` object by calling\n[`tfma.load_eval_results`](https://www.tensorflow.org/tfx/model_analysis/api_docs/python/tfma/api/load_eval_results).\nThe results can then be displayed using\n[`tfma.view.render_time_series`](https://www.tensorflow.org/tfx/model_analysis/api_docs/python/tfma/view/render_time_series)\n\nTo display the graph for a specific metric, simply click on it from the dropdown\nlist. To dismiss a graph, click on the X on the upper right corner.\n\nHover over any data point in the graph shows a tooltip indicating model run,\ndata span, and metric value."]]