 在 TensorFlow.org 上查看 在 TensorFlow.org 上查看 |
 在 Google Colab 中运行 在 Google Colab 中运行 |
 在 GitHub 上查看源代码 在 GitHub 上查看源代码 |
 下载笔记本 下载笔记本 |
概述
此 Colab 将介绍 DTensor,它是用于同步分布式计算的 TensorFlow 扩展程序。
DTensor 提供了一个全局编程模型,使开发者能够编写以全局方式在张量上进行运算,同时在内部管理跨设备分布的应用。DTensor 会通过称为单程序多数据 (SPMD) 扩展的过程根据分片指令分布程序和张量。
通过将应用与分片指令分离,DTensor 可以实现在单个设备、多个设备甚至多个客户端上运行相同的应用,同时保留其全局语义。
本指南将介绍用于分布式计算的 DTensor 的概念,以及 DTensor 如何与 TensorFlow 集成。要查看在模型训练中使用 DTensor 的演示,请参阅使用 DTensor 进行分布式训练教程。
安装
DTensor 是 TensorFlow 2.9.0 版本的一部分,并且包含在自 2022 年 4 月 9 日起的 TensorFlow Nightly 构建中。
pip install --quiet --upgrade --pre tensorflow安装后,导入 tensorflow 和 tf.experimental.dtensor。然后,将 TensorFlow 配置为使用 6 个虚拟 CPU。
本示例使用了 vCPU,但 DTensor 在 CPU、GPU 或 TPU 设备上的工作方式相同。
import tensorflow as tf
from tensorflow.experimental import dtensor

print('TensorFlow version:', tf.__version__)

def configure_virtual_cpus(ncpu):
  phy_devices = tf.config.list_physical_devices('CPU')
  tf.config.set_logical_device_configuration(phy_devices[0], [
        tf.config.LogicalDeviceConfiguration(),
    ] * ncpu)

configure_virtual_cpus(6)
DEVICES = [f'CPU:{i}' for i in range(6)]

tf.config.list_logical_devices('CPU')
2023-11-07 19:13:12.446689: E external/local_xla/xla/stream_executor/cuda/cuda_dnn.cc:9261] Unable to register cuDNN factory: Attempting to register factory for plugin cuDNN when one has already been registered
2023-11-07 19:13:12.446732: E external/local_xla/xla/stream_executor/cuda/cuda_fft.cc:607] Unable to register cuFFT factory: Attempting to register factory for plugin cuFFT when one has already been registered
2023-11-07 19:13:12.448299: E external/local_xla/xla/stream_executor/cuda/cuda_blas.cc:1515] Unable to register cuBLAS factory: Attempting to register factory for plugin cuBLAS when one has already been registered
TensorFlow version: 2.15.0-rc1
[LogicalDevice(name='/device:CPU:0', device_type='CPU'),
 LogicalDevice(name='/device:CPU:1', device_type='CPU'),
 LogicalDevice(name='/device:CPU:2', device_type='CPU'),
 LogicalDevice(name='/device:CPU:3', device_type='CPU'),
 LogicalDevice(name='/device:CPU:4', device_type='CPU'),
 LogicalDevice(name='/device:CPU:5', device_type='CPU')]
DTensor 的分布式张量模型
DTensor 引入了两个概念:dtensor.Mesh 和 dtensor.Layout。它们是对跨拓扑相关设备的张量分片建模的抽象化。
Mesh定义用于计算的设备列表。Layout定义如何在Mesh上执行张量维度分片。
网格
Mesh 表示一组设备的逻辑笛卡尔拓扑。笛卡尔网格的每个维度都被称为网格维度,以名称进行引用。同一 Mesh 内的网格维度名称必须唯一。
Layout 会引用网格维度的名称来描述 tf.Tensor 沿其每个轴的分片行为。我们将在后面的 Layout 部分中进行更详细的说明。
Mesh 可被视为设备的多维数组。
在一维 Mesh 中,所有设备会以单一网格维度构成列表。以下示例使用 dtensor.create_mesh 从 6 个 CPU 设备沿网格维度 'x' 创建了一个网格,大小为 6 个设备:

mesh_1d = dtensor.create_mesh([('x', 6)], devices=DEVICES)
print(mesh_1d)
Mesh.from_string(|x=6|0,1,2,3,4,5|0,1,2,3,4,5|/job:localhost/replica:0/task:0/device:CPU:0,/job:localhost/replica:0/task:0/device:CPU:1,/job:localhost/replica:0/task:0/device:CPU:2,/job:localhost/replica:0/task:0/device:CPU:3,/job:localhost/replica:0/task:0/device:CPU:4,/job:localhost/replica:0/task:0/device:CPU:5)
Mesh 也可以是多维的。在以下示例中,6 个 CPU 设备构成了一个 3x2 网格,其中网格维度 'x' 的大小为 3 个设备,网格维度 'y' 的大小为 2 个设备:
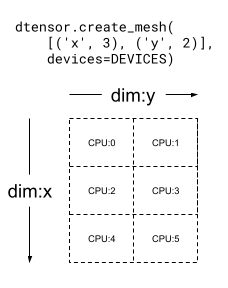
mesh_2d = dtensor.create_mesh([('x', 3), ('y', 2)], devices=DEVICES)
print(mesh_2d)
Mesh.from_string(|x=3,y=2|0,1,2,3,4,5|0,1,2,3,4,5|/job:localhost/replica:0/task:0/device:CPU:0,/job:localhost/replica:0/task:0/device:CPU:1,/job:localhost/replica:0/task:0/device:CPU:2,/job:localhost/replica:0/task:0/device:CPU:3,/job:localhost/replica:0/task:0/device:CPU:4,/job:localhost/replica:0/task:0/device:CPU:5)
布局
Layout 指定张量在 Mesh 上的分布或分片方式。
注:为了避免在 Mesh 和 Layout 之间发生混淆,本指南中将维度这一术语限定为仅与 Mesh 相关,而轴这一术语则与 Tensor 和 Layout 相关。
Layout 的秩应与应用该 Layout 的 Tensor 的秩相同。对于 Tensor 的每个轴,Layout 可能指定网格维度以对张量进行分片,或者将轴指定为“非分片”。张量会在任何未分片的网格维度间进行复制。
Layout 的秩无需与 Mesh 的维数相符。Layout 的 unsharded 轴无需与网格维度相关,并且 unsharded 网格维度也无需与 layout 轴相关。
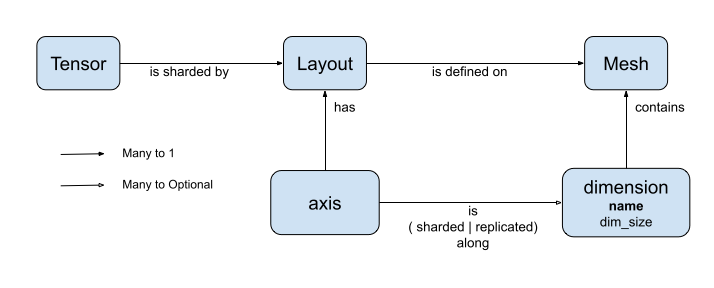
让我们分析在上一部分中创建的 Mesh 的几个 Layout 示例。
在诸如 [("x", 6)]之类的一维网格(上一部分中的 mesh_1d)上,Layout(["unsharded", "unsharded"], mesh_1d) 是在 6 个设备间复制的 2 秩张量的布局。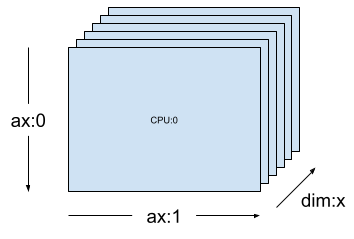
layout = dtensor.Layout([dtensor.UNSHARDED, dtensor.UNSHARDED], mesh_1d)
使用相同的张量和网格,布局 Layout(['unsharded', 'x']) 将在 6 个设备上对张量的第二个轴进行分片。
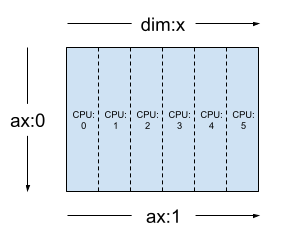
layout = dtensor.Layout([dtensor.UNSHARDED, 'x'], mesh_1d)
给定一个二维 3x2 网格,例如 [("x", 3), ("y", 2)](上一部分中的 mesh_2d),Layout(["y", "x"], mesh_2d) 是 2 秩 Tensor 的布局,其第一个轴在网格维度 "y" 上分片,第二个轴在网格维度 "x" 上分片。
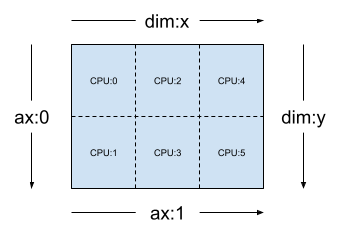
layout = dtensor.Layout(['y', 'x'], mesh_2d)
对于同一 mesh_2d,布局 Layout(["x", dtensor.UNSHARDED], mesh_2d) 是跨 "y" 复制的 2 秩 Tensor 的布局,其第一个轴在网格维度 x 上分片。
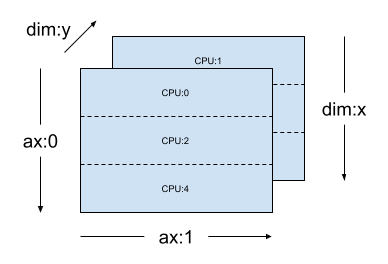
layout = dtensor.Layout(["x", dtensor.UNSHARDED], mesh_2d)
单客户端和多客户端应用
DTensor 支持单客户端和多客户端应用。Python 内核 Colab 就是单客户端 DTensor 应用的示例,其中包含一个 Python 进程。
在多客户端 DTensor 应用中,多个 Python 进程会共同作为连贯应用执行。多客户端 DTensor 应用中 Mesh 的笛卡尔网格可跨设备,无论它们是本地连接到当前客户端还是远程连接到其他客户端。Mesh 使用的所有设备的集合称为全局设备列表。
在多客户端 DTensor 应用中创建 Mesh 是一种集合运算,其中全局设备列表对于所有参与客户端都是相同的,并且 Mesh 的创建会起到全局屏障的作用。
在 Mesh 创建期间,每个客户端都会提供其局部设备列表以及预期的全局设备列表。DTensor 会验证两个列表是否一致。有关多客户端网格创建和全局设备列表的更多信息,请参阅 dtensor.create_mesh 和 dtensor.create_distributed_mesh 的 API 文档。
可以将单客户端视为一种仅含 1 个客户端的多客户端特例。在单客户端应用中,全局设备列表与局部设备列表相同。
DTensor 作为分片张量
现在,让我们开始使用 DTensor 进行编码。辅助函数 dtensor_from_array 演示了如何从类似于 tf.Tensor 的对象创建 DTensor。该函数执行 2 个步骤:
- 将张量复制到网格上的每个设备。
- 根据参数中请求的布局对副本进行分片。
def dtensor_from_array(arr, layout, shape=None, dtype=None):
  """Convert a DTensor from something that looks like an array or Tensor.

  This function is convenient for quick doodling DTensors from a known,
  unsharded data object in a single-client environment. This is not the
  most efficient way of creating a DTensor, but it will do for this
  tutorial.
  """
  if shape is not None or dtype is not None:
    arr = tf.constant(arr, shape=shape, dtype=dtype)

  # replicate the input to the mesh
  a = dtensor.copy_to_mesh(arr,
          layout=dtensor.Layout.replicated(layout.mesh, rank=layout.rank))
  # shard the copy to the desirable layout
  return dtensor.relayout(a, layout=layout)
DTensor 剖析
DTensor 是一个 tf.Tensor 对象,但增加了用于定义其分片行为的 Layout 注解。DTensor 包含以下内容:
- 全局张量元数据,包括张量的全局形状和数据类型。
Layout,用于定义Tensor所属的Mesh,以及Tensor如何分片至Mesh。- 张量分量列表,
Mesh中每个本地设备一个条目。
您可以使用 dtensor_from_array 创建您的第一个 DTensor(即 my_first_dtensor),并检查其内容。
mesh = dtensor.create_mesh([("x", 6)], devices=DEVICES)
layout = dtensor.Layout([dtensor.UNSHARDED], mesh)

my_first_dtensor = dtensor_from_array([0, 1], layout)

# Examine the dtensor content
print(my_first_dtensor)
print("global shape:", my_first_dtensor.shape)
print("dtype:", my_first_dtensor.dtype)
tf.Tensor([0 1], layout="sharding_specs:unsharded, mesh:|x=6|0,1,2,3,4,5|0,1,2,3,4,5|/job:localhost/replica:0/task:0/device:CPU:0,/job:localhost/replica:0/task:0/device:CPU:1,/job:localhost/replica:0/task:0/device:CPU:2,/job:localhost/replica:0/task:0/device:CPU:3,/job:localhost/replica:0/task:0/device:CPU:4,/job:localhost/replica:0/task:0/device:CPU:5", shape=(2,), dtype=int32)
global shape: (2,)
dtype: <dtype: 'int32'>
布局和 fetch_layout
DTensor 的布局不是 tf.Tensor 的常规特性。而 DTensor 提供了用于访问 DTensor 布局的函数 dtensor.fetch_layout。
print(dtensor.fetch_layout(my_first_dtensor))
assert layout == dtensor.fetch_layout(my_first_dtensor)
Layout.from_string(sharding_specs:unsharded, mesh:|x=6|0,1,2,3,4,5|0,1,2,3,4,5|/job:localhost/replica:0/task:0/device:CPU:0,/job:localhost/replica:0/task:0/device:CPU:1,/job:localhost/replica:0/task:0/device:CPU:2,/job:localhost/replica:0/task:0/device:CPU:3,/job:localhost/replica:0/task:0/device:CPU:4,/job:localhost/replica:0/task:0/device:CPU:5)
张量分量、pack 和 unpack
DTensor 包含一个张量分量列表。Mesh 中设备的张量分量是 Tensor 对象,后者代表了存储在此设备上的全局 DTensor 的片段。
DTensor 可以通过 dtensor.unpack 解包为张量分量。您可以利用 dtensor.unpack 来检查 DTensor 的分量,并确认它们位于 Mesh 的所有设备上。
请注意,全局视图中张量分量的位置可能相互重叠。例如,在完全复制布局的情况下,所有分量都是全局张量的相同副本。
for component_tensor in dtensor.unpack(my_first_dtensor):
  print("Device:", component_tensor.device, ",", component_tensor)
Device: /job:localhost/replica:0/task:0/device:CPU:0 , tf.Tensor([0 1], shape=(2,), dtype=int32)
Device: /job:localhost/replica:0/task:0/device:CPU:1 , tf.Tensor([0 1], shape=(2,), dtype=int32)
Device: /job:localhost/replica:0/task:0/device:CPU:2 , tf.Tensor([0 1], shape=(2,), dtype=int32)
Device: /job:localhost/replica:0/task:0/device:CPU:3 , tf.Tensor([0 1], shape=(2,), dtype=int32)
Device: /job:localhost/replica:0/task:0/device:CPU:4 , tf.Tensor([0 1], shape=(2,), dtype=int32)
Device: /job:localhost/replica:0/task:0/device:CPU:5 , tf.Tensor([0 1], shape=(2,), dtype=int32)
如上所示,my_first_dtensor 是复制到所有 6 个设备的 [0, 1] 的张量。
dtensor.unpack 的逆运算为 dtensor.pack。张量分量可以重新打包回 DTensor。
分量必须具有相同的秩和数据类型,即要还原的 DTensor 的秩和数据类型。不过,作为 dtensor.unpack 的输入,张量分量没有严格的设备放置要求:该函数会自动将张量分量复制到其各自对应的设备。
packed_dtensor = dtensor.pack(
    [[0, 1], [0, 1], [0, 1],
     [0, 1], [0, 1], [0, 1]],
     layout=layout
)
print(packed_dtensor)
tf.Tensor([0 1], layout="sharding_specs:unsharded, mesh:|x=6|0,1,2,3,4,5|0,1,2,3,4,5|/job:localhost/replica:0/task:0/device:CPU:0,/job:localhost/replica:0/task:0/device:CPU:1,/job:localhost/replica:0/task:0/device:CPU:2,/job:localhost/replica:0/task:0/device:CPU:3,/job:localhost/replica:0/task:0/device:CPU:4,/job:localhost/replica:0/task:0/device:CPU:5", shape=(2,), dtype=int32)
将 DTensor 分片到网格
到目前为止,您已经使用过 my_first_dtensor,它是在一维 Mesh 中完全复制的 1 秩 DTensor。
接下来,我们要创建并检查在二维 Mesh 中分片的 DTensor。下一个示例使用 3x2 Mesh 在 6 个 CPU 设备上执行此操作,其中网格维度 'x' 的大小为 3 个设备,网格维度 'y' 的大小为 2 个设备。
mesh = dtensor.create_mesh([("x", 3), ("y", 2)], devices=DEVICES)
二维网格上的完全分片 2 秩张量
创建一个 3x2 的 2 秩 DTensor,将其第一个轴沿网格维度 'x' 分片,将其第二个轴沿网格维度 'y' 分片。
- 由于张量形状等于沿所有分片轴的网格维度,每个设备都会接收 DTensor 的一个元素。
- 张量分量的秩与全局形状的秩始终相同。DTensor 利用这种惯例来方便地保存用于定位张量分量与全局 DTensor 之间关系的信息。
fully_sharded_dtensor = dtensor_from_array(
    tf.reshape(tf.range(6), (3, 2)),
    layout=dtensor.Layout(["x", "y"], mesh))

for raw_component in dtensor.unpack(fully_sharded_dtensor):
  print("Device:", raw_component.device, ",", raw_component)
Device: /job:localhost/replica:0/task:0/device:CPU:0 , tf.Tensor([[0]], shape=(1, 1), dtype=int32)
Device: /job:localhost/replica:0/task:0/device:CPU:1 , tf.Tensor([[1]], shape=(1, 1), dtype=int32)
Device: /job:localhost/replica:0/task:0/device:CPU:2 , tf.Tensor([[2]], shape=(1, 1), dtype=int32)
Device: /job:localhost/replica:0/task:0/device:CPU:3 , tf.Tensor([[3]], shape=(1, 1), dtype=int32)
Device: /job:localhost/replica:0/task:0/device:CPU:4 , tf.Tensor([[4]], shape=(1, 1), dtype=int32)
Device: /job:localhost/replica:0/task:0/device:CPU:5 , tf.Tensor([[5]], shape=(1, 1), dtype=int32)
二维网格上的完全复制 2 秩张量
为了对比,我们仍创建一个 3x2 的 2 秩 DTensor,完全复制到相同的二维网格。
- 由于 DTensor 是完全复制的,每个设备都会接收 3x2 DTensor 的完整副本。
- 张量分量的秩与全局形状的秩相同 – 这一事实不足为奇,因为在这种情况下,张量分量的形状无论如何都将与全局形状相同。
fully_replicated_dtensor = dtensor_from_array(
    tf.reshape(tf.range(6), (3, 2)),
    layout=dtensor.Layout([dtensor.UNSHARDED, dtensor.UNSHARDED], mesh))
# Or, layout=tensor.Layout.fully_replicated(mesh, rank=2)

for component_tensor in dtensor.unpack(fully_replicated_dtensor):
  print("Device:", component_tensor.device, ",", component_tensor)
Device: /job:localhost/replica:0/task:0/device:CPU:0 , tf.Tensor(
[[0 1]
 [2 3]
 [4 5]], shape=(3, 2), dtype=int32)
Device: /job:localhost/replica:0/task:0/device:CPU:1 , tf.Tensor(
[[0 1]
 [2 3]
 [4 5]], shape=(3, 2), dtype=int32)
Device: /job:localhost/replica:0/task:0/device:CPU:2 , tf.Tensor(
[[0 1]
 [2 3]
 [4 5]], shape=(3, 2), dtype=int32)
Device: /job:localhost/replica:0/task:0/device:CPU:3 , tf.Tensor(
[[0 1]
 [2 3]
 [4 5]], shape=(3, 2), dtype=int32)
Device: /job:localhost/replica:0/task:0/device:CPU:4 , tf.Tensor(
[[0 1]
 [2 3]
 [4 5]], shape=(3, 2), dtype=int32)
Device: /job:localhost/replica:0/task:0/device:CPU:5 , tf.Tensor(
[[0 1]
 [2 3]
 [4 5]], shape=(3, 2), dtype=int32)
二维网格上的混合 2 秩张量
介于完全分片与完全复制之间会如何?
DTensor 允许采用混合 Layout:沿某些轴分片,但沿其他轴复制。
例如,您可以通过以下方式对相同的 3x2 2 秩 DTensor 进行分片:
- 第 1 个轴沿网格维度
'x'分片。 - 第 2 个轴沿网格维度
'y'复制。
要实现这种分片方案,您只需将第 2 个轴的分片规范从 'y' 更改为 dtensor.UNSHARDED,以指示您打算沿第 2 个轴进行复制。布局对象类似于 Layout(['x', dtensor.UNSHARDED], mesh)。
hybrid_sharded_dtensor = dtensor_from_array(
    tf.reshape(tf.range(6), (3, 2)),
    layout=dtensor.Layout(['x', dtensor.UNSHARDED], mesh))

for component_tensor in dtensor.unpack(hybrid_sharded_dtensor):
  print("Device:", component_tensor.device, ",", component_tensor)
Device: /job:localhost/replica:0/task:0/device:CPU:0 , tf.Tensor([[0 1]], shape=(1, 2), dtype=int32)
Device: /job:localhost/replica:0/task:0/device:CPU:1 , tf.Tensor([[0 1]], shape=(1, 2), dtype=int32)
Device: /job:localhost/replica:0/task:0/device:CPU:2 , tf.Tensor([[2 3]], shape=(1, 2), dtype=int32)
Device: /job:localhost/replica:0/task:0/device:CPU:3 , tf.Tensor([[2 3]], shape=(1, 2), dtype=int32)
Device: /job:localhost/replica:0/task:0/device:CPU:4 , tf.Tensor([[4 5]], shape=(1, 2), dtype=int32)
Device: /job:localhost/replica:0/task:0/device:CPU:5 , tf.Tensor([[4 5]], shape=(1, 2), dtype=int32)
您可以检查创建的 DTensor 的张量分量并验证它们是否确实已根据您的方案进行了分片。使用图表说明情况可能会有所帮助:
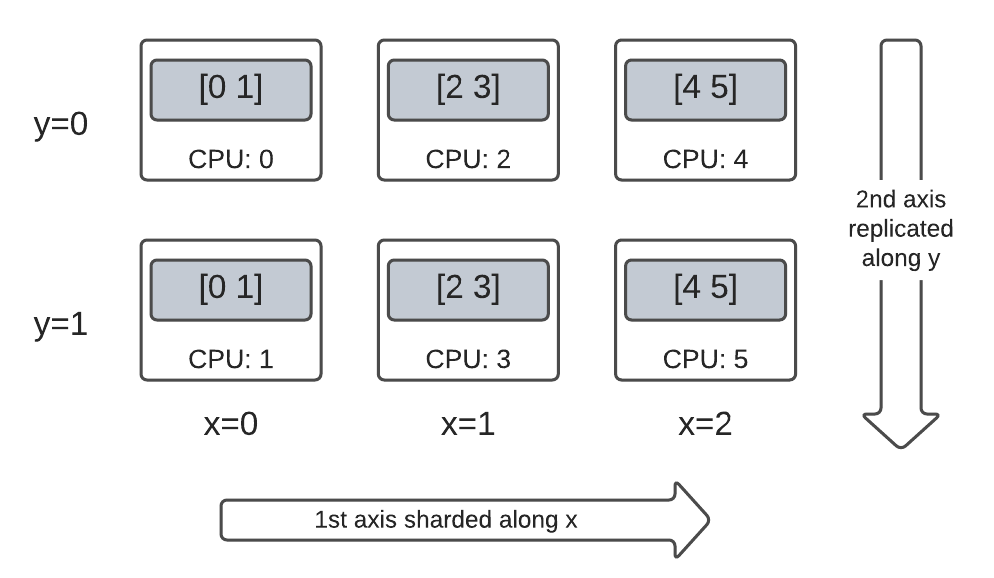
Tensor.numpy() 和分片 DTensor
请注意,在分片 DTensor 上调用 .numpy() 方法会引发错误。错误的根本原理是为防止从多个计算设备向支持返回的 NumPy 数组的主机 CPU 设备意外收集数据。
print(fully_replicated_dtensor.numpy())

try:
  fully_sharded_dtensor.numpy()
except tf.errors.UnimplementedError:
  print("got an error as expected for fully_sharded_dtensor")

try:
  hybrid_sharded_dtensor.numpy()
except tf.errors.UnimplementedError:
  print("got an error as expected for hybrid_sharded_dtensor")
[[0 1]
 [2 3]
 [4 5]]
got an error as expected for fully_sharded_dtensor
got an error as expected for hybrid_sharded_dtensor
DTensor 的相关 TensorFlow API
DTensor 致力于以普适性的方式在您的程序中替代张量。使用 tf.Tensor 的 TensorFlow Python API(例如运算库函数、tf.function、tf.GradientTape)也可以与 DTensor 一起使用。
为此,针对每个 TensorFlow 计算图,DTensor 都会在称为 SPMD 扩展的过程中生成并执行等效的 SPMD 计算图。DTensor SPMD 扩展的几个关键步骤包括:
- 在 TensorFlow 计算图中传播 DTensor 的分片
Layout - 使用张量分量上的等效 TensorFlow 运算重写全局 DTensor 上的 TensorFlow 运算,必要时插入集合和通信运算
- 将后端中性 TensorFlow 运算降为后端特定 TensorFlow 运算。
最后,DTensor 成为张量的普适性替代。
注:DTensor 仍为实验性 API,这意味着您将探索和推动拓宽 DTensor 编程模型的边界和限制。
可以通过两种方式触发 DTensor 执行:
- DTensor 为 Python 函数的运算对象,例如,如果
a、b或两者都是 DTensor,则tf.matmul(a, b)将通过 DTensor 运行。 - 请求 Python 函数的结果为 DTensor,例如,
dtensor.call_with_layout(tf.ones, layout, shape=(3, 2))将通过 DTensor 运行,因为我们请求根据layout对 tf.ones 的输出进行分片。
DTensor 作为运算对象
许多 TensorFlow API 函数都会将 tf.Tensor 作为其运算对象,并返回 tf.Tensor 作为其结果。对于这些函数,您可以通过传入 DTensor 作为运算对象来表明要通过 DTensor 运行函数的意图。本部分将以 tf.matmul(a, b) 为例。
完全复制输入和输出
在这种情况下,DTensor 会被完全复制。在 Mesh 的每个设备上,
- 运算对象
a的张量分量为[[1, 2, 3], [4, 5, 6]](2x3) - 运算对象
b的张量分量为[[6, 5], [4, 3], [2, 1]](3x2) - 计算由
(2x3, 3x2) -> 2x2的单个MatMul组成 - 结果
c的张量分量为[[20, 14], [56,41]](2x2)
浮点 mul 运算的总数为 6 device * 4 result * 3 mul = 72。
mesh = dtensor.create_mesh([("x", 6)], devices=DEVICES)
layout = dtensor.Layout([dtensor.UNSHARDED, dtensor.UNSHARDED], mesh)
a = dtensor_from_array([[1, 2, 3], [4, 5, 6]], layout=layout)
b = dtensor_from_array([[6, 5], [4, 3], [2, 1]], layout=layout)

c = tf.matmul(a, b) # runs 6 identical matmuls in parallel on 6 devices

# `c` is a DTensor replicated on all devices (same as `a` and `b`)
print('Sharding spec:', dtensor.fetch_layout(c).sharding_specs)
print("components:")
for component_tensor in dtensor.unpack(c):
  print(component_tensor.device, component_tensor.numpy())
Sharding spec: ['unsharded', 'unsharded']
components:
/job:localhost/replica:0/task:0/device:CPU:0 [[20 14]
 [56 41]]
/job:localhost/replica:0/task:0/device:CPU:1 [[20 14]
 [56 41]]
/job:localhost/replica:0/task:0/device:CPU:2 [[20 14]
 [56 41]]
/job:localhost/replica:0/task:0/device:CPU:3 [[20 14]
 [56 41]]
/job:localhost/replica:0/task:0/device:CPU:4 [[20 14]
 [56 41]]
/job:localhost/replica:0/task:0/device:CPU:5 [[20 14]
 [56 41]]
沿收缩轴分片运算对象
您可以通过对运算对象 a 和 b 进行分片来降低每个设备的计算量。tf.matmul 的一种热门分片方案为沿收缩轴对运算对象进行分片,这意味着沿第二个轴对 a 进行分片,沿第一个轴对 b 进行分片。
在此方案下分片的全局矩阵乘积可以通过同时运行的局部 matmul 高效地执行,然后进行集合归约以聚合局部结果。这也是实现分布式矩阵点积的规范方式。
浮点 mul 运算的总数为 6 devices * 4 result * 1 = 24,仅为上述完全复制情况 (72) 的 1/3。系数 3 源自于沿网格维度 x 在 3 个设备间的共享。
减少按顺序运行的运算数量是同步模型并行加速训练所采用的主要机制。
mesh = dtensor.create_mesh([("x", 3), ("y", 2)], devices=DEVICES)
a_layout = dtensor.Layout([dtensor.UNSHARDED, 'x'], mesh)
a = dtensor_from_array([[1, 2, 3], [4, 5, 6]], layout=a_layout)
b_layout = dtensor.Layout(['x', dtensor.UNSHARDED], mesh)
b = dtensor_from_array([[6, 5], [4, 3], [2, 1]], layout=b_layout)

c = tf.matmul(a, b)
# `c` is a DTensor replicated on all devices (same as `a` and `b`)
print('Sharding spec:', dtensor.fetch_layout(c).sharding_specs)
Sharding spec: ['unsharded', 'unsharded']
额外分片
您可以对输入执行额外的分片,它们会适当地转移到结果中。例如,您可以在网格维度 'y' 上对运算对象 a 沿其第一个轴应用额外分片。额外分片将被转移到结果 c 的第一个轴。
浮点 mul 运算的总数为 6 devices * 2 result * 1 = 12,仅为上述上述情况 (24) 的 1/2。系数 2 源自于沿网格维度 y 在 2 个设备间的共享。
mesh = dtensor.create_mesh([("x", 3), ("y", 2)], devices=DEVICES)

a_layout = dtensor.Layout(['y', 'x'], mesh)
a = dtensor_from_array([[1, 2, 3], [4, 5, 6]], layout=a_layout)
b_layout = dtensor.Layout(['x', dtensor.UNSHARDED], mesh)
b = dtensor_from_array([[6, 5], [4, 3], [2, 1]], layout=b_layout)

c = tf.matmul(a, b)
# The sharding of `a` on the first axis is carried to `c'
print('Sharding spec:', dtensor.fetch_layout(c).sharding_specs)
print("components:")
for component_tensor in dtensor.unpack(c):
  print(component_tensor.device, component_tensor.numpy())
Sharding spec: ['y', 'unsharded']
components:
/job:localhost/replica:0/task:0/device:CPU:0 [[20 14]]
/job:localhost/replica:0/task:0/device:CPU:1 [[56 41]]
/job:localhost/replica:0/task:0/device:CPU:2 [[20 14]]
/job:localhost/replica:0/task:0/device:CPU:3 [[56 41]]
/job:localhost/replica:0/task:0/device:CPU:4 [[20 14]]
/job:localhost/replica:0/task:0/device:CPU:5 [[56 41]]
DTensor 作为输出
不接受运算对象但会返回可分片的张量结果的 Python 函数如何?此类函数的示例为:
针对这些 Python 函数,DTensor 提供了 dtensor.call_with_layout,后者支持使用 DTensor 以 Eager 方式执行 Python 函数,并确保返回的张量是具有请求 Layout 的 DTensor。
help(dtensor.call_with_layout)
Help on function call_with_layout in module tensorflow.dtensor.python.api:

call_with_layout(fn: Callable[..., Any], layout: Optional[tensorflow.dtensor.python.layout.Layout], *args, **kwargs) -> Any
    Calls a function in the DTensor device scope if `layout` is not None.

    If `layout` is not None, `fn` consumes DTensor(s) as input and produces a
    DTensor as output; a DTensor is a tf.Tensor with layout-related attributes.

    If `layout` is None, `fn` consumes and produces regular tf.Tensors.

    Args:
      fn: A supported TF API function such as tf.zeros.
      layout: Optional, the layout of the output DTensor.
      *args:  Arguments given to `fn`.
      **kwargs: Keyword arguments given to `fn`.

    Returns:
      The return value of `fn` transformed to a DTensor if requested.
以 Eager 方式执行的 Python 函数通常只包含一个非常重要的 TensorFlow 运算。
要使用通过 dtensor.call_with_layout 发出多个 TensorFlow 运算的 Python 函数,应将该函数转换为 tf.function。调用 tf.function 为单个 TensorFlow 运算。调用 tf.function 时,DTensor 可以在任何中间张量具体化之前在分析 tf.function 的计算图时执行布局传播。
发出单个 TensorFlow 运算的 API
如果函数发出单个 TensorFlow 运算,您可以直接将 dtensor.call_with_layout 应用于该函数。
help(tf.ones)
Help on function ones in module tensorflow.python.ops.array_ops:

ones(shape, dtype=tf.float32, name=None, layout=None)
    Creates a tensor with all elements set to one (1).

    See also `tf.ones_like`, `tf.zeros`, `tf.fill`, `tf.eye`.

    This operation returns a tensor of type `dtype` with shape `shape` and
    all elements set to one.

    >>> tf.ones([3, 4], tf.int32)
    <tf.Tensor: shape=(3, 4), dtype=int32, numpy=
    array([[1, 1, 1, 1],
           [1, 1, 1, 1],
           [1, 1, 1, 1]], dtype=int32)>

    Args:
      shape: A `list` of integers, a `tuple` of integers, or a 1-D `Tensor` of
        type `int32`.
      dtype: Optional DType of an element in the resulting `Tensor`. Default is
        `tf.float32`.
      name: Optional string. A name for the operation.
      layout: Optional, `tf.experimental.dtensor.Layout`. If provided, the result
        is a [DTensor](https://www.tensorflow.org/guide/dtensor_overview) with the
        provided layout.

    Returns:
      A `Tensor` with all elements set to one (1).
mesh = dtensor.create_mesh([("x", 3), ("y", 2)], devices=DEVICES)
ones = dtensor.call_with_layout(tf.ones, dtensor.Layout(['x', 'y'], mesh), shape=(6, 4))
print(ones)
tf.Tensor({"CPU:0": [[1 1]
 [1 1]], "CPU:1": [[1 1]
 [1 1]], "CPU:2": [[1 1]
 [1 1]], "CPU:3": [[1 1]
 [1 1]], "CPU:4": [[1 1]
 [1 1]], "CPU:5": [[1 1]
 [1 1]]}, layout="sharding_specs:x,y, mesh:|x=3,y=2|0,1,2,3,4,5|0,1,2,3,4,5|/job:localhost/replica:0/task:0/device:CPU:0,/job:localhost/replica:0/task:0/device:CPU:1,/job:localhost/replica:0/task:0/device:CPU:2,/job:localhost/replica:0/task:0/device:CPU:3,/job:localhost/replica:0/task:0/device:CPU:4,/job:localhost/replica:0/task:0/device:CPU:5", shape=(6, 4), dtype=float32)
发出多个 TensorFlow 运算的 API
如果 API 发出多个 TensorFlow 运算,请通过 tf.function 将函数转换为单个运算。例如 tf.random.stateleess_normal
help(tf.random.stateless_normal)
Help on function stateless_random_normal in module tensorflow.python.ops.stateless_random_ops:

stateless_random_normal(shape, seed, mean=0.0, stddev=1.0, dtype=tf.float32, name=None, alg='auto_select')
    Outputs deterministic pseudorandom values from a normal distribution.

    This is a stateless version of `tf.random.normal`: if run twice with the
    same seeds and shapes, it will produce the same pseudorandom numbers.  The
    output is consistent across multiple runs on the same hardware (and between
    CPU and GPU), but may change between versions of TensorFlow or on non-CPU/GPU
    hardware.

    Args:
      shape: A 1-D integer Tensor or Python array. The shape of the output tensor.
      seed: A shape [2] Tensor, the seed to the random number generator. Must have
        dtype `int32` or `int64`. (When using XLA, only `int32` is allowed.)
      mean: A 0-D Tensor or Python value of type `dtype`. The mean of the normal
        distribution.
      stddev: A 0-D Tensor or Python value of type `dtype`. The standard deviation
        of the normal distribution.
      dtype: The float type of the output: `float16`, `bfloat16`, `float32`,
        `float64`. Defaults to `float32`.
      name: A name for the operation (optional).
      alg: The RNG algorithm used to generate the random numbers. See
        `tf.random.stateless_uniform` for a detailed explanation.

    Returns:
      A tensor of the specified shape filled with random normal values.
ones = dtensor.call_with_layout(
    tf.function(tf.random.stateless_normal),
    dtensor.Layout(['x', 'y'], mesh),
    shape=(6, 4),
    seed=(1, 1))
print(ones)
tf.Tensor({"CPU:0": [[0.0368092842 1.76192284]
 [1.22868407 -0.731756687]], "CPU:1": [[0.255247623 -0.13820985]
 [-0.747412503 1.06443202]], "CPU:2": [[-0.395325899 -0.836183369]
 [0.581941128 -0.2587713]], "CPU:3": [[0.476060659 0.406645179]
 [-0.110623844 -1.49052978]], "CPU:4": [[0.645035267 1.36384416]
 [2.18210244 -0.965060234]], "CPU:5": [[-1.70534277 1.32558191]
 [0.972473264 0.972343624]]}, layout="sharding_specs:x,y, mesh:|x=3,y=2|0,1,2,3,4,5|0,1,2,3,4,5|/job:localhost/replica:0/task:0/device:CPU:0,/job:localhost/replica:0/task:0/device:CPU:1,/job:localhost/replica:0/task:0/device:CPU:2,/job:localhost/replica:0/task:0/device:CPU:3,/job:localhost/replica:0/task:0/device:CPU:4,/job:localhost/replica:0/task:0/device:CPU:5", shape=(6, 4), dtype=float32)
允许使用 tf.function 来包装发出单个 TensorFlow 运算的 Python 函数。唯一需要注意的是,必须承担从 Python 函数创建 tf.function 的相关成本和复杂性。
ones = dtensor.call_with_layout(
    tf.function(tf.ones),
    dtensor.Layout(['x', 'y'], mesh),
    shape=(6, 4))
print(ones)
tf.Tensor({"CPU:0": [[1 1]
 [1 1]], "CPU:1": [[1 1]
 [1 1]], "CPU:2": [[1 1]
 [1 1]], "CPU:3": [[1 1]
 [1 1]], "CPU:4": [[1 1]
 [1 1]], "CPU:5": [[1 1]
 [1 1]]}, layout="sharding_specs:x,y, mesh:|x=3,y=2|0,1,2,3,4,5|0,1,2,3,4,5|/job:localhost/replica:0/task:0/device:CPU:0,/job:localhost/replica:0/task:0/device:CPU:1,/job:localhost/replica:0/task:0/device:CPU:2,/job:localhost/replica:0/task:0/device:CPU:3,/job:localhost/replica:0/task:0/device:CPU:4,/job:localhost/replica:0/task:0/device:CPU:5", shape=(6, 4), dtype=float32)
从 tf.Variable 到 dtensor.DVariable
在 Tensorflow 中,tf.Variable 是可变 Tensor 值的持有者。使用 DTensor 时,dtensor.DVariable 可以提供相应的变量语义。
为 DTensor 变量引入新类型 DVariable 的原因是 DVariable 有一个额外的要求,即布局的初始值不能改变。
mesh = dtensor.create_mesh([("x", 6)], devices=DEVICES)
layout = dtensor.Layout([dtensor.UNSHARDED, dtensor.UNSHARDED], mesh)

v = dtensor.DVariable(
    initial_value=dtensor.call_with_layout(
        tf.function(tf.random.stateless_normal),
        layout=layout,
        shape=tf.TensorShape([64, 32]),
        seed=[1, 1],
        dtype=tf.float32))

print(v.handle)
assert layout == dtensor.fetch_layout(v)
tf.Tensor(<ResourceHandle(name="Variable/0", device="/job:localhost/replica:0/task:0/device:CPU:0", container="Anonymous", type="tensorflow::Var", dtype and shapes : "[ DType enum: 1, Shape: [64,32] ]")>, layout="sharding_specs:unsharded,unsharded, mesh:|x=6|0,1,2,3,4,5|0,1,2,3,4,5|/job:localhost/replica:0/task:0/device:CPU:0,/job:localhost/replica:0/task:0/device:CPU:1,/job:localhost/replica:0/task:0/device:CPU:2,/job:localhost/replica:0/task:0/device:CPU:3,/job:localhost/replica:0/task:0/device:CPU:4,/job:localhost/replica:0/task:0/device:CPU:5", shape=(), dtype=resource)
除了匹配 layout 的要求外,DVariable 的行为与 tf.Variable 相同。例如,您可以将 DVariable 添加到 DTensor。
a = dtensor.call_with_layout(tf.ones, layout=layout, shape=(64, 32))
b = v + a # add DVariable and DTensor
print(b)
tf.Tensor([[2.66521645 2.36637592 1.77863169 ... -1.18624139 2.26035929 0.664066315]
 [0.511952519 0.655031443 0.122243524 ... 0.0424078107 1.67057109 0.912334144]
 [0.769825 1.42743981 3.13473773 ... 1.16159868 0.628931046 0.733521938]
 ...
 [0.388001859 2.72882509 2.92771554 ... 1.17472672 1.72462416 1.5047121]
 [-0.252545118 0.761886716 1.72119033 ... 0.775034547 2.8065362 1.00457215]
 [1.23498726 0.584536672 1.15659761 ... 0.955793858 1.11440909 0.18848455]], layout="sharding_specs:unsharded,unsharded, mesh:|x=6|0,1,2,3,4,5|0,1,2,3,4,5|/job:localhost/replica:0/task:0/device:CPU:0,/job:localhost/replica:0/task:0/device:CPU:1,/job:localhost/replica:0/task:0/device:CPU:2,/job:localhost/replica:0/task:0/device:CPU:3,/job:localhost/replica:0/task:0/device:CPU:4,/job:localhost/replica:0/task:0/device:CPU:5", shape=(64, 32), dtype=float32)
您还可以将 DTensor 指定给 DVariable。
v.assign(a) # assign a DTensor to a DVariable
print(a)
tf.Tensor([[1 1 1 ... 1 1 1]
 [1 1 1 ... 1 1 1]
 [1 1 1 ... 1 1 1]
 ...
 [1 1 1 ... 1 1 1]
 [1 1 1 ... 1 1 1]
 [1 1 1 ... 1 1 1]], layout="sharding_specs:unsharded,unsharded, mesh:|x=6|0,1,2,3,4,5|0,1,2,3,4,5|/job:localhost/replica:0/task:0/device:CPU:0,/job:localhost/replica:0/task:0/device:CPU:1,/job:localhost/replica:0/task:0/device:CPU:2,/job:localhost/replica:0/task:0/device:CPU:3,/job:localhost/replica:0/task:0/device:CPU:4,/job:localhost/replica:0/task:0/device:CPU:5", shape=(64, 32), dtype=float32)
通过指定具有不兼容布局的 DTensor 来尝试改变 DVariable 的布局会产生错误。
# variable's layout is immutable.
another_mesh = dtensor.create_mesh([("x", 3), ("y", 2)], devices=DEVICES)
b = dtensor.call_with_layout(tf.ones,
                     layout=dtensor.Layout([dtensor.UNSHARDED, dtensor.UNSHARDED], another_mesh),
                     shape=(64, 32))
try:
  v.assign(b)
except:
  print("exception raised")
exception raised
后续步骤
在此 Colab 中,您了解了 DTensor,它是用于分布式计算的 TensorFlow 扩展程序。要在教程中尝试运用这些概念,请参阅使用 DTensor 进行分布式训练。
