
 在 GitHub 上查看源代码 在 GitHub 上查看源代码 |
本 Colab 演示了如何使用基于生成对抗网络 (GAN) 的 TF-Hub 模块。该模块从 N 维向量(称为隐空间)映射到 RGB 图像。
本文提供了两个示例:
- 从隐空间映射到图像,以及
- 提供一个目标图像,利用梯度下降法找到生成与目标图像相似的图像的隐向量。
可选前提条件
- 熟悉低级 Tensorflow 概念。
- 维基百科上的生成对抗网络。
- 关于渐进式 GAN 的论文:Progressive Growing of GANs for Improved Quality, Stability, and Variation。
更多模型
您可以在这里找到 tfhub.dev 上当前托管的所有模型,您可以使用这些模型生成图像。
设置
# Install imageio for creating animations.pip -q install imageiopip -q install scikit-imagepip install git+https://github.com/tensorflow/docs
Imports and function definitions
from absl import logging

import imageio
import PIL.Image
import matplotlib.pyplot as plt
import numpy as np

import tensorflow as tf
tf.random.set_seed(0)

import tensorflow_hub as hub
from tensorflow_docs.vis import embed
import time

try:
  from google.colab import files
except ImportError:
  pass

from IPython import display
from skimage import transform

# We could retrieve this value from module.get_input_shapes() if we didn't know
# beforehand which module we will be using.
latent_dim = 512


# Interpolates between two vectors that are non-zero and don't both lie on a
# line going through origin. First normalizes v2 to have the same norm as v1.
# Then interpolates between the two vectors on the hypersphere.
def interpolate_hypersphere(v1, v2, num_steps):
  v1_norm = tf.norm(v1)
  v2_norm = tf.norm(v2)
  v2_normalized = v2 * (v1_norm / v2_norm)

  vectors = []
  for step in range(num_steps):
    interpolated = v1 + (v2_normalized - v1) * step / (num_steps - 1)
    interpolated_norm = tf.norm(interpolated)
    interpolated_normalized = interpolated * (v1_norm / interpolated_norm)
    vectors.append(interpolated_normalized)
  return tf.stack(vectors)

# Simple way to display an image.
def display_image(image):
  image = tf.constant(image)
  image = tf.image.convert_image_dtype(image, tf.uint8)
  return PIL.Image.fromarray(image.numpy())

# Given a set of images, show an animation.
def animate(images):
  images = np.array(images)
  converted_images = np.clip(images * 255, 0, 255).astype(np.uint8)
  imageio.mimsave('./animation.gif', converted_images)
  return embed.embed_file('./animation.gif')

logging.set_verbosity(logging.ERROR)
2023-11-07 18:59:27.352652: E external/local_xla/xla/stream_executor/cuda/cuda_dnn.cc:9261] Unable to register cuDNN factory: Attempting to register factory for plugin cuDNN when one has already been registered
2023-11-07 18:59:27.352699: E external/local_xla/xla/stream_executor/cuda/cuda_fft.cc:607] Unable to register cuFFT factory: Attempting to register factory for plugin cuFFT when one has already been registered
2023-11-07 18:59:27.354507: E external/local_xla/xla/stream_executor/cuda/cuda_blas.cc:1515] Unable to register cuBLAS factory: Attempting to register factory for plugin cuBLAS when one has already been registered
隐空间插值法
随机向量
两个随机初始化向量之间的隐空间插值。我们将使用包含预训练渐进式 GAN 的 TF-Hub 模块 progan-128。
progan = hub.load("https://tfhub.dev/google/progan-128/1").signatures['default']
def interpolate_between_vectors():
  v1 = tf.random.normal([latent_dim])
  v2 = tf.random.normal([latent_dim])

  # Creates a tensor with 25 steps of interpolation between v1 and v2.
  vectors = interpolate_hypersphere(v1, v2, 50)

  # Uses module to generate images from the latent space.
  interpolated_images = progan(vectors)['default']

  return interpolated_images

interpolated_images = interpolate_between_vectors()
animate(interpolated_images)
查找隐空间中的最近向量
确定目标图像。例如,使用从模块生成的图像或上传自己的图像。
image_from_module_space = True  # @param { isTemplate:true, type:"boolean" }

def get_module_space_image():
  vector = tf.random.normal([1, latent_dim])
  images = progan(vector)['default'][0]
  return images

def upload_image():
  uploaded = files.upload()
  image = imageio.imread(uploaded[list(uploaded.keys())[0]])
  return transform.resize(image, [128, 128])

if image_from_module_space:
  target_image = get_module_space_image()
else:
  target_image = upload_image()

display_image(target_image)

定义目标图像与隐空间变量生成的图像之后,我们可以利用梯度下降法找到最大限度减少损失的变量值。
tf.random.set_seed(42)
initial_vector = tf.random.normal([1, latent_dim])
display_image(progan(initial_vector)['default'][0])

def find_closest_latent_vector(initial_vector, num_optimization_steps,
                               steps_per_image):
  images = []
  losses = []

  vector = tf.Variable(initial_vector)
  optimizer = tf.optimizers.Adam(learning_rate=0.01)
  loss_fn = tf.losses.MeanAbsoluteError(reduction="sum")

  for step in range(num_optimization_steps):
    if (step % 100)==0:
      print()
    print('.', end='')
    with tf.GradientTape() as tape:
      image = progan(vector.read_value())['default'][0]
      if (step % steps_per_image) == 0:
        images.append(image.numpy())
      target_image_difference = loss_fn(image, target_image[:,:,:3])
      # The latent vectors were sampled from a normal distribution. We can get
      # more realistic images if we regularize the length of the latent vector to
      # the average length of vector from this distribution.
      regularizer = tf.abs(tf.norm(vector) - np.sqrt(latent_dim))

      loss = target_image_difference + regularizer
      losses.append(loss.numpy())
    grads = tape.gradient(loss, [vector])
    optimizer.apply_gradients(zip(grads, [vector]))

  return images, losses


num_optimization_steps=200
steps_per_image=5
images, loss = find_closest_latent_vector(initial_vector, num_optimization_steps, steps_per_image)
.
WARNING: All log messages before absl::InitializeLog() is called are written to STDERR
I0000 00:00:1699383604.217769   80180 device_compiler.h:186] Compiled cluster using XLA!  This line is logged at most once for the lifetime of the process.
...................................................................................................
....................................................................................................
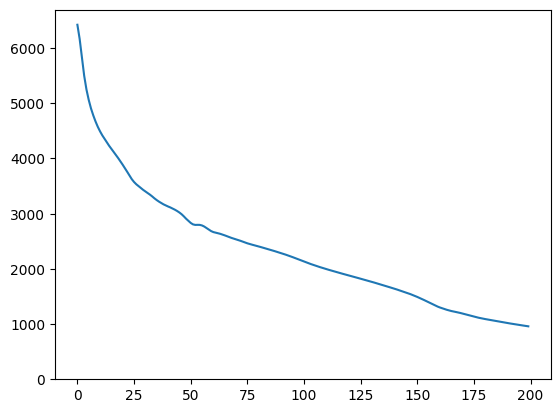
plt.plot(loss)
plt.ylim([0,max(plt.ylim())])
(0.0, 6696.204772949219)
animate(np.stack(images))

将结果与目标进行对比:
display_image(np.concatenate([images[-1], target_image], axis=1))

试运行上述示例
如果图像来自模块空间,则下降很快且会收敛到合理的样本。如果尝试下降到不是来自模块空间的图像,则只有当图像相当接近训练图像的空间时,下降才会收敛。
如何使其更快速地下降并变成更真实的图像?您可以尝试:
- 对图像差异使用不同的损失,例如二次方程,
- 对隐向量使用不同的正则化器,
- 在多次运行中从随机向量初始化,
- 等等。