
 在 Github 上查看源代码 在 Github 上查看源代码 |
本教程包含 DeepDream 的最小规模实现,如此篇由 Alexander Mordvintsev 发布的博文所述。
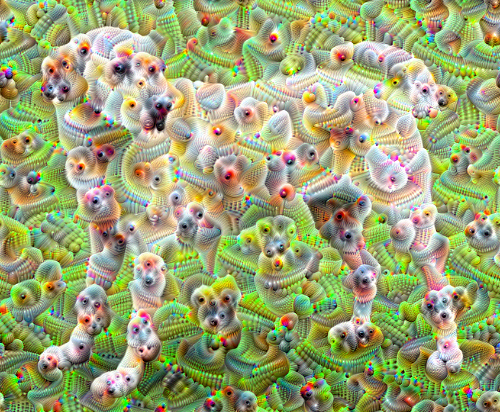
DeepDream 是一项将神经网络学习模式予以可视化展现的实验。与孩子们观察云朵并尝试解释随机形状相类似,DeepDream 会过度解释并增强其在图像中看到的图案。
该技术的原理是通过网络转发图像,然后计算图像相对于特定层激活的梯度。随后,图像将被修改以增加这些激活,从而增强网络可识别到的图案,并生成梦境般的图像。该过程被称为“盗梦”(引用自 InceptionNet,以及电影《盗梦空间》)。
让我们演示如何帮助神经网络“造梦”并增强其在图像中识别到的超现实图案。

import tensorflow as tf
2023-11-07 19:31:51.241714: E external/local_xla/xla/stream_executor/cuda/cuda_dnn.cc:9261] Unable to register cuDNN factory: Attempting to register factory for plugin cuDNN when one has already been registered
2023-11-07 19:31:51.241758: E external/local_xla/xla/stream_executor/cuda/cuda_fft.cc:607] Unable to register cuFFT factory: Attempting to register factory for plugin cuFFT when one has already been registered
2023-11-07 19:31:51.243469: E external/local_xla/xla/stream_executor/cuda/cuda_blas.cc:1515] Unable to register cuBLAS factory: Attempting to register factory for plugin cuBLAS when one has already been registered
import numpy as np

import matplotlib as mpl

import IPython.display as display
import PIL.Image
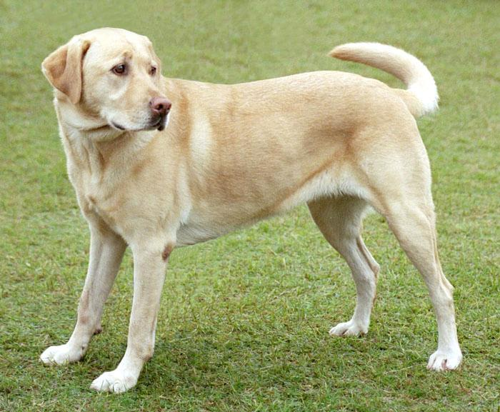
选择要梦境化的图像
在本教程中,我们使用了拉布拉多寻回犬的图片。
url = 'https://storage.googleapis.com/download.tensorflow.org/example_images/YellowLabradorLooking_new.jpg'
# Download an image and read it into a NumPy array.
def download(url, max_dim=None):
  name = url.split('/')[-1]
  image_path = tf.keras.utils.get_file(name, origin=url)
  img = PIL.Image.open(image_path)
  if max_dim:
    img.thumbnail((max_dim, max_dim))
  return np.array(img)

# Normalize an image
def deprocess(img):
  img = 255*(img + 1.0)/2.0
  return tf.cast(img, tf.uint8)

# Display an image
def show(img):
  display.display(PIL.Image.fromarray(np.array(img)))


# Downsizing the image makes it easier to work with.
original_img = download(url, max_dim=500)
show(original_img)
display.display(display.HTML('Image cc-by: <a "href=https://commons.wikimedia.org/wiki/File:Felis_catus-cat_on_snow.jpg">Von.grzanka</a>'))
Downloading data from https://storage.googleapis.com/download.tensorflow.org/example_images/YellowLabradorLooking_new.jpg
83281/83281 [==============================] - 0s 0us/step
准备特征提取模型
下载并准备预训练的图像分类模型。您将使用 InceptionV3,它与 DeepDream 中最初使用的模型相似。请注意,任何预训练模型均可使用,但如果对其进行了更改,则您需要调整下方的层名称。
base_model = tf.keras.applications.InceptionV3(include_top=False, weights='imagenet')
Downloading data from https://storage.googleapis.com/tensorflow/keras-applications/inception_v3/inception_v3_weights_tf_dim_ordering_tf_kernels_notop.h5
87910968/87910968 [==============================] - 1s 0us/step
DeepDream 的方案是选择一个或多个层,并以使图像渐增式“激发”层的方式最大化“损失”。融入特征的复杂性取决于您选择的层,即较低的层会产生笔触或简单的图案,而较深的层则会使图像甚至整个对象呈现出复杂的特征。
InceptionV3 架构十分庞大(有关模型架构的图表,请参见 TensorFlow 的研究仓库)。对于 DeepDream,目标层是将卷积串联在一起的层。InceptionV3 中有 11 层,名为“mixed0”至“mixed10”。使用不同的层将产生不同的梦幻图像。较深的层响应较高级的特征(例如,眼睛和面部),而较浅的层则响应较简单的特征(例如,边缘、形状和纹理)。请随意尝试以下选择的层,但请记住,由于梯度计算的深度较大,较深的层(索引较高的层)将需要较长的训练时间。
# Maximize the activations of these layers
names = ['mixed3', 'mixed5']
layers = [base_model.get_layer(name).output for name in names]

# Create the feature extraction model
dream_model = tf.keras.Model(inputs=base_model.input, outputs=layers)
计算损失
损失是所选层中激活的总和。损失在每一层均会进行归一化,因此较大层的贡献不会超过较小层。通常,您会希望通过梯度下降来实现损失量最小化。但在 DeepDream 中,您将通过梯度上升使这种损失最大化。
def calc_loss(img, model):
  # Pass forward the image through the model to retrieve the activations.
  # Converts the image into a batch of size 1.
  img_batch = tf.expand_dims(img, axis=0)
  layer_activations = model(img_batch)
  if len(layer_activations) == 1:
    layer_activations = [layer_activations]

  losses = []
  for act in layer_activations:
    loss = tf.math.reduce_mean(act)
    losses.append(loss)

  return  tf.reduce_sum(losses)
梯度上升
所选层的损失一旦计算完成,只需相对于图像计算梯度,并将梯度添加到原始图像即可。
将梯度添加到图像后,网络可以更清晰地识别图案。在每个步骤中,您都将创建一个图像,从而渐增式地激发网络中某些层的激活。
下文提供了执行此操作的方法,即包装在 tf.function 中,从而提升性能。它使用 input_signature 来确保不会因图像大小不一或 steps/step_size 值不同而回溯函数。有关详细信息,请参阅具体函数指南。
class DeepDream(tf.Module):
  def __init__(self, model):
    self.model = model

  @tf.function(
      input_signature=(
        tf.TensorSpec(shape=[None,None,3], dtype=tf.float32),
        tf.TensorSpec(shape=[], dtype=tf.int32),
        tf.TensorSpec(shape=[], dtype=tf.float32),)
  )
  def __call__(self, img, steps, step_size):
      print("Tracing")
      loss = tf.constant(0.0)
      for n in tf.range(steps):
        with tf.GradientTape() as tape:
          # This needs gradients relative to `img`
          # `GradientTape` only watches `tf.Variable`s by default
          tape.watch(img)
          loss = calc_loss(img, self.model)

        # Calculate the gradient of the loss with respect to the pixels of the input image.
        gradients = tape.gradient(loss, img)

        # Normalize the gradients.
        gradients /= tf.math.reduce_std(gradients) + 1e-8

        # In gradient ascent, the "loss" is maximized so that the input image increasingly "excites" the layers.
        # You can update the image by directly adding the gradients (because they're the same shape!)
        img = img + gradients*step_size
        img = tf.clip_by_value(img, -1, 1)

      return loss, img
deepdream = DeepDream(dream_model)
主循环
def run_deep_dream_simple(img, steps=100, step_size=0.01):
  # Convert from uint8 to the range expected by the model.
  img = tf.keras.applications.inception_v3.preprocess_input(img)
  img = tf.convert_to_tensor(img)
  step_size = tf.convert_to_tensor(step_size)
  steps_remaining = steps
  step = 0
  while steps_remaining:
    if steps_remaining>100:
      run_steps = tf.constant(100)
    else:
      run_steps = tf.constant(steps_remaining)
    steps_remaining -= run_steps
    step += run_steps

    loss, img = deepdream(img, run_steps, tf.constant(step_size))

    display.clear_output(wait=True)
    show(deprocess(img))
    print ("Step {}, loss {}".format(step, loss))


  result = deprocess(img)
  display.clear_output(wait=True)
  show(result)

  return result
dream_img = run_deep_dream_simple(img=original_img,
                                  steps=100, step_size=0.01)
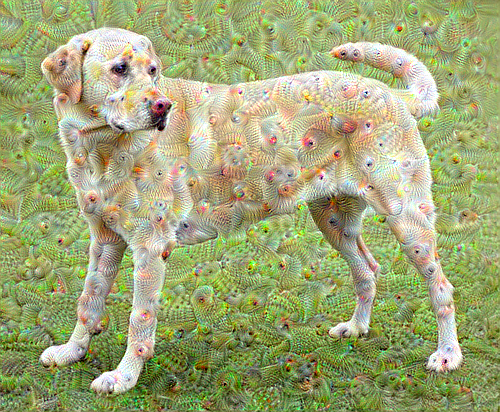
调高八度
很好,但是首次尝试会有一些问题:
- 输出有噪声(可以使用
tf.image.total_variation损失加以解决)。 - 图像分辨率低。
- 图案看起来粒度全部相同。
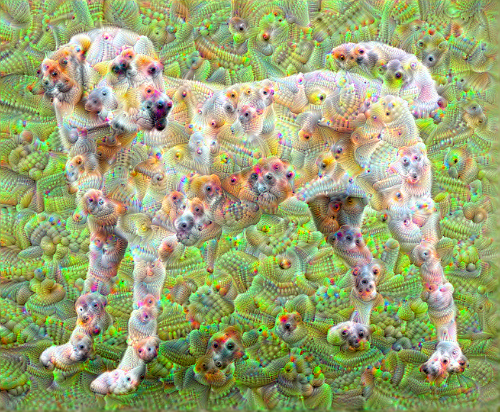
一种可以解决所有上述问题的方法是以不同比例应用梯度上升。这将使在较小比例下生成的图案能够融合到较大比例的图案中,并附加其他细节。
为此,您可以执行以前的梯度上升方法,然后增大图像尺寸(称为八度),并对多个八度重复此过程。
import time
start = time.time()

OCTAVE_SCALE = 1.30

img = tf.constant(np.array(original_img))
base_shape = tf.shape(img)[:-1]
float_base_shape = tf.cast(base_shape, tf.float32)

for n in range(-2, 3):
  new_shape = tf.cast(float_base_shape*(OCTAVE_SCALE**n), tf.int32)

  img = tf.image.resize(img, new_shape).numpy()

  img = run_deep_dream_simple(img=img, steps=50, step_size=0.01)

display.clear_output(wait=True)
img = tf.image.resize(img, base_shape)
img = tf.image.convert_image_dtype(img/255.0, dtype=tf.uint8)
show(img)

end = time.time()
end-start
16.966602325439453
可选:按比例增加图块
需要考虑的是,随着图像尺寸增大,执行梯度计算所需时间和内存也将随之增加。上文的八度实现不适用于非常大的图像或许多个八度。
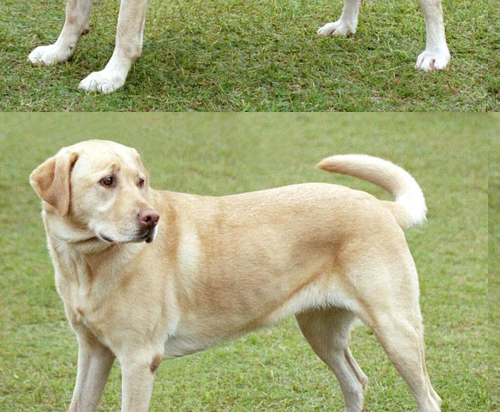
为避免此问题,您可以将图像拆分为图块并为每个图块计算梯度。
在每次图块计算之前对图像应用随机偏移可防止出现图块缝隙。
首先实现随机偏移:
def random_roll(img, maxroll):
  # Randomly shift the image to avoid tiled boundaries.
  shift = tf.random.uniform(shape=[2], minval=-maxroll, maxval=maxroll, dtype=tf.int32)
  img_rolled = tf.roll(img, shift=shift, axis=[0,1])
  return shift, img_rolled
shift, img_rolled = random_roll(np.array(original_img), 512)
show(img_rolled)
以下为此前定义的 deepdream 函数的图块式等效项:
class TiledGradients(tf.Module):
  def __init__(self, model):
    self.model = model

  @tf.function(
      input_signature=(
        tf.TensorSpec(shape=[None,None,3], dtype=tf.float32),
        tf.TensorSpec(shape=[2], dtype=tf.int32),
        tf.TensorSpec(shape=[], dtype=tf.int32),)
  )
  def __call__(self, img, img_size, tile_size=512):
    shift, img_rolled = random_roll(img, tile_size)

    # Initialize the image gradients to zero.
    gradients = tf.zeros_like(img_rolled)

    # Skip the last tile, unless there's only one tile.
    xs = tf.range(0, img_size[1], tile_size)[:-1]
    if not tf.cast(len(xs), bool):
      xs = tf.constant([0])
    ys = tf.range(0, img_size[0], tile_size)[:-1]
    if not tf.cast(len(ys), bool):
      ys = tf.constant([0])

    for x in xs:
      for y in ys:
        # Calculate the gradients for this tile.
        with tf.GradientTape() as tape:
          # This needs gradients relative to `img_rolled`.
          # `GradientTape` only watches `tf.Variable`s by default.
          tape.watch(img_rolled)

          # Extract a tile out of the image.
          img_tile = img_rolled[y:y+tile_size, x:x+tile_size]
          loss = calc_loss(img_tile, self.model)

        # Update the image gradients for this tile.
        gradients = gradients + tape.gradient(loss, img_rolled)

    # Undo the random shift applied to the image and its gradients.
    gradients = tf.roll(gradients, shift=-shift, axis=[0,1])

    # Normalize the gradients.
    gradients /= tf.math.reduce_std(gradients) + 1e-8

    return gradients
get_tiled_gradients = TiledGradients(dream_model)
将此组合到一起可提供能够感知八度的可扩展 Deepdream 实现:
def run_deep_dream_with_octaves(img, steps_per_octave=100, step_size=0.01,
                                octaves=range(-2,3), octave_scale=1.3):
  base_shape = tf.shape(img)
  img = tf.keras.utils.img_to_array(img)
  img = tf.keras.applications.inception_v3.preprocess_input(img)

  initial_shape = img.shape[:-1]
  img = tf.image.resize(img, initial_shape)
  for octave in octaves:
    # Scale the image based on the octave
    new_size = tf.cast(tf.convert_to_tensor(base_shape[:-1]), tf.float32)*(octave_scale**octave)
    new_size = tf.cast(new_size, tf.int32)
    img = tf.image.resize(img, new_size)

    for step in range(steps_per_octave):
      gradients = get_tiled_gradients(img, new_size)
      img = img + gradients*step_size
      img = tf.clip_by_value(img, -1, 1)

      if step % 10 == 0:
        display.clear_output(wait=True)
        show(deprocess(img))
        print ("Octave {}, Step {}".format(octave, step))

  result = deprocess(img)
  return result
img = run_deep_dream_with_octaves(img=original_img, step_size=0.01)

display.clear_output(wait=True)
img = tf.image.resize(img, base_shape)
img = tf.image.convert_image_dtype(img/255.0, dtype=tf.uint8)
show(img)
好多了!调整八度数量、八度范围和激活层,以更改 DeepDream 图像的外观。
读者可能还会有兴趣了解 TensorFlow Lucid,其中对本教程中介绍的用于可视化和解释神经网络的理念进行了扩展。