
| |
在 Google Colab 中运行 |  在 Github 上查看源代码 在 Github 上查看源代码
|
|
本教程提供了将 pandas DataFrame 加载到 TensorFlow 中的示例。
本教程使用了一个小型数据集,由克利夫兰诊所心脏病基金会(Cleveland Clinic Foundation for Heart Disease)提供. 此数据集中有几百行CSV。每行表示一个患者,每列表示一个属性(describe)。我们将使用这些信息来预测患者是否患有心脏病,这是一个二分类问题。
使用 pandas 读取数据
import pandas as pd
import tensorflow as tf

SHUFFLE_BUFFER = 500
BATCH_SIZE = 2
2023-11-07 23:52:53.061374: E external/local_xla/xla/stream_executor/cuda/cuda_dnn.cc:9261] Unable to register cuDNN factory: Attempting to register factory for plugin cuDNN when one has already been registered
2023-11-07 23:52:53.061428: E external/local_xla/xla/stream_executor/cuda/cuda_fft.cc:607] Unable to register cuFFT factory: Attempting to register factory for plugin cuFFT when one has already been registered
2023-11-07 23:52:53.063212: E external/local_xla/xla/stream_executor/cuda/cuda_blas.cc:1515] Unable to register cuBLAS factory: Attempting to register factory for plugin cuBLAS when one has already been registered
下载包含心脏病数据集的 CSV 文件:
csv_file = tf.keras.utils.get_file('heart.csv', 'https://storage.googleapis.com/download.tensorflow.org/data/heart.csv')
Downloading data from https://storage.googleapis.com/download.tensorflow.org/data/heart.csv
13273/13273 [==============================] - 0s 0us/step
使用 pandas 读取 CSV 文件:
df = pd.read_csv(csv_file)
数据如下:
df.head()
df.dtypes
age           int64
sex           int64
cp            int64
trestbps      int64
chol          int64
fbs           int64
restecg       int64
thalach       int64
exang         int64
oldpeak     float64
slope         int64
ca            int64
thal         object
target        int64
dtype: object
您将构建模型来预测 target 列中包含的标签。
target = df.pop('target')
创建并训练模型
如果您的数据具有统一的数据类型或 dtype,则可在任何可以使用 NumPy 数组的地方使用 pandas DataFrame。这是因为 pandas.DataFrame 类支持 __array__ 协议,并且 TensorFlow 的 tf.convert_to_tensor 函数接受支持该协议的对象。
从数据集中获取数值特征(暂时跳过分类特征):
numeric_feature_names = ['age', 'thalach', 'trestbps',  'chol', 'oldpeak']
numeric_features = df[numeric_feature_names]
numeric_features.head()
可以使用 DataFrame.values 属性或 numpy.array(df) 将 DataFrame 转换为 NumPy 数组。要将其转换为张量,请使用 tf.convert_to_tensor:
tf.convert_to_tensor(numeric_features)
<tf.Tensor: shape=(303, 5), dtype=float64, numpy=
array([[ 63. , 150. , 145. , 233. ,   2.3],
       [ 67. , 108. , 160. , 286. ,   1.5],
       [ 67. , 129. , 120. , 229. ,   2.6],
       ...,
       [ 65. , 127. , 135. , 254. ,   2.8],
       [ 48. , 150. , 130. , 256. ,   0. ],
       [ 63. , 154. , 150. , 407. ,   4. ]])>
通常,如果一个对象可以使用 tf.convert_to_tensor 转换为张量,则可以在任何可以传递 tf.Tensor 的位置传递该对象。
使用 Model.fit
解释为单个张量的 DataFrame,可以直接用作 Model.fit 方法的参数。
下面是使用数据集的数值特征训练模型的示例。
第一步是归一化输入范围。为此,请使用 tf.keras.layers.Normalization 层。
要在运行之前设置层的均值和标准差,请务必调用 Normalization.adapt 方法:
normalizer = tf.keras.layers.Normalization(axis=-1)
normalizer.adapt(numeric_features)
调用 DataFrame 前三行的层,以呈现此层的输出的样本:
normalizer(numeric_features.iloc[:3])
<tf.Tensor: shape=(3, 5), dtype=float32, numpy=
array([[ 0.93383914,  0.03480718,  0.74578077, -0.26008663,  1.0680453 ],
       [ 1.3782105 , -1.7806165 ,  1.5923285 ,  0.7573877 ,  0.38022864],
       [ 1.3782105 , -0.87290466, -0.6651321 , -0.33687714,  1.3259765 ]],
      dtype=float32)>
使用归一化层作为简单模型的第一层:
def get_basic_model():
  model = tf.keras.Sequential([
    normalizer,
    tf.keras.layers.Dense(10, activation='relu'),
    tf.keras.layers.Dense(10, activation='relu'),
    tf.keras.layers.Dense(1)
  ])

  model.compile(optimizer='adam',
                loss=tf.keras.losses.BinaryCrossentropy(from_logits=True),
                metrics=['accuracy'])
  return model
当您将 DataFrame 作为 x 参数传递给 Model.fit 时,Keras 会将 DataFrame 视为 NumPy 数组:
model = get_basic_model()
model.fit(numeric_features, target, epochs=15, batch_size=BATCH_SIZE)
Epoch 1/15
WARNING: All log messages before absl::InitializeLog() is called are written to STDERR
I0000 00:00:1699401180.163111  580456 device_compiler.h:186] Compiled cluster using XLA!  This line is logged at most once for the lifetime of the process.
152/152 [==============================] - 2s 3ms/step - loss: 0.5858 - accuracy: 0.7558
Epoch 2/15
152/152 [==============================] - 0s 3ms/step - loss: 0.4783 - accuracy: 0.7591
Epoch 3/15
152/152 [==============================] - 0s 3ms/step - loss: 0.4547 - accuracy: 0.7690
Epoch 4/15
152/152 [==============================] - 0s 3ms/step - loss: 0.4442 - accuracy: 0.7723
Epoch 5/15
152/152 [==============================] - 0s 3ms/step - loss: 0.4370 - accuracy: 0.7723
Epoch 6/15
152/152 [==============================] - 0s 3ms/step - loss: 0.4329 - accuracy: 0.7888
Epoch 7/15
152/152 [==============================] - 0s 3ms/step - loss: 0.4279 - accuracy: 0.7888
Epoch 8/15
152/152 [==============================] - 0s 3ms/step - loss: 0.4259 - accuracy: 0.7921
Epoch 9/15
152/152 [==============================] - 0s 3ms/step - loss: 0.4229 - accuracy: 0.7954
Epoch 10/15
152/152 [==============================] - 0s 3ms/step - loss: 0.4217 - accuracy: 0.7921
Epoch 11/15
152/152 [==============================] - 0s 3ms/step - loss: 0.4196 - accuracy: 0.7921
Epoch 12/15
152/152 [==============================] - 0s 3ms/step - loss: 0.4162 - accuracy: 0.8086
Epoch 13/15
152/152 [==============================] - 0s 3ms/step - loss: 0.4149 - accuracy: 0.7921
Epoch 14/15
152/152 [==============================] - 0s 3ms/step - loss: 0.4137 - accuracy: 0.7987
Epoch 15/15
152/152 [==============================] - 0s 3ms/step - loss: 0.4117 - accuracy: 0.8119
<keras.src.callbacks.History at 0x7f964c051790>
使用 tf.data
如果您想对统一 dtype 的 DataFrame 应用 tf.data 转换,Dataset.from_tensor_slices 方法将创建一个遍历 DataFrame 的行的数据集。每行最初都是一个值向量。要训练模型,您需要 (inputs, labels) 对,因此传递 (features, labels) 和 Dataset.from_tensor_slices 将返回所需的切片对:
numeric_dataset = tf.data.Dataset.from_tensor_slices((numeric_features, target))

for row in numeric_dataset.take(3):
  print(row)
(<tf.Tensor: shape=(5,), dtype=float64, numpy=array([ 63. , 150. , 145. , 233. ,   2.3])>, <tf.Tensor: shape=(), dtype=int64, numpy=0>)
(<tf.Tensor: shape=(5,), dtype=float64, numpy=array([ 67. , 108. , 160. , 286. ,   1.5])>, <tf.Tensor: shape=(), dtype=int64, numpy=1>)
(<tf.Tensor: shape=(5,), dtype=float64, numpy=array([ 67. , 129. , 120. , 229. ,   2.6])>, <tf.Tensor: shape=(), dtype=int64, numpy=0>)
numeric_batches = numeric_dataset.shuffle(1000).batch(BATCH_SIZE)

model = get_basic_model()
model.fit(numeric_batches, epochs=15)
Epoch 1/15
152/152 [==============================] - 1s 3ms/step - loss: 0.6462 - accuracy: 0.7624
Epoch 2/15
152/152 [==============================] - 0s 3ms/step - loss: 0.5397 - accuracy: 0.7426
Epoch 3/15
152/152 [==============================] - 0s 3ms/step - loss: 0.4908 - accuracy: 0.7426
Epoch 4/15
152/152 [==============================] - 0s 3ms/step - loss: 0.4679 - accuracy: 0.7624
Epoch 5/15
152/152 [==============================] - 0s 3ms/step - loss: 0.4542 - accuracy: 0.7756
Epoch 6/15
152/152 [==============================] - 0s 3ms/step - loss: 0.4452 - accuracy: 0.7888
Epoch 7/15
152/152 [==============================] - 0s 3ms/step - loss: 0.4390 - accuracy: 0.7855
Epoch 8/15
152/152 [==============================] - 0s 3ms/step - loss: 0.4352 - accuracy: 0.7954
Epoch 9/15
152/152 [==============================] - 0s 3ms/step - loss: 0.4307 - accuracy: 0.8053
Epoch 10/15
152/152 [==============================] - 0s 3ms/step - loss: 0.4277 - accuracy: 0.7987
Epoch 11/15
152/152 [==============================] - 0s 3ms/step - loss: 0.4252 - accuracy: 0.8020
Epoch 12/15
152/152 [==============================] - 0s 3ms/step - loss: 0.4229 - accuracy: 0.7954
Epoch 13/15
152/152 [==============================] - 0s 3ms/step - loss: 0.4211 - accuracy: 0.7921
Epoch 14/15
152/152 [==============================] - 0s 3ms/step - loss: 0.4206 - accuracy: 0.7987
Epoch 15/15
152/152 [==============================] - 0s 3ms/step - loss: 0.4168 - accuracy: 0.7921
<keras.src.callbacks.History at 0x7f9600114940>
DataFrame 作为字典
当您开始处理异构数据时,不再可能将 DataFrame 视为单个数组。TensorFlow 张量要求所有元素都具有相同的 dtype。
因此,在这种情况下,您需要开始将它视为列字典,其中每一列都具有统一的 dtype。DataFrame 非常像数组字典,所以您通常只需将 DataFrame 强制转换为 Python 字典。许多重要的 TensorFlow API 都支持将(嵌套)数组字典作为输入。
tf.data 输入流水线可以很好地进行此项处理。所有 tf.data 运算都会自动处理字典和元组。因此,要从 DataFrame 制作字典样本数据集,只需将其强制转换为字典,然后再使用 Dataset.from_tensor_slices 对其进行切片:
numeric_dict_ds = tf.data.Dataset.from_tensor_slices((dict(numeric_features), target))
以下是该数据集中的前三个样本:
for row in numeric_dict_ds.take(3):
  print(row)
({'age': <tf.Tensor: shape=(), dtype=int64, numpy=63>, 'thalach': <tf.Tensor: shape=(), dtype=int64, numpy=150>, 'trestbps': <tf.Tensor: shape=(), dtype=int64, numpy=145>, 'chol': <tf.Tensor: shape=(), dtype=int64, numpy=233>, 'oldpeak': <tf.Tensor: shape=(), dtype=float64, numpy=2.3>}, <tf.Tensor: shape=(), dtype=int64, numpy=0>)
({'age': <tf.Tensor: shape=(), dtype=int64, numpy=67>, 'thalach': <tf.Tensor: shape=(), dtype=int64, numpy=108>, 'trestbps': <tf.Tensor: shape=(), dtype=int64, numpy=160>, 'chol': <tf.Tensor: shape=(), dtype=int64, numpy=286>, 'oldpeak': <tf.Tensor: shape=(), dtype=float64, numpy=1.5>}, <tf.Tensor: shape=(), dtype=int64, numpy=1>)
({'age': <tf.Tensor: shape=(), dtype=int64, numpy=67>, 'thalach': <tf.Tensor: shape=(), dtype=int64, numpy=129>, 'trestbps': <tf.Tensor: shape=(), dtype=int64, numpy=120>, 'chol': <tf.Tensor: shape=(), dtype=int64, numpy=229>, 'oldpeak': <tf.Tensor: shape=(), dtype=float64, numpy=2.6>}, <tf.Tensor: shape=(), dtype=int64, numpy=0>)
接受字典的 Keras
通常,Keras 模型和层需要单个输入张量,但这些类可以接受和返回字典、元组和张量的嵌套结构。这些结构称为“嵌套”(有关详细信息,请参阅 tf.nest 模块)。
可以通过两种等效方式编写接受字典作为输入的 Keras 模型。
1. 模型-子类样式
编写 tf.keras.Model(或 tf.keras.Layer)的子类。直接处理输入,并创建输出:
def stack_dict(inputs, fun=tf.stack):
    values = []
    for key in sorted(inputs.keys()):
      values.append(tf.cast(inputs[key], tf.float32))

    return fun(values, axis=-1)
class MyModel(tf.keras.Model):
  def __init__(self):
    # Create all the internal layers in init.
    super().__init__(self)

    self.normalizer = tf.keras.layers.Normalization(axis=-1)

    self.seq = tf.keras.Sequential([
      self.normalizer,
      tf.keras.layers.Dense(10, activation='relu'),
      tf.keras.layers.Dense(10, activation='relu'),
      tf.keras.layers.Dense(1)
    ])

  def adapt(self, inputs):
    # Stack the inputs and `adapt` the normalization layer.
    inputs = stack_dict(inputs)
    self.normalizer.adapt(inputs)

  def call(self, inputs):
    # Stack the inputs
    inputs = stack_dict(inputs)
    # Run them through all the layers.
    result = self.seq(inputs)

    return result

model = MyModel()

model.adapt(dict(numeric_features))

model.compile(optimizer='adam',
              loss=tf.keras.losses.BinaryCrossentropy(from_logits=True),
              metrics=['accuracy'],
              run_eagerly=True)
此模型可以接受列字典或字典元素数据集进行训练:
model.fit(dict(numeric_features), target, epochs=5, batch_size=BATCH_SIZE)
Epoch 1/5
WARNING:tensorflow:5 out of the last 5 calls to <function _BaseOptimizer._update_step_xla at 0x7f95dc79ca60> triggered tf.function retracing. Tracing is expensive and the excessive number of tracings could be due to (1) creating @tf.function repeatedly in a loop, (2) passing tensors with different shapes, (3) passing Python objects instead of tensors. For (1), please define your @tf.function outside of the loop. For (2), @tf.function has reduce_retracing=True option that can avoid unnecessary retracing. For (3), please refer to https://www.tensorflow.org/guide/function#controlling_retracing and https://www.tensorflow.org/api_docs/python/tf/function for  more details.
WARNING:tensorflow:6 out of the last 6 calls to <function _BaseOptimizer._update_step_xla at 0x7f95dc79ca60> triggered tf.function retracing. Tracing is expensive and the excessive number of tracings could be due to (1) creating @tf.function repeatedly in a loop, (2) passing tensors with different shapes, (3) passing Python objects instead of tensors. For (1), please define your @tf.function outside of the loop. For (2), @tf.function has reduce_retracing=True option that can avoid unnecessary retracing. For (3), please refer to https://www.tensorflow.org/guide/function#controlling_retracing and https://www.tensorflow.org/api_docs/python/tf/function for  more details.
152/152 [==============================] - 5s 29ms/step - loss: 0.6392 - accuracy: 0.7261
Epoch 2/5
152/152 [==============================] - 4s 28ms/step - loss: 0.5554 - accuracy: 0.7261
Epoch 3/5
152/152 [==============================] - 4s 28ms/step - loss: 0.5025 - accuracy: 0.7228
Epoch 4/5
152/152 [==============================] - 4s 28ms/step - loss: 0.4722 - accuracy: 0.7393
Epoch 5/5
152/152 [==============================] - 4s 27ms/step - loss: 0.4554 - accuracy: 0.7624
<keras.src.callbacks.History at 0x7f95dc71f850>
numeric_dict_batches = numeric_dict_ds.shuffle(SHUFFLE_BUFFER).batch(BATCH_SIZE)
model.fit(numeric_dict_batches, epochs=5)
Epoch 1/5
152/152 [==============================] - 4s 24ms/step - loss: 0.4471 - accuracy: 0.7756
Epoch 2/5
152/152 [==============================] - 4s 24ms/step - loss: 0.4402 - accuracy: 0.7657
Epoch 3/5
152/152 [==============================] - 4s 24ms/step - loss: 0.4371 - accuracy: 0.7888
Epoch 4/5
152/152 [==============================] - 4s 24ms/step - loss: 0.4350 - accuracy: 0.7954
Epoch 5/5
152/152 [==============================] - 4s 24ms/step - loss: 0.4304 - accuracy: 0.7822
<keras.src.callbacks.History at 0x7f95dc66e3d0>
以下是前三个样本的预测:
model.predict(dict(numeric_features.iloc[:3]))
1/1 [==============================] - 0s 55ms/step
array([[[0.45955092]],

       [[0.7383403 ]],

       [[0.46781164]]], dtype=float32)
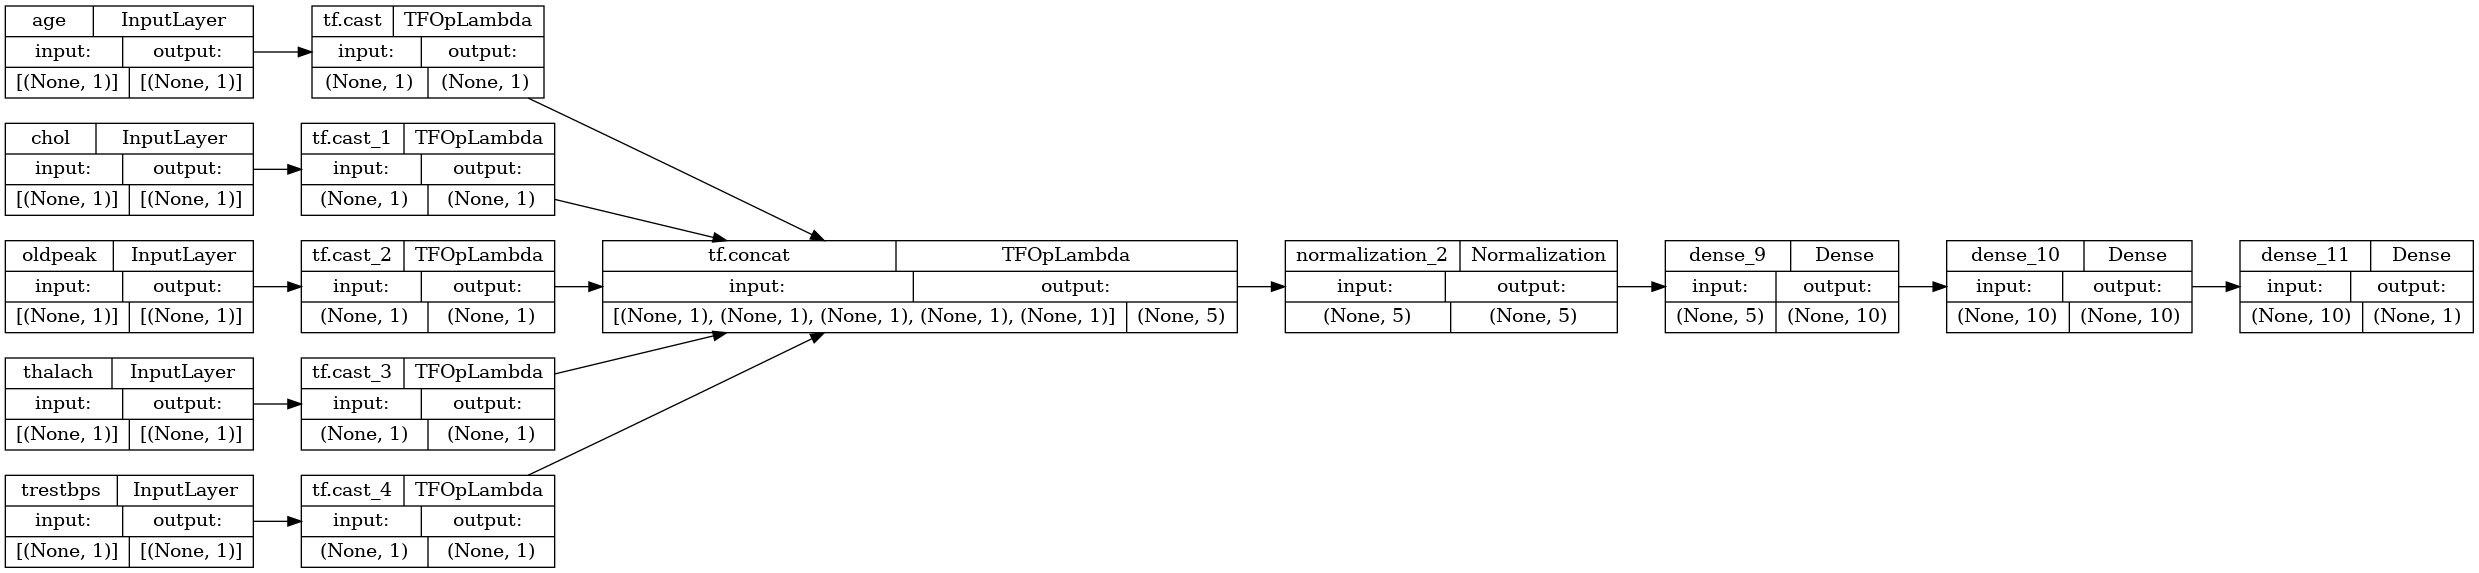
2. Keras 函数式样式
inputs = {}
for name, column in numeric_features.items():
  inputs[name] = tf.keras.Input(
      shape=(1,), name=name, dtype=tf.float32)

inputs
{'age': <KerasTensor: shape=(None, 1) dtype=float32 (created by layer 'age')>,
 'thalach': <KerasTensor: shape=(None, 1) dtype=float32 (created by layer 'thalach')>,
 'trestbps': <KerasTensor: shape=(None, 1) dtype=float32 (created by layer 'trestbps')>,
 'chol': <KerasTensor: shape=(None, 1) dtype=float32 (created by layer 'chol')>,
 'oldpeak': <KerasTensor: shape=(None, 1) dtype=float32 (created by layer 'oldpeak')>}
x = stack_dict(inputs, fun=tf.concat)

normalizer = tf.keras.layers.Normalization(axis=-1)
normalizer.adapt(stack_dict(dict(numeric_features)))

x = normalizer(x)
x = tf.keras.layers.Dense(10, activation='relu')(x)
x = tf.keras.layers.Dense(10, activation='relu')(x)
x = tf.keras.layers.Dense(1)(x)

model = tf.keras.Model(inputs, x)

model.compile(optimizer='adam',
              loss=tf.keras.losses.BinaryCrossentropy(from_logits=True),
              metrics=['accuracy'],
              run_eagerly=True)
tf.keras.utils.plot_model(model, rankdir="LR", show_shapes=True)
您可以像模型子类一样训练函数式模型:
model.fit(dict(numeric_features), target, epochs=5, batch_size=BATCH_SIZE)
Epoch 1/5
152/152 [==============================] - 5s 26ms/step - loss: 0.5387 - accuracy: 0.7426
Epoch 2/5
152/152 [==============================] - 4s 26ms/step - loss: 0.4771 - accuracy: 0.7393
Epoch 3/5
152/152 [==============================] - 4s 26ms/step - loss: 0.4580 - accuracy: 0.7426
Epoch 4/5
152/152 [==============================] - 4s 26ms/step - loss: 0.4504 - accuracy: 0.7624
Epoch 5/5
152/152 [==============================] - 4s 26ms/step - loss: 0.4442 - accuracy: 0.7723
<keras.src.callbacks.History at 0x7f9600776250>
numeric_dict_batches = numeric_dict_ds.shuffle(SHUFFLE_BUFFER).batch(BATCH_SIZE)
model.fit(numeric_dict_batches, epochs=5)
Epoch 1/5
152/152 [==============================] - 4s 27ms/step - loss: 0.4412 - accuracy: 0.7690
Epoch 2/5
152/152 [==============================] - 4s 27ms/step - loss: 0.4387 - accuracy: 0.7789
Epoch 3/5
152/152 [==============================] - 4s 27ms/step - loss: 0.4359 - accuracy: 0.7921
Epoch 4/5
152/152 [==============================] - 4s 27ms/step - loss: 0.4355 - accuracy: 0.7822
Epoch 5/5
152/152 [==============================] - 4s 27ms/step - loss: 0.4330 - accuracy: 0.7921
<keras.src.callbacks.History at 0x7f95dc66eaf0>
完整样本
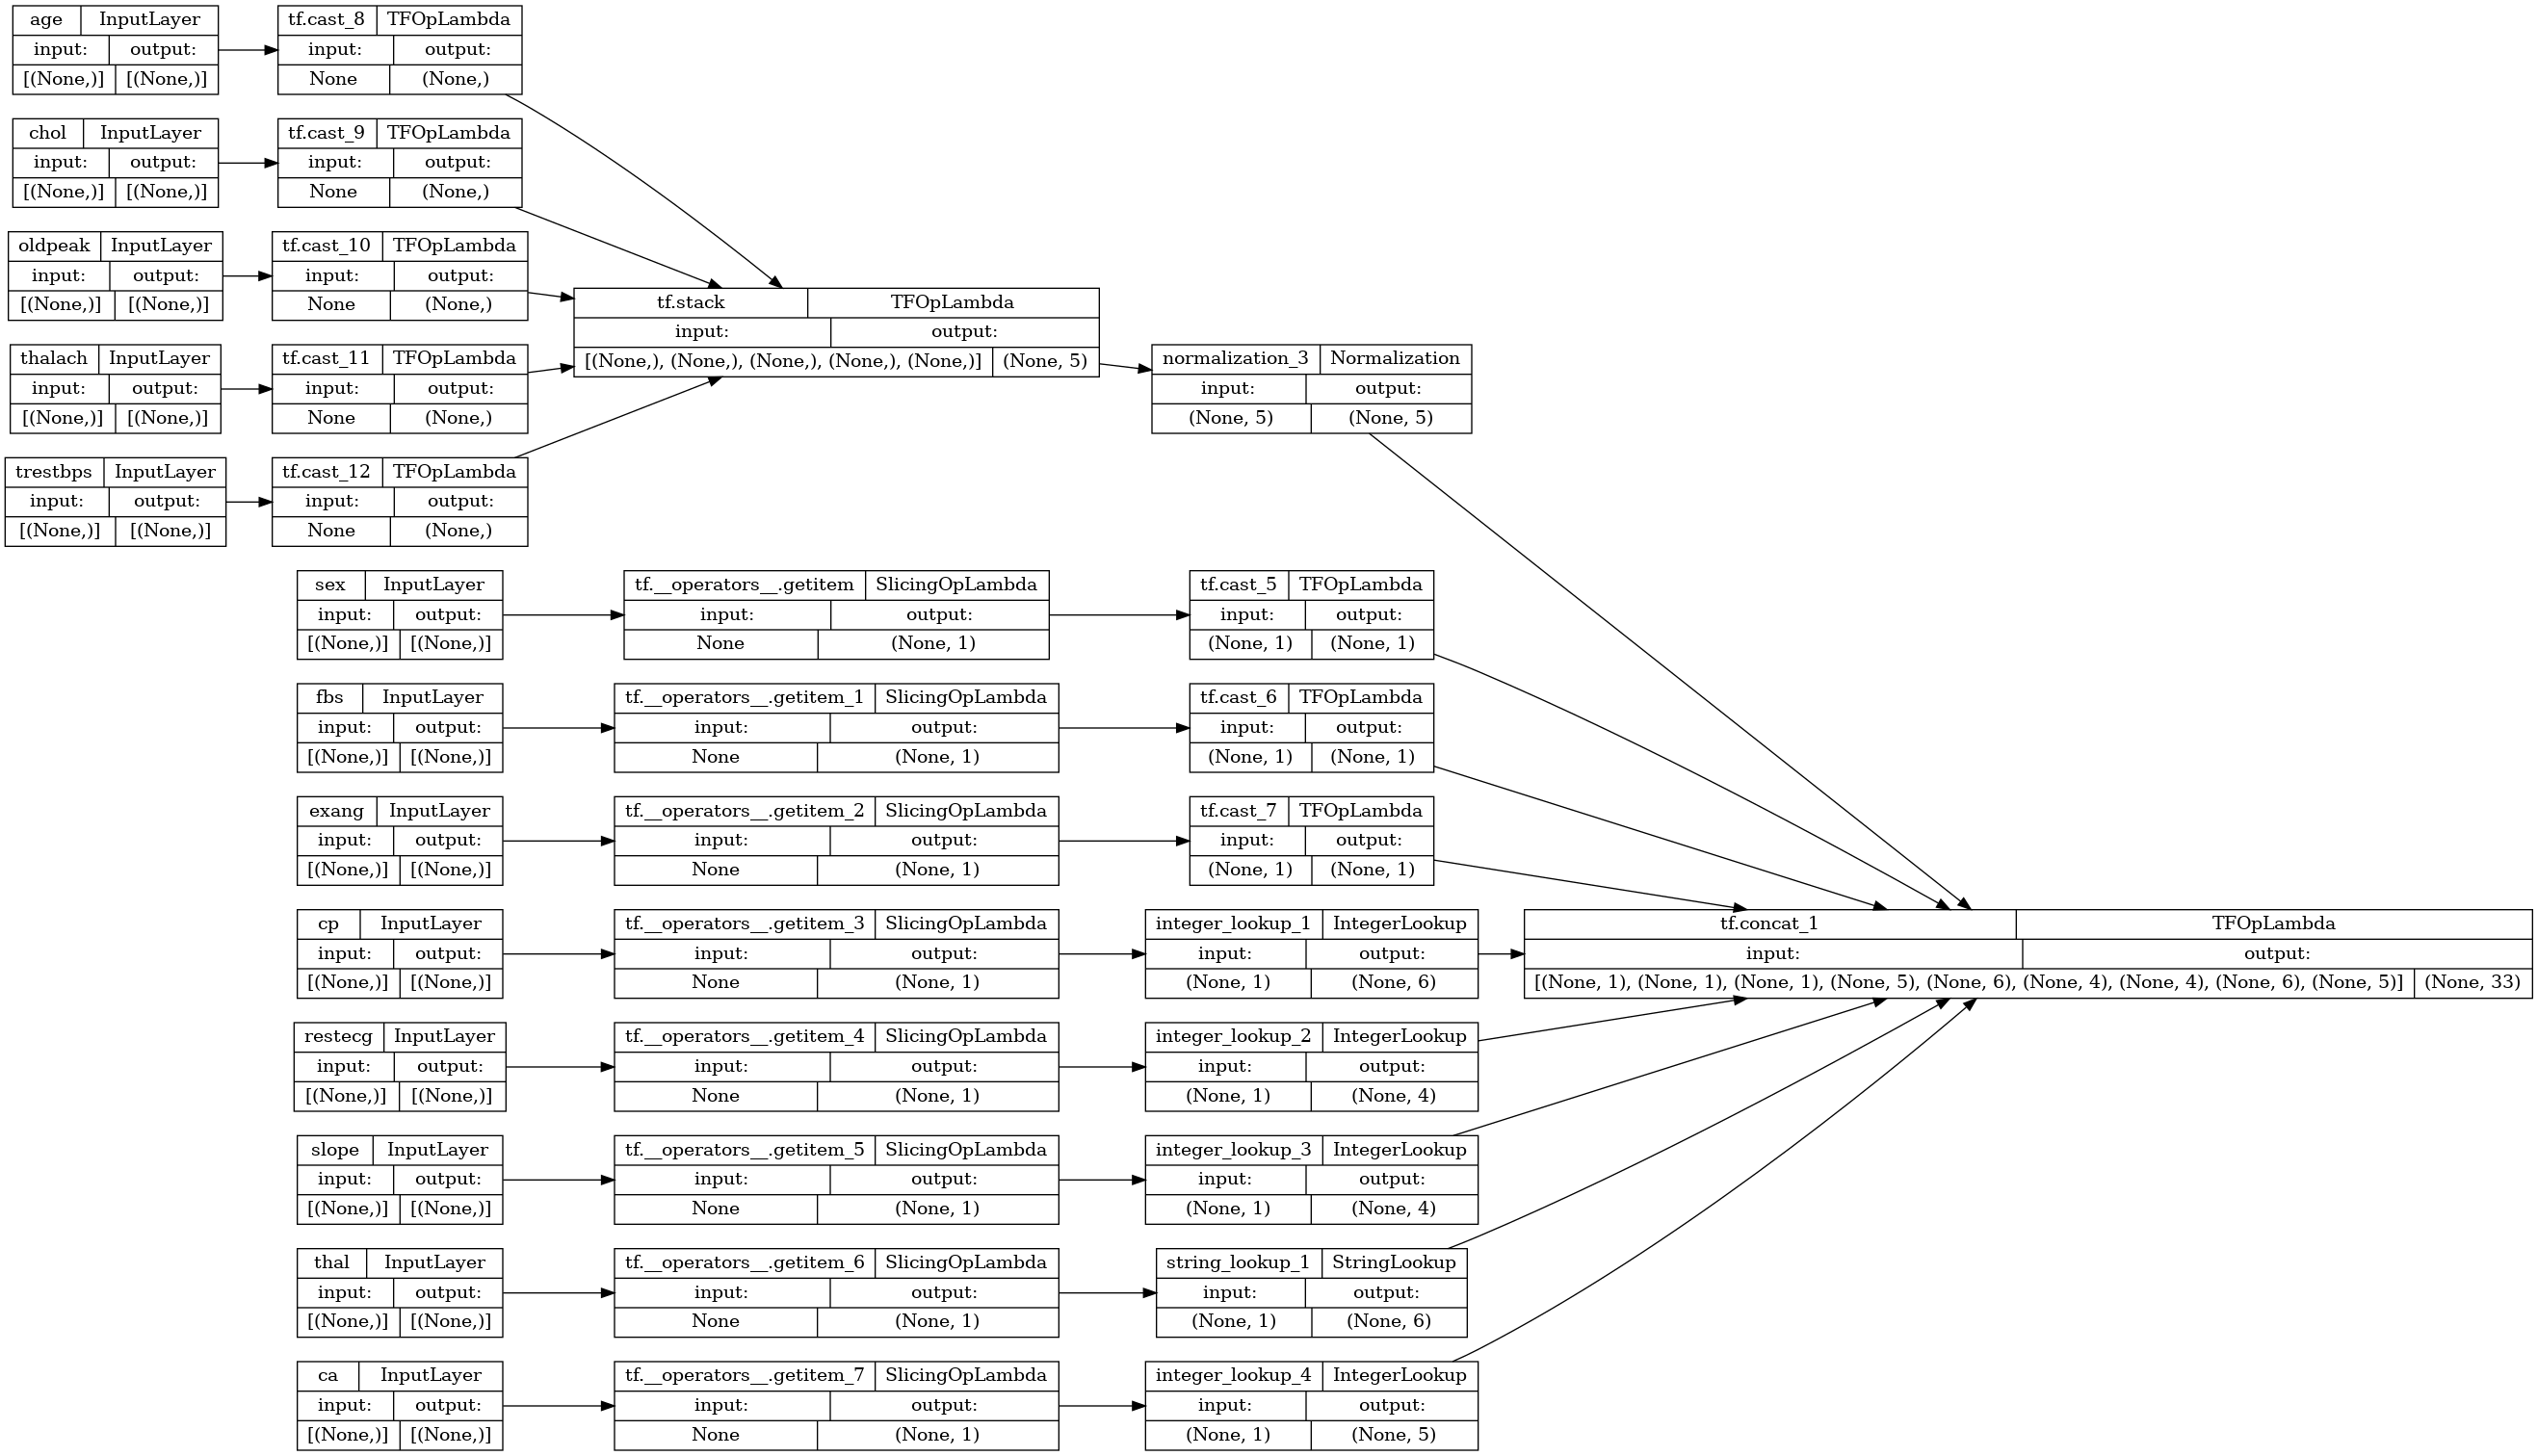
如果您将异构 DataFrame 传递给 Keras,则每列都可能需要独特的预处理。您可以直接在 DataFrame 中进行此预处理,但要使模型正常工作,始终需要以相同的方式对输入进行预处理。因此,最好的方式是将预处理构建到模型中。Keras 预处理层涵盖许多常见任务。
构建预处理头文件
在此数据集中,原始数据中的一些“整数”特征实际上是分类索引。这些索引并非真正有序的数值(有关详细信息,请参阅数据集描述)。这些索引是无序的,因此不适合直接馈送给模型;该模型会将它们解释为有序索引。要使用这些输入,您需要将它们编码为独热向量或嵌入向量。这同样适用于字符串分类特征。
注:如果您有许多特征需要相同的预处理,那么在应用预处理之前将它们连接在一起会更加有效。
另一方面,二元特征通常不需要编码或归一化。
首先创建属于每个组的特征的列表:
binary_feature_names = ['sex', 'fbs', 'exang']
categorical_feature_names = ['cp', 'restecg', 'slope', 'thal', 'ca']
下一步为构建预处理模型,该模型将对每个输入应用适当的预处理并连接结果。
本部分使用 Keras 函数式 API 来实现预处理。首先为 dataframe 的每一列创建一个 tf.keras.Input:
inputs = {}
for name, column in df.items():
  if type(column[0]) == str:
    dtype = tf.string
  elif (name in categorical_feature_names or
        name in binary_feature_names):
    dtype = tf.int64
  else:
    dtype = tf.float32

  inputs[name] = tf.keras.Input(shape=(), name=name, dtype=dtype)
inputs
{'age': <KerasTensor: shape=(None,) dtype=float32 (created by layer 'age')>,
 'sex': <KerasTensor: shape=(None,) dtype=int64 (created by layer 'sex')>,
 'cp': <KerasTensor: shape=(None,) dtype=int64 (created by layer 'cp')>,
 'trestbps': <KerasTensor: shape=(None,) dtype=float32 (created by layer 'trestbps')>,
 'chol': <KerasTensor: shape=(None,) dtype=float32 (created by layer 'chol')>,
 'fbs': <KerasTensor: shape=(None,) dtype=int64 (created by layer 'fbs')>,
 'restecg': <KerasTensor: shape=(None,) dtype=int64 (created by layer 'restecg')>,
 'thalach': <KerasTensor: shape=(None,) dtype=float32 (created by layer 'thalach')>,
 'exang': <KerasTensor: shape=(None,) dtype=int64 (created by layer 'exang')>,
 'oldpeak': <KerasTensor: shape=(None,) dtype=float32 (created by layer 'oldpeak')>,
 'slope': <KerasTensor: shape=(None,) dtype=int64 (created by layer 'slope')>,
 'ca': <KerasTensor: shape=(None,) dtype=int64 (created by layer 'ca')>,
 'thal': <KerasTensor: shape=(None,) dtype=string (created by layer 'thal')>}
对于每个输入,您都将使用 Keras 层和 TensorFlow 运算应用一些转换。每个特征都以一批标量 (shape=(batch,)) 开始。每个特征的输出都应是一批 tf.float32 向量 (shape=(batch, n))。最后一步将把这些向量全部连接到一起。
二元输入
二元输入不需要任何预处理,因此只需添加向量轴,将它们强制转换为 float32 并将它们添加到预处理输入列表中:
preprocessed = []

for name in binary_feature_names:
  inp = inputs[name]
  inp = inp[:, tf.newaxis]
  float_value = tf.cast(inp, tf.float32)
  preprocessed.append(float_value)

preprocessed
[<KerasTensor: shape=(None, 1) dtype=float32 (created by layer 'tf.cast_5')>,
 <KerasTensor: shape=(None, 1) dtype=float32 (created by layer 'tf.cast_6')>,
 <KerasTensor: shape=(None, 1) dtype=float32 (created by layer 'tf.cast_7')>]
数值输入
与之前的部分一样,使用前需要先通过 tf.keras.layers.Normalization 层运行这些数值输入。不同之处是此次它们将作为字典输入。以下代码会从 DataFrame 中收集数值特征,将它们堆叠在一起并将传递给 Normalization.adapt 方法。
normalizer = tf.keras.layers.Normalization(axis=-1)
normalizer.adapt(stack_dict(dict(numeric_features)))
以下代码堆叠数值特征并通过规一化层运行它们。
numeric_inputs = {}
for name in numeric_feature_names:
  numeric_inputs[name]=inputs[name]

numeric_inputs = stack_dict(numeric_inputs)
numeric_normalized = normalizer(numeric_inputs)

preprocessed.append(numeric_normalized)

preprocessed
[<KerasTensor: shape=(None, 1) dtype=float32 (created by layer 'tf.cast_5')>,
 <KerasTensor: shape=(None, 1) dtype=float32 (created by layer 'tf.cast_6')>,
 <KerasTensor: shape=(None, 1) dtype=float32 (created by layer 'tf.cast_7')>,
 <KerasTensor: shape=(None, 5) dtype=float32 (created by layer 'normalization_3')>]
分类特征
要使用分类特征,您首先需要将它们编码为二元向量或嵌入向量。这些特征仅包含少量类别,因此使用 tf.keras.layers.StringLookup 和 tf.keras.layers.IntegerLookup 层均支持的 output_mode='one_hot' 选项将输入直接转换为独热向量。
以下是这些层如何工作的示例:
vocab = ['a','b','c']
lookup = tf.keras.layers.StringLookup(vocabulary=vocab, output_mode='one_hot')
lookup(['c','a','a','b','zzz'])
<tf.Tensor: shape=(5, 4), dtype=float32, numpy=
array([[0., 0., 0., 1.],
       [0., 1., 0., 0.],
       [0., 1., 0., 0.],
       [0., 0., 1., 0.],
       [1., 0., 0., 0.]], dtype=float32)>
vocab = [1,4,7,99]
lookup = tf.keras.layers.IntegerLookup(vocabulary=vocab, output_mode='one_hot')

lookup([-1,4,1])
<tf.Tensor: shape=(3, 5), dtype=float32, numpy=
array([[1., 0., 0., 0., 0.],
       [0., 0., 1., 0., 0.],
       [0., 1., 0., 0., 0.]], dtype=float32)>
要确定每个输入的词汇表,请创建一个用于将该词汇表转换为独热向量的层:
for name in categorical_feature_names:
  vocab = sorted(set(df[name]))
  print(f'name: {name}')
  print(f'vocab: {vocab}\n')

  if type(vocab[0]) is str:
    lookup = tf.keras.layers.StringLookup(vocabulary=vocab, output_mode='one_hot')
  else:
    lookup = tf.keras.layers.IntegerLookup(vocabulary=vocab, output_mode='one_hot')

  x = inputs[name][:, tf.newaxis]
  x = lookup(x)
  preprocessed.append(x)
name: cp
vocab: [0, 1, 2, 3, 4]

name: restecg
vocab: [0, 1, 2]

name: slope
vocab: [1, 2, 3]

name: thal
vocab: ['1', '2', 'fixed', 'normal', 'reversible']

name: ca
vocab: [0, 1, 2, 3]
组装预处理头文件
此时,preprocessed 仅为所有预处理结果的 Python 列表,每个结果的形状均为 (batch_size, depth):
preprocessed
[<KerasTensor: shape=(None, 1) dtype=float32 (created by layer 'tf.cast_5')>,
 <KerasTensor: shape=(None, 1) dtype=float32 (created by layer 'tf.cast_6')>,
 <KerasTensor: shape=(None, 1) dtype=float32 (created by layer 'tf.cast_7')>,
 <KerasTensor: shape=(None, 5) dtype=float32 (created by layer 'normalization_3')>,
 <KerasTensor: shape=(None, 6) dtype=float32 (created by layer 'integer_lookup_1')>,
 <KerasTensor: shape=(None, 4) dtype=float32 (created by layer 'integer_lookup_2')>,
 <KerasTensor: shape=(None, 4) dtype=float32 (created by layer 'integer_lookup_3')>,
 <KerasTensor: shape=(None, 6) dtype=float32 (created by layer 'string_lookup_1')>,
 <KerasTensor: shape=(None, 5) dtype=float32 (created by layer 'integer_lookup_4')>]
沿 depth 轴连接所有预处理特征,使每个字典样本都转换为单个向量。向量包含分类特征、数值特征和分类独热特征:
preprocesssed_result = tf.concat(preprocessed, axis=-1)
preprocesssed_result
<KerasTensor: shape=(None, 33) dtype=float32 (created by layer 'tf.concat_1')>
现在通过该计算创建模型以便重用:
preprocessor = tf.keras.Model(inputs, preprocesssed_result)
tf.keras.utils.plot_model(preprocessor, rankdir="LR", show_shapes=True)
要测试预处理器,请使用 DataFrame.iloc 访问器对 DataFrame 中的第一个样本进行切片。然后将它转换为字典并将字典传递给预处理器。结果为包含二元特征、归一化数值特征和独热分类特征的单个向量,按该顺序:
preprocessor(dict(df.iloc[:1]))
<tf.Tensor: shape=(1, 33), dtype=float32, numpy=
array([[ 1.        ,  1.        ,  0.        ,  0.93383914, -0.26008663,
         1.0680453 ,  0.03480718,  0.74578077,  0.        ,  0.        ,

         1.        ,  0.        ,  0.        ,  0.        ,  0.        ,
         0.        ,  0.        ,  1.        ,  0.        ,  0.        ,
         0.        ,  1.        ,  0.        ,  0.        ,  0.        ,
         1.        ,  0.        ,  0.        ,  0.        ,  1.        ,
         0.        ,  0.        ,  0.        ]], dtype=float32)>
创建和训练模型
现在,构建模型主体。使用与上一个示例相同的配置:一对 Dense 修正线性层和一个 Dense(1) 输出层用于分类。
body = tf.keras.Sequential([
  tf.keras.layers.Dense(10, activation='relu'),
  tf.keras.layers.Dense(10, activation='relu'),
  tf.keras.layers.Dense(1)
])
现在,使用 Keras 函数式 API 将这两部分结合在一起。
inputs
{'age': <KerasTensor: shape=(None,) dtype=float32 (created by layer 'age')>,
 'sex': <KerasTensor: shape=(None,) dtype=int64 (created by layer 'sex')>,
 'cp': <KerasTensor: shape=(None,) dtype=int64 (created by layer 'cp')>,
 'trestbps': <KerasTensor: shape=(None,) dtype=float32 (created by layer 'trestbps')>,
 'chol': <KerasTensor: shape=(None,) dtype=float32 (created by layer 'chol')>,
 'fbs': <KerasTensor: shape=(None,) dtype=int64 (created by layer 'fbs')>,
 'restecg': <KerasTensor: shape=(None,) dtype=int64 (created by layer 'restecg')>,
 'thalach': <KerasTensor: shape=(None,) dtype=float32 (created by layer 'thalach')>,
 'exang': <KerasTensor: shape=(None,) dtype=int64 (created by layer 'exang')>,
 'oldpeak': <KerasTensor: shape=(None,) dtype=float32 (created by layer 'oldpeak')>,
 'slope': <KerasTensor: shape=(None,) dtype=int64 (created by layer 'slope')>,
 'ca': <KerasTensor: shape=(None,) dtype=int64 (created by layer 'ca')>,
 'thal': <KerasTensor: shape=(None,) dtype=string (created by layer 'thal')>}
x = preprocessor(inputs)
x
<KerasTensor: shape=(None, 33) dtype=float32 (created by layer 'model_1')>
result = body(x)
result
<KerasTensor: shape=(None, 1) dtype=float32 (created by layer 'sequential_3')>
model = tf.keras.Model(inputs, result)

model.compile(optimizer='adam',
                loss=tf.keras.losses.BinaryCrossentropy(from_logits=True),
                metrics=['accuracy'])
此模型需要一个输入字典。将数据传递给它的最简单方式是将 DataFrame 转换为字典并将该字典作为 x 参数传递给 Model.fit:
history = model.fit(dict(df), target, epochs=5, batch_size=BATCH_SIZE)
Epoch 1/5
152/152 [==============================] - 2s 4ms/step - loss: 0.4911 - accuracy: 0.7327
Epoch 2/5
152/152 [==============================] - 1s 4ms/step - loss: 0.4004 - accuracy: 0.7789
Epoch 3/5
152/152 [==============================] - 1s 4ms/step - loss: 0.3546 - accuracy: 0.8218
Epoch 4/5
152/152 [==============================] - 1s 4ms/step - loss: 0.3270 - accuracy: 0.8383
Epoch 5/5
152/152 [==============================] - 1s 4ms/step - loss: 0.3083 - accuracy: 0.8350
也可以使用 tf.data:
ds = tf.data.Dataset.from_tensor_slices((
    dict(df),
    target
))

ds = ds.batch(BATCH_SIZE)
import pprint

for x, y in ds.take(1):
  pprint.pprint(x)
  print()
  print(y)
{'age': <tf.Tensor: shape=(2,), dtype=int64, numpy=array([63, 67])>,
 'ca': <tf.Tensor: shape=(2,), dtype=int64, numpy=array([0, 3])>,
 'chol': <tf.Tensor: shape=(2,), dtype=int64, numpy=array([233, 286])>,
 'cp': <tf.Tensor: shape=(2,), dtype=int64, numpy=array([1, 4])>,
 'exang': <tf.Tensor: shape=(2,), dtype=int64, numpy=array([0, 1])>,
 'fbs': <tf.Tensor: shape=(2,), dtype=int64, numpy=array([1, 0])>,
 'oldpeak': <tf.Tensor: shape=(2,), dtype=float64, numpy=array([2.3, 1.5])>,
 'restecg': <tf.Tensor: shape=(2,), dtype=int64, numpy=array([2, 2])>,
 'sex': <tf.Tensor: shape=(2,), dtype=int64, numpy=array([1, 1])>,
 'slope': <tf.Tensor: shape=(2,), dtype=int64, numpy=array([3, 2])>,
 'thal': <tf.Tensor: shape=(2,), dtype=string, numpy=array([b'fixed', b'normal'], dtype=object)>,
 'thalach': <tf.Tensor: shape=(2,), dtype=int64, numpy=array([150, 108])>,
 'trestbps': <tf.Tensor: shape=(2,), dtype=int64, numpy=array([145, 160])>}

tf.Tensor([0 1], shape=(2,), dtype=int64)
history = model.fit(ds, epochs=5)
Epoch 1/5
152/152 [==============================] - 1s 4ms/step - loss: 0.2946 - accuracy: 0.8383
Epoch 2/5
152/152 [==============================] - 1s 4ms/step - loss: 0.2832 - accuracy: 0.8515
Epoch 3/5
152/152 [==============================] - 1s 4ms/step - loss: 0.2742 - accuracy: 0.8548
Epoch 4/5
152/152 [==============================] - 1s 4ms/step - loss: 0.2663 - accuracy: 0.8548
Epoch 5/5
152/152 [==============================] - 1s 4ms/step - loss: 0.2596 - accuracy: 0.8680