
यह "स्टैंडअलोन" नोटबुक टीएफएक्स/एमएलएमडी संदर्भ के बिना मॉडल कार्ड टूलकिट का उपयोग करके प्रदर्शित करता है। TFX / MLMD साथ मॉडल कार्ड टूलकिट का उपयोग कैसे करें जानने के लिए, कृपया जाँच MLMD मॉडल कार्ड टूलकिट डेमो ।
| | |  गिटहब पर देखें गिटहब पर देखें | |
उद्देश्य
यह नोटबुक दर्शाती है कि जुपिटर/कोलाब वातावरण में मॉडल कार्ड टूलकिट का उपयोग करके एक मॉडल कार्ड कैसे बनाया जाता है। आपको कम से मॉडल कार्ड के बारे में अधिक सीख सकते हैं https://modelcards.withgoogle.com/about
हम इस डेमो में केरस मॉडल का उपयोग कर रहे हैं। लेकिन नीचे दिया गया तर्क सामान्य रूप से अन्य एमएल ढांचे पर भी लागू होता है।
सेट अप
हमें सबसे पहले a) आवश्यक पैकेजों को स्थापित और आयात करना होगा, और b) डेटा डाउनलोड करना होगा।
पिप 20.2 में अपग्रेड करें और मॉडल कार्ड टूलकिट स्थापित करें
pip install --upgrade pip==20.2pip install 'model-card-toolkit>=1.0.0,<1.1'pip install 'tensorflow>=2.3.1'
क्या आपने रनटाइम को पुनरारंभ किया?
यदि आप Google Colab का उपयोग कर रहे हैं, जब आप पहली बार ऊपर सेल चलाते हैं, तो आपको रनटाइम को पुनरारंभ करना होगा (रनटाइम> रनटाइम पुनरारंभ करें ...)। ऐसा इसलिए है क्योंकि Colab संकुल को लोड करता है।
आयात
import tensorflow as tf
import numpy as np
import model_card_toolkit as mctlib
from model_card_toolkit.documentation.examples import cats_vs_dogs
from model_card_toolkit.utils.graphics import figure_to_base64str
import tempfile
import matplotlib.pyplot as plt
from IPython import display
import requests
import os
import zipfile
नमूना
हम बंद आधारित वास्तुकला के साथ एक pretrained मॉडल का उपयोग करेगा MobileNetV2 , एक लोकप्रिय 16-परत छवि वर्गीकरण मॉडल। हमारे मॉडल betweens बिल्लियों और कुत्तों का उपयोग कर के बीच अंतर करने के लिए प्रशिक्षित किया गया है कुत्तों बनाम बिल्लियों डाटासेट। मॉडल प्रशिक्षण पर आधारित था TensorFlow हस्तांतरण सीखने ट्यूटोरियल ।
URL = 'https://storage.googleapis.com/cats_vs_dogs_model/cats_vs_dogs_model.zip'
BASE_PATH = tempfile.mkdtemp()
ZIP_PATH = os.path.join(BASE_PATH, 'cats_vs_dogs_model.zip')
MODEL_PATH = os.path.join(BASE_PATH,'cats_vs_dogs_model')

r = requests.get(URL, allow_redirects=True)
open(ZIP_PATH, 'wb').write(r.content)

with zipfile.ZipFile(ZIP_PATH, 'r') as zip_ref:
    zip_ref.extractall(BASE_PATH)

model = tf.keras.models.load_model(MODEL_PATH)
WARNING:tensorflow:SavedModel saved prior to TF 2.5 detected when loading Keras model. Please ensure that you are saving the model with model.save() or tf.keras.models.save_model(), *NOT* tf.saved_model.save(). To confirm, there should be a file named "keras_metadata.pb" in the SavedModel directory.
WARNING:tensorflow:SavedModel saved prior to TF 2.5 detected when loading Keras model. Please ensure that you are saving the model with model.save() or tf.keras.models.save_model(), *NOT* tf.saved_model.save(). To confirm, there should be a file named "keras_metadata.pb" in the SavedModel directory.
डेटासेट
बिल्लियों-बनाम-कुत्ते डेटासेट में, लेबल = 0 बिल्लियों से मेल खाता है जबकि लेबल = 1 कुत्तों से मेल खाता है।
def compute_accuracy(data):
  x = np.stack(data['examples'])
  y = np.asarray(data['labels'])
  _, metric = model.evaluate(x, y)
  return metric
examples = cats_vs_dogs.get_data()
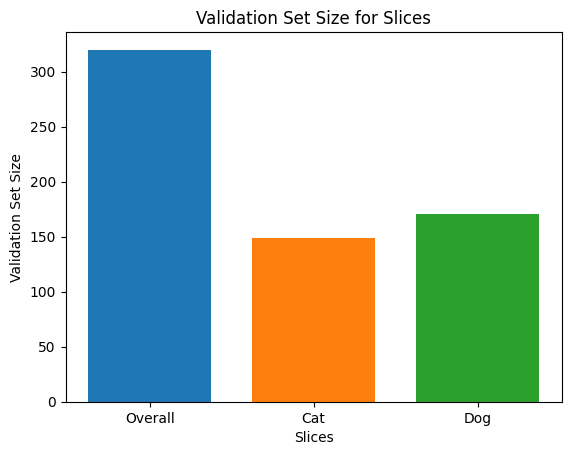
print('num validation examples:', len(examples['combined']['examples']))
print('num cat examples:', len(examples['cat']['examples']))
print('num dog examples:', len(examples['dog']['examples']))
num validation examples: 320
num cat examples: 149
num dog examples: 171
2022-01-07 19:54:14.702877: W tensorflow/core/kernels/data/cache_dataset_ops.cc:768] The calling iterator did not fully read the dataset being cached. In order to avoid unexpected truncation of the dataset, the partially cached contents of the dataset  will be discarded. This can happen if you have an input pipeline similar to `dataset.cache().take(k).repeat()`. You should use `dataset.take(k).cache().repeat()` instead.
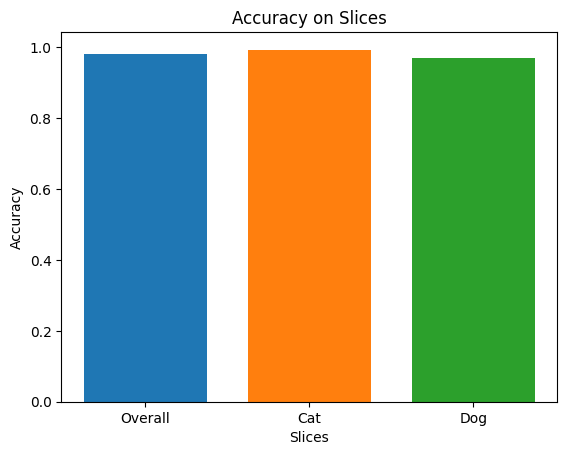
accuracy = compute_accuracy(examples['combined'])
cat_accuracy = compute_accuracy(examples['cat'])
dog_accuracy = compute_accuracy(examples['dog'])
10/10 [==============================] - 9s 12ms/step - loss: 0.0794 - binary_accuracy: 0.9812
5/5 [==============================] - 1s 41ms/step - loss: 0.0608 - binary_accuracy: 0.9933
6/6 [==============================] - 0s 34ms/step - loss: 0.0956 - binary_accuracy: 0.9708
मॉडल कार्ड टूलकिट का उपयोग करें
मॉडल कार्ड टूलकिट को इनिशियलाइज़ करें
पहला कदम एक प्रारंभ करने में है ModelCardToolkit वस्तु है, जो एक सहित संपत्ति का कहना है मॉडल कार्ड JSON फ़ाइल और मॉडल कार्ड दस्तावेज़ । कॉल ModelCardToolkit.scaffold_assets() इन परिसंपत्तियों पैदा करते हैं और एक वापस जाने के लिए ModelCard वस्तु।
# https://github.com/tensorflow/model-card-toolkit/blob/master/model_card_toolkit/model_card_toolkit.py
model_card_dir = tempfile.mkdtemp()
mct = mctlib.ModelCardToolkit(model_card_dir)

# https://github.com/tensorflow/model-card-toolkit/blob/master/model_card_toolkit/model_card.py
model_card = mct.scaffold_assets()
मॉडल कार्ड की व्याख्या करें
ModelCard वस्तु द्वारा दिया scaffold_assets() कई क्षेत्रों कि सीधे संशोधित किया जा सकता है। ये फ़ील्ड अंतिम जेनरेट किए गए मॉडल कार्ड दस्तावेज़ में प्रस्तुत किए गए हैं। एक व्यापक सूची के लिए, देखें model_card.py । देखें प्रलेखन अधिक जानकारी के लिए।
टेक्स्ट फ़ील्ड
मॉडल विवरण
model_card.model_details जैसे कई बुनियादी मेटाडाटा फ़ील्ड हैं name , owners , और version । आप में अपने मॉडल के लिए एक विवरण प्रदान कर सकते हैं overview क्षेत्र।
model_card.model_details.name = 'Fine-tuned MobileNetV2 Model for Cats vs. Dogs'
model_card.model_details.overview = (
    'This model distinguishes cat and dog images. It uses the MobileNetV2 '
    'architecture (https://arxiv.org/abs/1801.04381) and is trained on the '
    'Cats vs Dogs dataset '
    '(https://www.tensorflow.org/datasets/catalog/cats_vs_dogs). This model '
    'performed with high accuracy on both Cat and Dog images.'
)
model_card.model_details.owners = [
  mctlib.Owner(name='Model Cards Team', contact='model-cards@google.com')
]
model_card.model_details.version = mctlib.Version(name='v1.0', date='08/28/2020')
model_card.model_details.references = [
    mctlib.Reference(reference='https://www.tensorflow.org/guide/keras/transfer_learning'),
    mctlib.Reference(reference='https://arxiv.org/abs/1801.04381'),
]
model_card.model_details.licenses = [mctlib.License(identifier='Apache-2.0')]
model_card.model_details.citations = [mctlib.Citation(citation='https://github.com/tensorflow/model-card-toolkit/blob/master/model_card_toolkit/documentation/examples/Standalone_Model_Card_Toolkit_Demo.ipynb')]
मात्रात्मक विश्लेषण
model_card.quantitative_analysis एक मॉडल के प्रदर्शन मैट्रिक्स के बारे में जानकारी शामिल है।
नीचे, हम अपने डेटासेट पर निर्मित एक काल्पनिक मॉडल के लिए कुछ सिंथेटिक प्रदर्शन मीट्रिक मान बनाते हैं।
model_card.quantitative_analysis.performance_metrics = [
  mctlib.PerformanceMetric(type='accuracy', value=str(accuracy)),
  mctlib.PerformanceMetric(type='accuracy', value=str(cat_accuracy), slice='cat'),
  mctlib.PerformanceMetric(type='accuracy', value=str(dog_accuracy), slice='Dog'),
]
विचार
model_card.considerations अपने मॉडल के बारे में जानकारी योग्यता शामिल हैं - उचित उपयोग के मामलों, सीमाओं है कि उपयोगकर्ताओं को ध्यान में रखना चाहिए रहे हैं क्या, आवेदन की नैतिक आधार, आदि कर रहे हैं क्या क्या कर रहे हैं
model_card.considerations.use_cases = [
    mctlib.UseCase(description='This model classifies images of cats and dogs.')
]
model_card.considerations.limitations = [
    mctlib.Limitation(description='This model is not able to classify images of other classes.')
]
model_card.considerations.ethical_considerations = [mctlib.Risk(
    name=
        'While distinguishing between cats and dogs is generally agreed to be '
        'a benign application of machine learning, harmful results can occur '
        'when the model attempts to classify images that don’t contain cats or '
        'dogs.',
    mitigation_strategy=
        'Avoid application on non-dog and non-cat images.'
)]
ग्राफ़ फ़ील्ड
किसी रिपोर्ट के लिए मॉडल के प्रशिक्षण डेटा और मूल्यांकन डेटा में उसके प्रदर्शन के बारे में जानकारी प्रदान करना अक्सर सबसे अच्छा अभ्यास होता है। मॉडल कार्ड टूलकिट उपयोगकर्ताओं को इस जानकारी को मॉडल कार्ड में प्रदान किए गए विज़ुअलाइज़ेशन में एन्कोड करने की अनुमति देता है।
model_card रेखांकन के लिए तीन खंड हैं - model_card.model_parameters.data.train.graphics डाटासेट आँकड़े प्रशिक्षण के लिए, model_card.model_parameters.data.eval.graphics मूल्यांकन डाटासेट आँकड़ों के लिए, और model_card.quantitative_analysis.graphics मॉडल प्रदर्शन के मात्रात्मक विश्लेषण के लिए।
रेखांकन के रूप में जमा हो जाती है base64 तार । यदि आप एक है, तो matplotlib आंकड़ा है, आप के साथ एक बेस 64 स्ट्रिंग के लिए रूपांतरित कर सकते हैं model_card_toolkit.utils.graphics.figure_to_base64str() ।
# Validation Set Size Bar Chart
fig, ax = plt.subplots()
width = 0.75
rects0 = ax.bar(0, len(examples['combined']['examples']), width, label='Overall')
rects1 = ax.bar(1, len(examples['cat']['examples']), width, label='Cat')
rects2 = ax.bar(2, len(examples['dog']['examples']), width, label='Dog')
ax.set_xticks(np.arange(3))
ax.set_xticklabels(['Overall', 'Cat', 'Dog'])
ax.set_ylabel('Validation Set Size')
ax.set_xlabel('Slices')
ax.set_title('Validation Set Size for Slices')
validation_set_size_barchart = figure_to_base64str(fig)
# Acuracy Bar Chart
fig, ax = plt.subplots()
width = 0.75
rects0 = ax.bar(0, accuracy, width, label='Overall')
rects1 = ax.bar(1, cat_accuracy, width, label='Cat')
rects2 = ax.bar(2, dog_accuracy, width, label='Dog')
ax.set_xticks(np.arange(3))
ax.set_xticklabels(['Overall', 'Cat', 'Dog'])
ax.set_ylabel('Accuracy')
ax.set_xlabel('Slices')
ax.set_title('Accuracy on Slices')
accuracy_barchart = figure_to_base64str(fig)
अब हम उन्हें हमारे लिए जोड़ सकते हैं ModelCard ।
model_card.model_parameters.data.append(mctlib.Dataset())
model_card.model_parameters.data[0].graphics.collection = [
  mctlib.Graphic(name='Validation Set Size', image=validation_set_size_barchart),
]
model_card.quantitative_analysis.graphics.collection = [
  mctlib.Graphic(name='Accuracy', image=accuracy_barchart),
]
मॉडल कार्ड जनरेट करें
आइए मॉडल कार्ड दस्तावेज़ उत्पन्न करें। उपलब्ध प्रारूपों में जमा हो जाती है model_card_toolkit / टेम्पलेट । यहां, हम HTML और मार्कडाउन स्वरूपों को प्रदर्शित करेंगे।
सबसे पहले, हम अद्यतन करने की आवश्यकता ModelCardToolkit नवीनतम के साथ ModelCard ।
mct.update_model_card(model_card)
अब, ModelCardToolkit के साथ एक मॉडल कार्ड दस्तावेज़ उत्पन्न कर सकते हैं ModelCardToolkit.export_format() ।
# Generate a model card document in HTML (default)
html_doc = mct.export_format()

# Display the model card document in HTML
display.display(display.HTML(html_doc))
आप मार्कडाउन जैसे अन्य प्रारूपों में एक मॉडल कार्ड भी आउटपुट कर सकते हैं।
# Generate a model card document in Markdown
md_path = os.path.join(model_card_dir, 'template/md/default_template.md.jinja')
md_doc = mct.export_format(template_path=md_path, output_file='model_card.md')

# Display the model card document in Markdown
display.display(display.Markdown(md_doc))
फाइन-ट्यून MobileNetV2 के लिए मॉडल कार्ड बिल्लियों बनाम कुत्तों के लिए मॉडल
मॉडल विवरण
अवलोकन
यह मॉडल बिल्ली और कुत्ते की छवियों को अलग करता है। यह MobileNetV2 वास्तुकला (का उपयोग करता https://arxiv.org/abs/1801.04381 ) और बिल्लियों कुत्तों डाटासेट बनाम (पर प्रशिक्षित किया जाता है https://www.tensorflow.org/datasets/catalog/cats_vs_dogs )। इस मॉडल ने कैट और डॉग दोनों छवियों पर उच्च सटीकता के साथ प्रदर्शन किया।
संस्करण
नाम: v1.0
दिनांक: 08/28/2020
मालिकों
- मॉडल कार्ड टीम, model-cards@google.com
लाइसेंस
- अपाचे-2.0
संदर्भ
उद्धरण
विचार
बक्सों का इस्तेमाल करें
- यह मॉडल बिल्लियों और कुत्तों की छवियों को वर्गीकृत करता है।
सीमाओं
- यह मॉडल अन्य वर्गों की छवियों को वर्गीकृत करने में सक्षम नहीं है।
नैतिक प्रतिपूर्ति
- जोखिम: जबकि बिल्लियों और कुत्तों के बीच अंतर करना आम तौर पर मशीन लर्निंग का एक सौम्य अनुप्रयोग माना जाता है, हानिकारक परिणाम तब हो सकते हैं जब मॉडल उन छवियों को वर्गीकृत करने का प्रयास करता है जिनमें बिल्लियाँ या कुत्ते नहीं होते हैं।
- शमन रणनीति: गैर-कुत्ते और गैर-बिल्ली छवियों पर आवेदन से बचें।
ग्राफिक्स
सत्यापन सेट आकार

शुद्धता

मैट्रिक्स
| नाम | मूल्य |
|---|---|
| शुद्धता | 0.981249988079071 |
| सटीकता, बिल्ली | 0.9932885766029358 |
| सटीकता, कुत्ता | 0.9707602262496948 |