
| | |  ดูแหล่งที่มาบน GitHub ดูแหล่งที่มาบน GitHub | |
ภาพรวม
บทช่วยสอนนี้สาธิตการเสริมข้อมูล: เทคนิคในการเพิ่มความหลากหลายของชุดการฝึกของคุณโดยใช้การแปลงแบบสุ่ม (แต่เหมือนจริง) เช่น การหมุนภาพ
คุณจะได้เรียนรู้วิธีใช้การเพิ่มข้อมูลในสองวิธี:
- ใช้เลเยอร์การประมวลผลล่วงหน้าของ Keras เช่น
tf.keras.layers.Resizing,tf.keras.layers.Rescaling,tf.keras.layers.RandomFlipและtf.keras.layers.RandomRotation - ใช้
tf.imageเช่นtf.image.flip_left_right,tf.image.rgb_to_grayscale,tf.image.adjust_brightness,tf.image.central_cropและtf.image.stateless_random*
ติดตั้ง
import matplotlib.pyplot as plt
import numpy as np
import tensorflow as tf
import tensorflow_datasets as tfds

from tensorflow.keras import layers
ดาวน์โหลดชุดข้อมูล
บทช่วยสอนนี้ใช้ชุดข้อมูล tf_flowers เพื่อความสะดวก ให้ดาวน์โหลดชุดข้อมูลโดยใช้ TensorFlow Datasets หากคุณต้องการเรียนรู้เกี่ยวกับวิธีการอื่นๆ ในการนำเข้าข้อมูล โปรดดูบทแนะนำการ โหลดรูปภาพ
(train_ds, val_ds, test_ds), metadata = tfds.load(
    'tf_flowers',
    split=['train[:80%]', 'train[80%:90%]', 'train[90%:]'],
    with_info=True,
    as_supervised=True,
)
ชุดข้อมูลดอกไม้มีห้าคลาส
num_classes = metadata.features['label'].num_classes
print(num_classes)
5
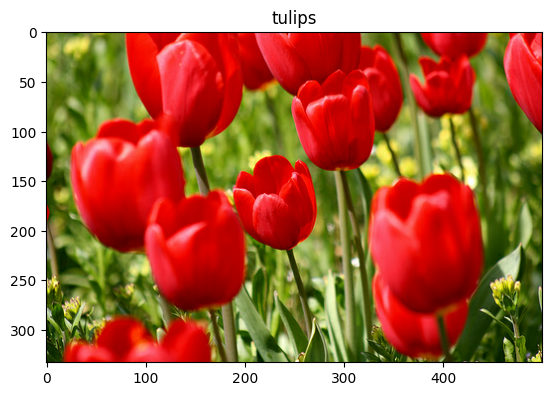
มาดึงรูปภาพจากชุดข้อมูลและใช้เพื่อสาธิตการเพิ่มข้อมูล
get_label_name = metadata.features['label'].int2str

image, label = next(iter(train_ds))
_ = plt.imshow(image)
_ = plt.title(get_label_name(label))
2022-01-26 05:09:18.712477: W tensorflow/core/kernels/data/cache_dataset_ops.cc:768] The calling iterator did not fully read the dataset being cached. In order to avoid unexpected truncation of the dataset, the partially cached contents of the dataset will be discarded. This can happen if you have an input pipeline similar to `dataset.cache().take(k).repeat()`. You should use `dataset.take(k).cache().repeat()` instead.
ใช้เลเยอร์การประมวลผลล่วงหน้าของ Keras
การปรับขนาดและการปรับขนาด
คุณสามารถใช้เลเยอร์การประมวลผลล่วงหน้าของ Keras เพื่อปรับขนาดรูปภาพของคุณให้เป็นรูปร่างที่สอดคล้องกัน (ด้วย tf.keras.layers.Resizing ) และเพื่อปรับขนาดค่าพิกเซลใหม่ (ด้วย tf.keras.layers.Rescaling )
IMG_SIZE = 180

resize_and_rescale = tf.keras.Sequential([
  layers.Resizing(IMG_SIZE, IMG_SIZE),
  layers.Rescaling(1./255)
])
คุณสามารถเห็นภาพผลลัพธ์ของการใช้เลเยอร์เหล่านี้กับรูปภาพ
result = resize_and_rescale(image)
_ = plt.imshow(result)
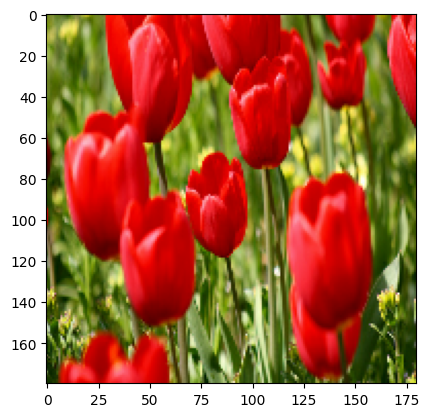
ตรวจสอบว่าพิกเซลอยู่ในช่วง [0, 1] :
print("Min and max pixel values:", result.numpy().min(), result.numpy().max())
Min and max pixel values: 0.0 1.0
การเสริมข้อมูล
คุณสามารถใช้เลเยอร์การประมวลผลล่วงหน้าของ Keras สำหรับการเพิ่มข้อมูลได้เช่นกัน เช่น tf.keras.layers.RandomFlip และ tf.keras.layers.RandomRotation
มาสร้างเลเยอร์การประมวลผลล่วงหน้าสองสามเลเยอร์แล้วนำไปใช้กับรูปภาพเดียวกันซ้ำๆ
data_augmentation = tf.keras.Sequential([
  layers.RandomFlip("horizontal_and_vertical"),
  layers.RandomRotation(0.2),
])
# Add the image to a batch.
image = tf.expand_dims(image, 0)
plt.figure(figsize=(10, 10))
for i in range(9):
  augmented_image = data_augmentation(image)
  ax = plt.subplot(3, 3, i + 1)
  plt.imshow(augmented_image[0])
  plt.axis("off")
WARNING:matplotlib.image:Clipping input data to the valid range for imshow with RGB data ([0..1] for floats or [0..255] for integers).
WARNING:matplotlib.image:Clipping input data to the valid range for imshow with RGB data ([0..1] for floats or [0..255] for integers).
WARNING:matplotlib.image:Clipping input data to the valid range for imshow with RGB data ([0..1] for floats or [0..255] for integers).
WARNING:matplotlib.image:Clipping input data to the valid range for imshow with RGB data ([0..1] for floats or [0..255] for integers).
WARNING:matplotlib.image:Clipping input data to the valid range for imshow with RGB data ([0..1] for floats or [0..255] for integers).
WARNING:matplotlib.image:Clipping input data to the valid range for imshow with RGB data ([0..1] for floats or [0..255] for integers).
WARNING:matplotlib.image:Clipping input data to the valid range for imshow with RGB data ([0..1] for floats or [0..255] for integers).
WARNING:matplotlib.image:Clipping input data to the valid range for imshow with RGB data ([0..1] for floats or [0..255] for integers).
WARNING:matplotlib.image:Clipping input data to the valid range for imshow with RGB data ([0..1] for floats or [0..255] for integers).
มีเลเยอร์การประมวลผลล่วงหน้ามากมายที่คุณสามารถใช้สำหรับการเพิ่มข้อมูลได้ ซึ่งรวมถึง tf.keras.layers.RandomContrast , tf.keras.layers.RandomCrop , tf.keras.layers.RandomZoom และอื่นๆ
สองตัวเลือกในการใช้เลเยอร์การประมวลผลล่วงหน้าของ Keras
คุณสามารถใช้เลเยอร์การประมวลผลล่วงหน้าเหล่านี้ได้สองวิธี โดยมีข้อดีข้อเสีย
ตัวเลือกที่ 1: ทำให้เลเยอร์ก่อนการประมวลผลเป็นส่วนหนึ่งของโมเดลของคุณ
model = tf.keras.Sequential([
  # Add the preprocessing layers you created earlier.
  resize_and_rescale,
  data_augmentation,
  layers.Conv2D(16, 3, padding='same', activation='relu'),
  layers.MaxPooling2D(),
  # Rest of your model.
])
มีสองประเด็นสำคัญที่ควรทราบในกรณีนี้:
การเพิ่มข้อมูลจะทำงานบนอุปกรณ์ ซิงโครนัสกับเลเยอร์ที่เหลือของคุณ และได้รับประโยชน์จากการเร่งความเร็วของ GPU
เมื่อคุณส่งออกแบบจำลองของคุณโดยใช้
model.saveเลเยอร์การประมวลผลล่วงหน้าจะถูกบันทึกพร้อมกับส่วนที่เหลือของแบบจำลองของคุณ หากคุณปรับใช้โมเดลนี้ในภายหลัง โมเดลจะสร้างมาตรฐานให้กับรูปภาพโดยอัตโนมัติ (ตามการกำหนดค่าเลเยอร์ของคุณ) วิธีนี้ช่วยให้คุณไม่ต้องพยายามปรับใช้ลอจิกฝั่งเซิร์ฟเวอร์อีกครั้ง
ตัวเลือกที่ 2: ใช้เลเยอร์การประมวลผลล่วงหน้ากับชุดข้อมูลของคุณ
aug_ds = train_ds.map(
  lambda x, y: (resize_and_rescale(x, training=True), y))
ด้วยวิธีการนี้ คุณใช้ Dataset.map เพื่อสร้างชุดข้อมูลที่ให้ชุดของรูปภาพเสริม ในกรณีนี้:
- การเพิ่มข้อมูลจะเกิดขึ้นแบบอะซิงโครนัสบน CPU และไม่มีการบล็อก คุณสามารถทับซ้อนการฝึกโมเดลของคุณบน GPU ด้วยการประมวลผลข้อมูลล่วงหน้า โดยใช้
Dataset.prefetchที่แสดงด้านล่าง - ในกรณีนี้ เลเยอร์การประมวลผลล่วงหน้าจะไม่ถูกส่งออกพร้อมกับโมเดลเมื่อคุณเรียกใช้
Model.saveคุณจะต้องแนบไฟล์เหล่านี้กับโมเดลของคุณก่อนที่จะบันทึกหรือปรับใช้ใหม่ทางฝั่งเซิร์ฟเวอร์ หลังการฝึก คุณสามารถแนบเลเยอร์การประมวลผลล่วงหน้าก่อนส่งออกได้
คุณสามารถดูตัวอย่างตัวเลือกแรกได้ในบทแนะนำการ จัดหมวดหมู่รูปภาพ มาสาธิตตัวเลือกที่สองกันที่นี่
ใช้เลเยอร์การประมวลผลล่วงหน้ากับชุดข้อมูล
กำหนดค่าการฝึกอบรม การตรวจสอบ และทดสอบชุดข้อมูลด้วยเลเยอร์การประมวลผลล่วงหน้าของ Keras ที่คุณสร้างไว้ก่อนหน้านี้ คุณยังกำหนดค่าชุดข้อมูลสำหรับประสิทธิภาพ โดยใช้การอ่านแบบขนานและการดึงข้อมูลล่วงหน้าแบบบัฟเฟอร์เพื่อให้แบตช์จากดิสก์ที่ไม่มี I/O กลายเป็นการบล็อก (เรียนรู้เพิ่มเติมเกี่ยวกับประสิทธิภาพของชุดข้อมูลใน ประสิทธิภาพที่ ดีขึ้น ด้วยคู่มือ tf.data API )
batch_size = 32
AUTOTUNE = tf.data.AUTOTUNE

def prepare(ds, shuffle=False, augment=False):
  # Resize and rescale all datasets.
  ds = ds.map(lambda x, y: (resize_and_rescale(x), y),
              num_parallel_calls=AUTOTUNE)

  if shuffle:
    ds = ds.shuffle(1000)

  # Batch all datasets.
  ds = ds.batch(batch_size)

  # Use data augmentation only on the training set.
  if augment:
    ds = ds.map(lambda x, y: (data_augmentation(x, training=True), y),
                num_parallel_calls=AUTOTUNE)

  # Use buffered prefetching on all datasets.
  return ds.prefetch(buffer_size=AUTOTUNE)
train_ds = prepare(train_ds, shuffle=True, augment=True)
val_ds = prepare(val_ds)
test_ds = prepare(test_ds)
ฝึกนางแบบ
เพื่อความสมบูรณ์ ตอนนี้คุณจะต้องฝึกแบบจำลองโดยใช้ชุดข้อมูลที่คุณเพิ่งจัดเตรียม
โมเดล Sequential ประกอบด้วยบล็อกการบิดสามบล็อก ( tf.keras.layers.Conv2D ) ที่มีเลเยอร์การรวมสูงสุด ( tf.keras.layers.MaxPooling2D ) ในแต่ละอัน มีเลเยอร์ที่เชื่อมต่ออย่างสมบูรณ์ ( tf.keras.layers.Dense ) โดยมี 128 ยูนิตอยู่ด้านบนซึ่งเปิดใช้งานโดยฟังก์ชันการเปิดใช้งาน ReLU ( 'relu' ) โมเดลนี้ไม่ได้รับการปรับแต่งเพื่อความแม่นยำ (เป้าหมายคือเพื่อแสดงกลไกให้คุณเห็น)
model = tf.keras.Sequential([
  layers.Conv2D(16, 3, padding='same', activation='relu'),
  layers.MaxPooling2D(),
  layers.Conv2D(32, 3, padding='same', activation='relu'),
  layers.MaxPooling2D(),
  layers.Conv2D(64, 3, padding='same', activation='relu'),
  layers.MaxPooling2D(),
  layers.Flatten(),
  layers.Dense(128, activation='relu'),
  layers.Dense(num_classes)
])
เลือก tf.keras.optimizers.Adam Optimizer และ tf.keras.losses.SparseCategoricalCrossentropy loss function ในการดูการฝึกอบรมและการตรวจสอบความถูกต้องสำหรับช่วงการฝึกแต่ละครั้ง ให้ส่งอาร์กิวเมนต์ metrics ไปที่ Model.compile
model.compile(optimizer='adam',
              loss=tf.keras.losses.SparseCategoricalCrossentropy(from_logits=True),
              metrics=['accuracy'])
ฝึกสองสามยุค:
epochs=5
history = model.fit(
  train_ds,
  validation_data=val_ds,
  epochs=epochs
)
Epoch 1/5
92/92 [==============================] - 13s 110ms/step - loss: 1.2768 - accuracy: 0.4622 - val_loss: 1.0929 - val_accuracy: 0.5640
Epoch 2/5
92/92 [==============================] - 3s 25ms/step - loss: 1.0579 - accuracy: 0.5749 - val_loss: 0.9711 - val_accuracy: 0.6349
Epoch 3/5
92/92 [==============================] - 3s 26ms/step - loss: 0.9677 - accuracy: 0.6291 - val_loss: 0.9764 - val_accuracy: 0.6431
Epoch 4/5
92/92 [==============================] - 3s 25ms/step - loss: 0.9150 - accuracy: 0.6468 - val_loss: 0.8906 - val_accuracy: 0.6431
Epoch 5/5
92/92 [==============================] - 3s 25ms/step - loss: 0.8636 - accuracy: 0.6604 - val_loss: 0.8233 - val_accuracy: 0.6730
loss, acc = model.evaluate(test_ds)
print("Accuracy", acc)
12/12 [==============================] - 5s 14ms/step - loss: 0.7922 - accuracy: 0.6948
Accuracy 0.6948229074478149
การเพิ่มข้อมูลที่กำหนดเอง
คุณยังสามารถสร้างเลเยอร์การเพิ่มข้อมูลที่กำหนดเองได้อีกด้วย
บทช่วยสอนส่วนนี้แสดงวิธีดำเนินการสองวิธี:
- ขั้นแรก คุณจะต้องสร้างเลเยอร์
tf.keras.layers.Lambdaนี่เป็นวิธีที่ดีในการเขียนโค้ดที่กระชับ - ถัดไป คุณจะเขียนเลเยอร์ใหม่ผ่าน คลาสย่อย ซึ่งช่วยให้คุณควบคุมได้มากขึ้น
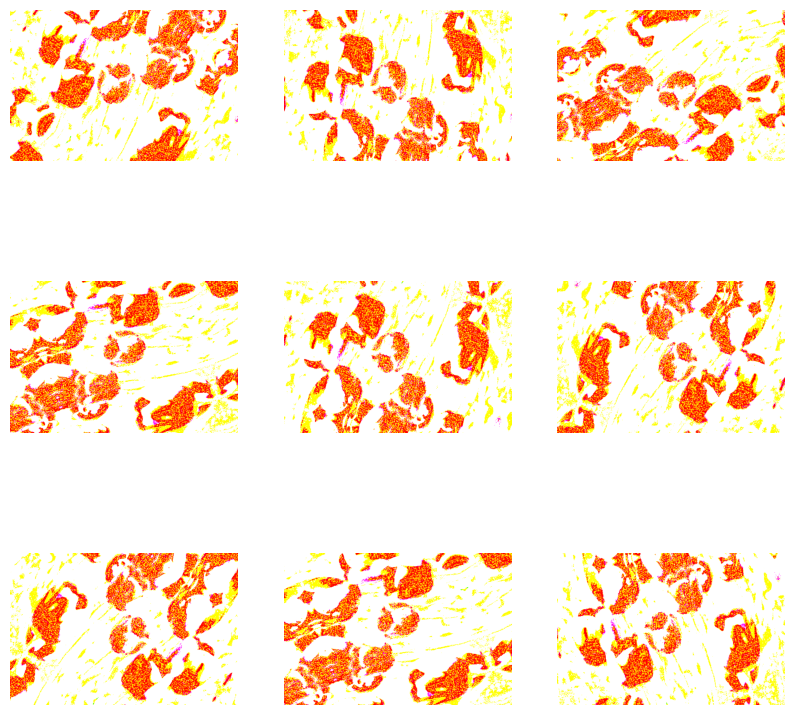
เลเยอร์ทั้งสองจะสุ่มสลับสีในภาพตามความน่าจะเป็น
def random_invert_img(x, p=0.5):
  if  tf.random.uniform([]) < p:
    x = (255-x)
  else:
    x
  return x
def random_invert(factor=0.5):
  return layers.Lambda(lambda x: random_invert_img(x, factor))

random_invert = random_invert()
plt.figure(figsize=(10, 10))
for i in range(9):
  augmented_image = random_invert(image)
  ax = plt.subplot(3, 3, i + 1)
  plt.imshow(augmented_image[0].numpy().astype("uint8"))
  plt.axis("off")
2022-01-26 05:09:53.045204: W tensorflow/compiler/xla/service/gpu/llvm_gpu_backend/gpu_backend_lib.cc:399] target triple not found in the module
2022-01-26 05:09:53.045264: W tensorflow/compiler/xla/service/gpu/llvm_gpu_backend/gpu_backend_lib.cc:399] target triple not found in the module
2022-01-26 05:09:53.045312: W tensorflow/compiler/xla/service/gpu/llvm_gpu_backend/gpu_backend_lib.cc:399] target triple not found in the module
2022-01-26 05:09:53.045369: W tensorflow/compiler/xla/service/gpu/llvm_gpu_backend/gpu_backend_lib.cc:399] target triple not found in the module
2022-01-26 05:09:53.045418: W tensorflow/compiler/xla/service/gpu/llvm_gpu_backend/gpu_backend_lib.cc:399] target triple not found in the module
2022-01-26 05:09:53.045467: W tensorflow/compiler/xla/service/gpu/llvm_gpu_backend/gpu_backend_lib.cc:399] target triple not found in the module
2022-01-26 05:09:53.045511: W tensorflow/compiler/xla/service/gpu/llvm_gpu_backend/gpu_backend_lib.cc:399] target triple not found in the module
2022-01-26 05:09:53.047630: W tensorflow/compiler/xla/service/gpu/llvm_gpu_backend/gpu_backend_lib.cc:399] target triple not found in the module

ถัดไป ใช้เลเยอร์ที่กำหนดเองโดยการจัด คลาสย่อย :
class RandomInvert(layers.Layer):
  def __init__(self, factor=0.5, **kwargs):
    super().__init__(**kwargs)
    self.factor = factor

  def call(self, x):
    return random_invert_img(x)
_ = plt.imshow(RandomInvert()(image)[0])

เลเยอร์ทั้งสองนี้สามารถใช้ได้ตามที่อธิบายไว้ในตัวเลือกที่ 1 และ 2 ด้านบน
ใช้ tf.image
ยูทิลิตี้การประมวลผลล่วงหน้าของ Keras ด้านบนนั้นสะดวก แต่สำหรับการควบคุมที่ละเอียดยิ่งขึ้น คุณสามารถเขียนไปป์ไลน์หรือเลเยอร์การเสริมข้อมูลของคุณเองโดยใช้ tf.data และ tf.image (คุณอาจต้องการตรวจสอบ TensorFlow Addons Image: Operations และ TensorFlow I/O: Color Space Conversions )
เนื่องจากก่อนหน้านี้ชุดข้อมูลดอกไม้ได้รับการกำหนดค่าด้วยการเพิ่มข้อมูล ให้นำเข้าใหม่เพื่อเริ่มต้นใหม่:
(train_ds, val_ds, test_ds), metadata = tfds.load(
    'tf_flowers',
    split=['train[:80%]', 'train[80%:90%]', 'train[90%:]'],
    with_info=True,
    as_supervised=True,
)
ดึงภาพที่จะทำงานกับ:
image, label = next(iter(train_ds))
_ = plt.imshow(image)
_ = plt.title(get_label_name(label))
2022-01-26 05:09:59.918847: W tensorflow/core/kernels/data/cache_dataset_ops.cc:768] The calling iterator did not fully read the dataset being cached. In order to avoid unexpected truncation of the dataset, the partially cached contents of the dataset will be discarded. This can happen if you have an input pipeline similar to `dataset.cache().take(k).repeat()`. You should use `dataset.take(k).cache().repeat()` instead.ตัวยึดตำแหน่ง33

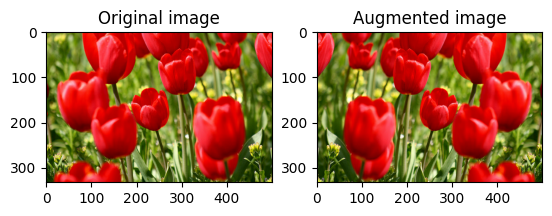
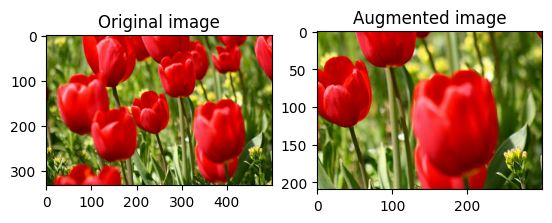
ลองใช้ฟังก์ชันต่อไปนี้ในการแสดงภาพและเปรียบเทียบภาพต้นฉบับและภาพเสริมกัน:
def visualize(original, augmented):
  fig = plt.figure()
  plt.subplot(1,2,1)
  plt.title('Original image')
  plt.imshow(original)

  plt.subplot(1,2,2)
  plt.title('Augmented image')
  plt.imshow(augmented)
การเสริมข้อมูล
พลิกภาพ
พลิกรูปภาพในแนวตั้งหรือแนวนอนด้วย tf.image.flip_left_right :
flipped = tf.image.flip_left_right(image)
visualize(image, flipped)
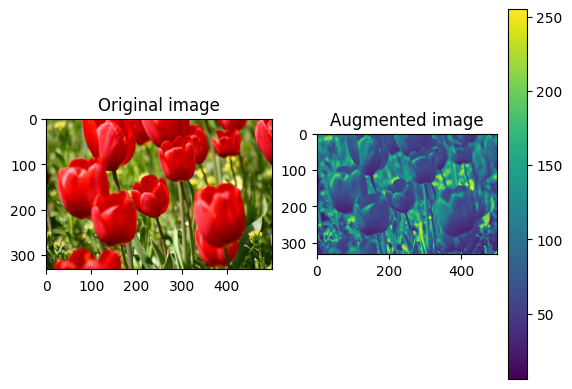
ภาพสีเทา
คุณสามารถสเกลภาพสีเทาด้วย tf.image.rgb_to_grayscale :
grayscaled = tf.image.rgb_to_grayscale(image)
visualize(image, tf.squeeze(grayscaled))
_ = plt.colorbar()
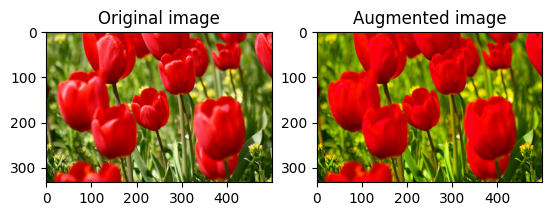
อิ่มตัวภาพ
ทำให้ภาพอิ่มตัวด้วย tf.image.adjust_saturation โดยระบุปัจจัยความอิ่มตัว:
saturated = tf.image.adjust_saturation(image, 3)
visualize(image, saturated)
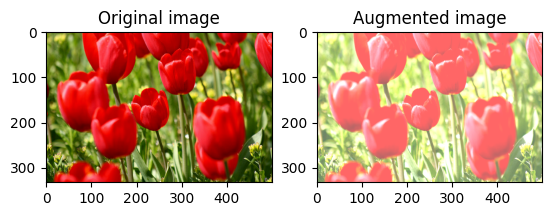
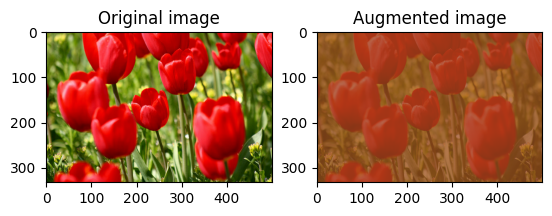
เปลี่ยนความสว่างของภาพ
เปลี่ยนความสว่างของภาพด้วย tf.image.adjust_brightness โดยระบุปัจจัยความสว่าง:
bright = tf.image.adjust_brightness(image, 0.4)
visualize(image, bright)
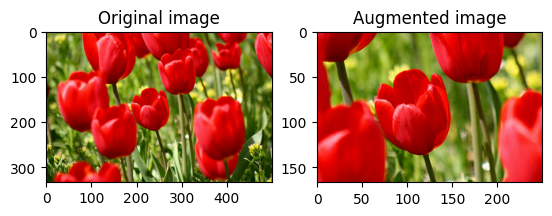
ครอบตัดรูปภาพตรงกลาง
ครอบตัดรูปภาพจากกึ่งกลางไปยังส่วนรูปภาพที่คุณต้องการโดยใช้ tf.image.central_crop :
cropped = tf.image.central_crop(image, central_fraction=0.5)
visualize(image, cropped)
หมุนภาพ
หมุนรูปภาพ 90 องศาด้วย tf.image.rot90 :
rotated = tf.image.rot90(image)
visualize(image, rotated)

การแปลงแบบสุ่ม
การใช้การแปลงแบบสุ่มกับรูปภาพสามารถช่วยทำให้ภาพรวมและขยายชุดข้อมูลได้กว้างขึ้น tf.image API ปัจจุบันมีการดำเนินการรูปภาพแบบสุ่มแปดแบบ (ops):
-
tf.image.stateless_random_brightness -
tf.image.stateless_random_contrast -
tf.image.stateless_random_crop -
tf.image.stateless_random_flip_left_right -
tf.image.stateless_random_flip_up_down -
tf.image.stateless_random_hue -
tf.image.stateless_random_jpeg_quality -
tf.image.stateless_random_saturation
ops ภาพสุ่มเหล่านี้ทำงานได้อย่างหมดจด: เอาต์พุตขึ้นอยู่กับอินพุตเท่านั้น ซึ่งทำให้ง่ายต่อการใช้งานในไพพ์ไลน์อินพุตที่มีประสิทธิภาพสูงและกำหนดได้ พวกเขาต้องการค่า seed ที่จะป้อนในแต่ละขั้นตอน ให้ seed เดียวกัน ส่งคืนผลลัพธ์เดียวกันโดยไม่ขึ้นกับจำนวนครั้งที่ถูกเรียก
ในส่วนต่อไปนี้ คุณจะ:
- ดูตัวอย่างการใช้การดำเนินการรูปภาพแบบสุ่มเพื่อแปลงรูปภาพ
- สาธิตวิธีการใช้การแปลงแบบสุ่มกับชุดข้อมูลการฝึกอบรม
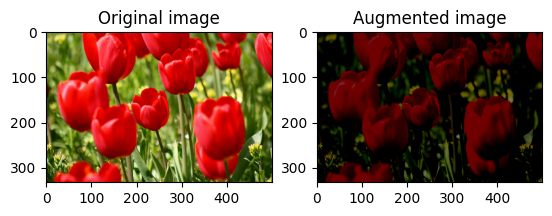
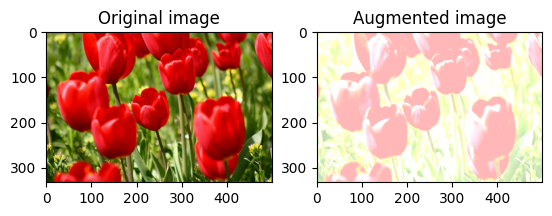
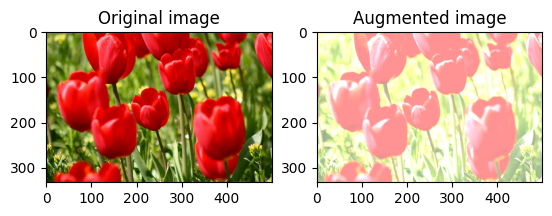
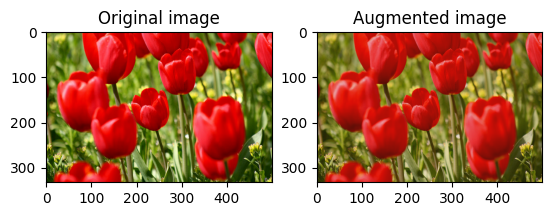
สุ่มเปลี่ยนความสว่างของภาพ
สุ่มเปลี่ยนความสว่างของ image โดยใช้ tf.image.stateless_random_brightness โดยให้ปัจจัยความสว่างและ seed ปัจจัยความสว่างจะถูกเลือกแบบสุ่มในช่วง [-max_delta, max_delta) และสัมพันธ์กับ seed ที่กำหนด
for i in range(3):
  seed = (i, 0)  # tuple of size (2,)
  stateless_random_brightness = tf.image.stateless_random_brightness(
      image, max_delta=0.95, seed=seed)
  visualize(image, stateless_random_brightness)
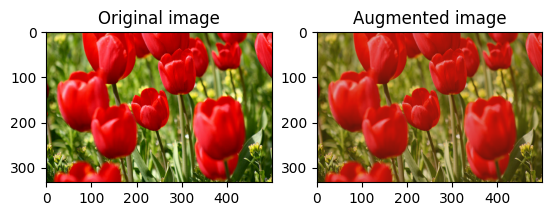
สุ่มเปลี่ยนความคมชัดของภาพ
สุ่มเปลี่ยนความคมชัดของ image โดยใช้ tf.image.stateless_random_contrast โดยให้ช่วงความคมชัดและ seed ช่วงความคมชัดจะถูกเลือกแบบสุ่มในช่วงเวลา [lower, upper] และสัมพันธ์กับ seed ที่กำหนด
for i in range(3):
  seed = (i, 0)  # tuple of size (2,)
  stateless_random_contrast = tf.image.stateless_random_contrast(
      image, lower=0.1, upper=0.9, seed=seed)
  visualize(image, stateless_random_contrast)
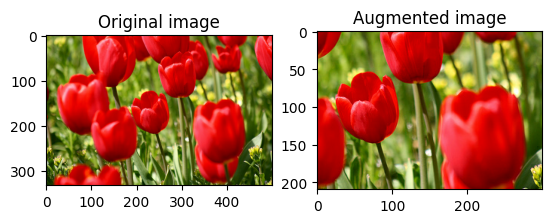
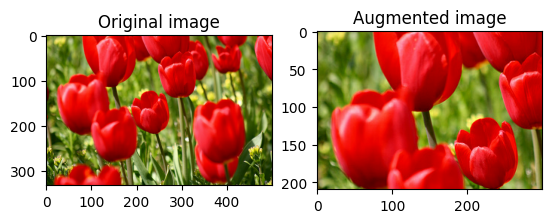
ครอบตัดรูปภาพแบบสุ่ม
ครอบตัด image แบบสุ่มโดยใช้ tf.image.stateless_random_crop โดยระบุ size เป้าหมายและ seed ส่วนที่ถูกครอบตัดออกจาก image จะอยู่ที่ออฟเซ็ตที่เลือกแบบสุ่มและสัมพันธ์กับ seed ที่กำหนด
for i in range(3):
  seed = (i, 0)  # tuple of size (2,)
  stateless_random_crop = tf.image.stateless_random_crop(
      image, size=[210, 300, 3], seed=seed)
  visualize(image, stateless_random_crop)
ใช้การเสริมกับชุดข้อมูล
เรามาดาวน์โหลดชุดข้อมูลภาพกันก่อนอีกครั้งในกรณีที่มีการแก้ไขในส่วนก่อนหน้า
(train_datasets, val_ds, test_ds), metadata = tfds.load(
    'tf_flowers',
    split=['train[:80%]', 'train[80%:90%]', 'train[90%:]'],
    with_info=True,
    as_supervised=True,
)
ถัดไป กำหนดฟังก์ชันยูทิลิตี้สำหรับการปรับขนาดและปรับขนาดรูปภาพ ฟังก์ชันนี้จะใช้ในการรวมขนาดและขนาดของรูปภาพในชุดข้อมูล:
def resize_and_rescale(image, label):
  image = tf.cast(image, tf.float32)
  image = tf.image.resize(image, [IMG_SIZE, IMG_SIZE])
  image = (image / 255.0)
  return image, label
มากำหนดฟังก์ชัน augment ที่สามารถใช้การแปลงแบบสุ่มกับรูปภาพได้ ฟังก์ชันนี้จะใช้กับชุดข้อมูลในขั้นตอนต่อไป
def augment(image_label, seed):
  image, label = image_label
  image, label = resize_and_rescale(image, label)
  image = tf.image.resize_with_crop_or_pad(image, IMG_SIZE + 6, IMG_SIZE + 6)
  # Make a new seed.
  new_seed = tf.random.experimental.stateless_split(seed, num=1)[0, :]
  # Random crop back to the original size.
  image = tf.image.stateless_random_crop(
      image, size=[IMG_SIZE, IMG_SIZE, 3], seed=seed)
  # Random brightness.
  image = tf.image.stateless_random_brightness(
      image, max_delta=0.5, seed=new_seed)
  image = tf.clip_by_value(image, 0, 1)
  return image, label
ตัวเลือกที่ 1: การใช้ tf.data.experimental.Counter
สร้างวัตถุ tf.data.experimental.Counter (เรียกมันว่า counter ) และ Dataset.zip ชุดข้อมูลด้วย (counter, counter) เพื่อให้แน่ใจว่ารูปภาพแต่ละรูปในชุดข้อมูลเชื่อมโยงกับค่าที่ไม่ซ้ำกัน (ของรูปร่าง (2,) ) ตามตัว counter ซึ่งต่อมาสามารถส่งผ่านไปยังฟังก์ชัน augment เป็นค่า seed ต้นสำหรับการแปลงแบบสุ่ม
# Create a `Counter` object and `Dataset.zip` it together with the training set.
counter = tf.data.experimental.Counter()
train_ds = tf.data.Dataset.zip((train_datasets, (counter, counter)))
แมปฟังก์ชัน augment กับชุดข้อมูลการฝึกอบรม:
train_ds = (
    train_ds
    .shuffle(1000)
    .map(augment, num_parallel_calls=AUTOTUNE)
    .batch(batch_size)
    .prefetch(AUTOTUNE)
)
val_ds = (
    val_ds
    .map(resize_and_rescale, num_parallel_calls=AUTOTUNE)
    .batch(batch_size)
    .prefetch(AUTOTUNE)
)
test_ds = (
    test_ds
    .map(resize_and_rescale, num_parallel_calls=AUTOTUNE)
    .batch(batch_size)
    .prefetch(AUTOTUNE)
)
ตัวเลือก 2: ใช้ tf.random.Generator
- สร้างอ็อบเจ็กต์
tf.random.Generatorด้วยค่าseedเริ่มต้น การเรียกใช้ฟังก์ชันmake_seedsบนอ็อบเจ็กต์ตัวสร้างเดียวกันจะส่งกลับค่าseedใหม่ที่ไม่ซ้ำกันเสมอ - กำหนดฟังก์ชัน wrapper ที่: 1) เรียกใช้ฟังก์ชัน
make_seeds; และ 2) ส่งผ่านค่าseedที่สร้างขึ้นใหม่ไปยังฟังก์ชันaugmentสำหรับการแปลงแบบสุ่ม
# Create a generator.
rng = tf.random.Generator.from_seed(123, alg='philox')
# Create a wrapper function for updating seeds.
def f(x, y):
  seed = rng.make_seeds(2)[0]
  image, label = augment((x, y), seed)
  return image, label
แมปฟังก์ชัน wrapper f กับชุดข้อมูลการฝึก และฟังก์ชัน resize_and_rescale กับชุดตรวจสอบและทดสอบ:
train_ds = (
    train_datasets
    .shuffle(1000)
    .map(f, num_parallel_calls=AUTOTUNE)
    .batch(batch_size)
    .prefetch(AUTOTUNE)
)
val_ds = (
    val_ds
    .map(resize_and_rescale, num_parallel_calls=AUTOTUNE)
    .batch(batch_size)
    .prefetch(AUTOTUNE)
)
test_ds = (
    test_ds
    .map(resize_and_rescale, num_parallel_calls=AUTOTUNE)
    .batch(batch_size)
    .prefetch(AUTOTUNE)
)
ตอนนี้ชุดข้อมูลเหล่านี้สามารถใช้ในการฝึกโมเดลดังที่แสดงไว้ก่อนหน้านี้
ขั้นตอนถัดไป
บทช่วยสอนนี้สาธิตการเพิ่มข้อมูลโดยใช้เลเยอร์การประมวลผลล่วงหน้าของ Keras และ tf.image
- หากต้องการเรียนรู้วิธีรวมเลเยอร์การประมวลผลล่วงหน้าไว้ในโมเดลของคุณ โปรดดูบทแนะนำการ จัดหมวดหมู่รูปภาพ
- คุณอาจสนใจที่จะเรียนรู้ว่าการประมวลผลล่วงหน้าของเลเยอร์สามารถช่วยคุณจัดประเภทข้อความได้อย่างไร ดังที่แสดงในบทแนะนำการ จัดประเภทข้อความพื้นฐาน
- คุณสามารถเรียนรู้เพิ่มเติมเกี่ยวกับ
tf.dataใน คู่มือ นี้ และคุณสามารถเรียนรู้วิธีกำหนดค่าไพพ์ไลน์อินพุตของคุณเพื่อประสิทธิภาพ ที่นี่